Happy Valentine's Day!
I've been creating Valentine's for months and guess what? I don't even have a Valentine card to share with you today ~ LOL! Heck, it's not even RED! Just the way things worked out today I guess. However, I do have a fun tutorial to share with you that I'm super excited about using some pretty images from Crafter's Companion.
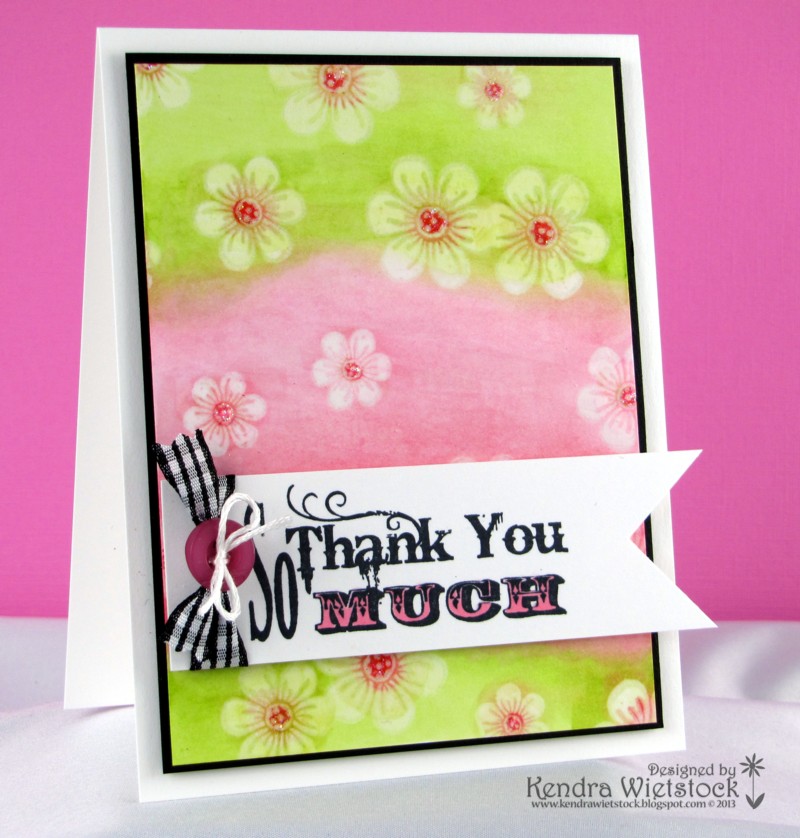
The technique I used on my card today is called the Spectrum Noir Resist Technique. I used my Spectrum Noir alcohol ink markers to add all of the blended color on this card. The stamps I used are called Flower Power & Through The Rain from the Sheena Collection. So first... here's my finished card.
The technique I used on my card today is called the Spectrum Noir Resist Technique. I used my Spectrum Noir alcohol ink markers to add all of the blended color on this card. The stamps I used are called Flower Power & Through The Rain from the Sheena Collection. So first... here's my finished card.
Step 1: I used the 3 small solid flowers from the Flower Power set and stamped them in a scattered pattern on white cardstock with VersaMark ink.

Step 2: Cover the white card base with clear embossing powder & tap off the excess. The embossing powder will stick to the stamped images.
TIP: For embossing powders that I use often, I like to keep them in a larger plastic container so I can dip the entire project in it. It makes is super easy to tap off the excess powder without having to put it all back inside the jar.

Step 3: Use your heat tool to emboss the stamped images.

Step 4: Select the Spectrum Noir Alcohol Ink marker colors for the project. I selected CG1 & CG2 for the greens and PP1, PP3, PP5 & CR11 for the pinks and red. Selecting colors in the same color family make blending a snap!

Step 5: Using the chisel tip of the marker, start coloring sections of the card base. As you color, the flowers you stamped will start to appear. I started with CG1 (light green) and then added a section of CG2 (darker green). Once you have the initial layers of green down ~ take your CG1 marker and go over the top of your CG2 color. This will blend the colors and take the darker green off the stamped flowers.

Step 6: Next make layers of your pinks ~ PP1, PP3 and then PP5. To blend them, use PP1 over the top of the darker colors. Keep adding and blending color until the background looks like you want it to.

Step 7: Using the CR11 Red marker, add spots of color to the center of each flower. To blend, use the CG1 (light green) marker on the green flowers & PP1 (light pink) to blend on the pink flowers.

Just keep adding color and blending until your card base looks the way you want it. This is a pretty quick and simple technique, but it's also a great way to practice your blending with the markers.

Step 8: Next I stamped the sentiment from the Through the Rain set on white cardstock in Tuxedo Black Memento Ink & colored the word MUCH with my PP5 marker so it would pop. I clipped the end with my square punch so it looked like a banner and then added some ribbon and a button.

Step 9: To assemble the card, I attached the stamped image panel to black cardstock and then attached it to the white cardbase. I added foam dots to the back of the sentiment and popped it up on top of the stamped background piece. VOILÁ ~ you're done!
I hope you enjoyed learning {or re-learning} this fun technique!


3 comments:
Thanks for sharing the tutorial Kendra! Your card is gorgeous!!
Great tutorial...I have these markers, but I rarely use them. That is about to change. Thanks for the inspiration. Love the colors you chose...the card is so cheery!
Great how-to! I'm excited to try it out! Just got my "lights" set today for my V-Day present! Gotta love it when the hubby let's you buy your own present! :)
Post a Comment