Friday, August 30, 2013

TGIF...

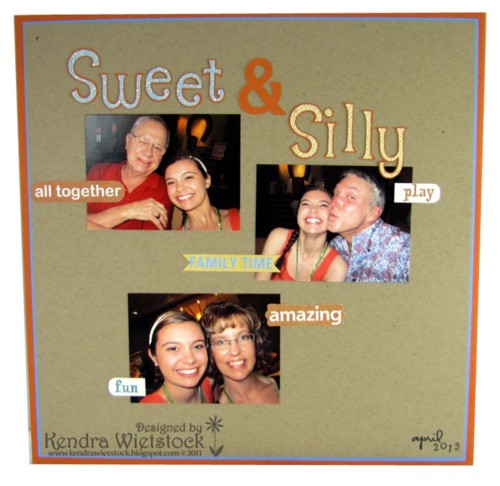
Happy Friday!  YIPEEE ~ it's a long weekend too!  BONUS!  My "Sweet & Silly" page today features some fun photos of my daughter with her G-Pa, Uncle and me from our Spring Break trip this year.  We took lots of silly {and sweet} photos but these were all from the same evening.  I used the new Island Sun Collection from Paper Loft for my die cut title and the words.  


Have a great weekend!
I'll be back on Sunday with some fun news!

Thursday, August 29, 2013

Time for some TRC!

Hi Crafty Friends!  I'm here today with a new super simple card for The Rubber Cafe.  

I used two favorite sets ~ Background Basics 2 for the polka-dot border & True Friend for the sentiment.  I simply stamped the polka-dot border & sentiment with Memento Toffee Crunch ink and lightly sponged the edges of the panel.  I used my 1/4" circle punch to take a notch out of each edge and then wrapped May Arts twine around the card about 5 or 6 times and secured it with a piece of Scor-Tape.  Then I secured the card to the kraft card base with Kool Tak Foam Tape.

For the final touch, I found this fabulous blue button in my stash and double-threaded more twine through it ~ creating the bow in the back.  I used more Scor-Tape on the back of the button to keep the bow in place and then secured it to the card with another Kool Tak Foam Tape piece.


I know you are as anxious as we are to see more from the new Creative Cafe Kits that will be coming out next week...so here's a little peek at one of the projects I'll be showcasing!


You still have time to enter the drawings to win the new Creative Cafe Kit!  Check out The Rubber Cafe blog post HERE for the details and HERE for the Pin-It to Win It details.

Wednesday, August 28, 2013

Color Throwdown with some Avery Elle!

Today it's Color Throwdown Day and I'm happy and sad ... all at the same time.  WHY?  Well because I love my card and I've had such fun playing along this month, but today is the last Wednesday of August and I'm all done with my guest spot.

Anyway... my card today uses some gorgeous stamps and matching dies from Avery Elle called Petals & Stems.  This set is one of my favorites!  Oh....and for the sentiment I used the Papel Picado Banners set ~ isn't it fabulous!!!!  The pattern paper is from My Mind's Eye (Happier) and the inks are from Clear Snap & Memento Luxe.


Here is the fun color palette for this week!


Thanks so much to The Color Throwdown team for having me as a guest this month!
It's been a blast!


Along with the Color Throwdown, I also played along on the Avery Elle monthly challenge.
This month they are doing a sketch!


Now you can hop around and see what the Color Throwdown team came up with...

Barbara AndersBroni Holcombe 
Joan Ervin 
Lori Tecler 
Lynn Put
Melody Rupple 
Tammy Hershberger 
Vickie Zimmer  
Wanda Cullen 
Kendra Wietstock – August Guest Designer (that's me!)

Tuesday, August 27, 2013

you make my tail wag!

Hi Friends... So I'm just going to admit it, I think this card is super cute!  I used the Drooly Dog digi image from Hambo Stamps & it totally makes me laugh!   So today, it's just a fun little giggle from me to you!


I'll see you tomorrow with special card for the Color Throwdown Challenge!

Supplies:
Digi Image ~  Drooly Dog from Hambo Stamps 

Spectrum Noir Markers ~ TN2, FS2, FS3, CR10, CR11, BT1, BT2, GB5, GB7, IG6, IG8, PP4, PP5
Pattern Paper ~ Pebbles Inc (Seen & Noted)
Postage Die ~ My Favorite Things
Banner Die ~ SP & Co.
Word Bubble Die ~ Avery Elle

Embossing Folder ~ Lifestyle Crafts

Monday, August 26, 2013

Water, Dye Inks and Stamping...a tutorial

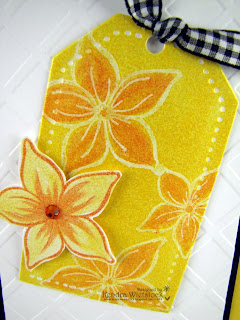
Hi Friends!  Today I have a pretty long tutorial post sharing 3 different techniques I used with my Memento Dye Inks.  All three cards have the same layout and I used the Always Floral stamp set from Crafter's Companion; however, I did something slightly different on each one.  Including using 3 different embossing folders ~ the blue card uses the Floral, the pink card uses the Petite Dots Embossalicious Folder, and the Yellow card uses the Lattice Embossalicious Folder.

Stamping with Water

That's right...I said WATER!  Yup, right from the tap!  Here's the finished card...


Note: It's important to prep all of your supplies and work quickly so the ink is still slightly wet when trying to stamp the image with water.  I used a sandwich size plastic container with a folded paper towel inside.  Then I added enough water so it was dripping wet. 

Step 1: Using a piece of Luxury Centura Pearl Cardstock, die cut a tag.  This cardstock has a GORGEOUS shimmer to it and comes in 6 different sizes.

Step 2:  I used Bahama Blue Memento Ink Dew Drop and rubbed ink over the entire tag.

Step 3:  Place your flower image on the clear block and get the image wet (just like you would on an ink pad), and then stamp the image on the inked tag.  The water will take away the dye ink.  Note: make sure not to have too much excess water on your image, otherwise you won't see the image.    


Step 4: Repeat as many times as you want...


Step 5: I added a sentiment from the Best Friend Swirls set in Tuxedo Black Memento Ink.  Then I set the tag aside to dry completely.  Note: the dye ink takes a little bit longer to dry on the  Luxury Centura Pearl Cardstock... but the look is TOTALLY worth it!

{I'll show how I did the flowers later in the tutorial.}


Embossed Resist


The next card uses an older technique called Embossed Resist.  Note: I used the same Luxury Centura Pearl Cardstock for my tag.


Step 1: I started out by stamping the 2 sizes of flower images with my VersaMark ink pad on the tag & then I heat embossed the images with clear embossing powder.


Step 2: Next, I used my Memento Rose Bud Dew Drop ink pad and swiped ink across the entire tag.  Tip: Use the end of a pen or paint brush to hold your tag in place.  The dye ink doesn't dry instantly on this shimmery cardstock.


Set aside to dry.  {I'll share how I did the flower below}


Embossed Resist & Watercoloring with Dye Inks

For the third and final look today, I did the same Embossed Resist technique, but this time I added another color to the flowers for something a bit different.


Step 1: Once again, I stamped the 2 sizes of flower images with my VersaMark ink pad on the tag & then I heat embossed the images with clear embossing powder.

Step 2: I swiped Dandelion Memento Ink over the entire tag.


Step 3:  Using one of my acrylic blocks, I added some ink from my Tangelo Memento Ink pad so I could use it as a palette to paint my flowers.


Step 4: Using a small, damp paint brush, paint the Tangelo ink on each flower petal.  Set aside to dry.


Here are what my tags looked like after they were dry.


Flower Embellishments

Next I made flower embellishments for each of my tags.   I really wanted the bright color of the ink to appear on each flower, but I also wanted to heat emboss the flowers.  Here's what I did...

Step 1: I inked up my flower image with VersaMark ink and then immediately inked it with one of the dye inks & stamped the image on the Luxury Centura Pearl Cardstock.  

Step 2: Sprinkle with clear embossing powder, shake off excess and heat emboss.

Step 3: Repeat for second color and then again for the third color.


Step 4: Using lighter shades of Memento Inks (Angel Pink, Dandelion, Summer Sky), I painted the background of each flower with a paint brush.  Note: I used my clear acrylic block as a paint palette again.

Step 5: Using the darker shades of Memento Inks that I used above (Tangelo, Rose Bud, Bahama Blue), I added some brush strokes on each flower petal.


TIP: When adding the brush strokes, start from the center of the flower and flick your wrist outward toward the edge.  Bring the brush tip up as you go.


And there you have it!  Three lovely techniques to get more out of your dye ink pads!
Saturday, August 24, 2013

just a note to say hi...

Just a quick "hi" for a Saturday morning...
This is for the Paper Smooches Sparks Challenge this week!


Supplies:
Stamps: Paper Smooches (Simply Said, Sentiment Sampler)
Word Bubble Dies: Paper Smooches
Ink: Memento (Rich Cocoa, Morocco)
Pattern Paper: My Minds Eye (Noteable)

Friday, August 23, 2013

Sheena's Magical New Release!

Crafter's Companion has a magical new release by Sheena called  'A Little Bit Magical'.  These stamps are available now on the website!  The collection of four enchanting EZMount™ stamp sets will allow you to escape to a land of magic, fantasy and adventure in your papercrafting projects. Perfect for coloring with a variety of mediums including Spectrum Noir pens, Distress inks and more, you can create an array of different styles with these images.

For my card today I used my favorite image from the stamp set called Knowledge.  I colored the books with my Spectrum Noir Markers (see colors below the photo).  I lightly stamped the Travel Script Background with Antique Linen Distress Ink and then used a sentiment from the Time to Dream stamp set.  And for a little bit of texture, I used two different embossing folders on my card ~ ABCs & Gun Metal.


Spectrum Noir Markers used: BT3, BT4, BT5, TB3, TB4, TB6, LG2, LG4, LG5, IG1, IG2, CR10, CR11, LV2, LV3, CT4, GB5, TN6.

As you can see below, all four sets in this collection are definitely must-haves!


Thanks for buzzing by today...see you soon!


Thursday, August 22, 2013

CAS & TRC ~ PLUS...Giveaway Info!

Hi Everyone ~ Today I wanted to share a super clean and simple (CAS) project today with a favorite image by The Rubber Cafe!


First, I stamped the pretty flowers from Daisy Bouquet on some kraft cardstock with Rich Cocoa Memento Ink.  I trimmed the image and then colored the flowers with a few Copic markers.  Next, I attached the image to the card base with Kool Tac Foam so it would POP.  The last details are a simple strip of pattern paper and a large rust colored button and twine.  Super simple card but very pretty!


Supplies:
Stamps:The Rubber Cafe' -  Daisy Bouquet
Paper: My Minds Eye Pattern Paper; Bazzill cardstock
Adhesive: Kool Tac Foam
Embellishments: May Arts twine
Misc Button

Now don't forget about the Giveaways going on right now!!!  We are super excited about the new Creative Cafe Kits and can't wait to share our projects with you the first week of September!

a Rafflecopter giveaway

Wednesday, August 21, 2013

Time for a little COLOR {throwdown}...

Good Wednesday Morning!  Are you ready for a THROWDOWN???  A Color Throwdown that is...

I'm totally loving the color palette this week and decided to pull out some pretty Paper Smooches sets for my card ~ Bold Blooms & matching Big Bloom dies.   For the leaves, I used the Reflections stamp set with the matching Reflections Leaves Dies.  The sentiment is from the Sentiment Sampler set.  The pattern paper is an old collection from My Mind's Eye called Happy Go Lucky.  I couldn't resist pulling it out for this challenge because the color are PERFECT!


Here's the pretty color palette...


Take a peek and see what lovely creations everyone on the team came up with...

Barbara AndersBroni Holcombe 
Joan Ervin 
Lori Tecler 
Lynn Put
Melody Rupple 
Tammy Hershberger 
Vickie Zimmer  
Wanda Cullen 
Kendra Wietstock – August Guest Designer (that's me!)

Tuesday, August 20, 2013

Sketch Challenge & Hambo

Hi Friends!

Super quick post today to share a new card.
Here a fun little pup from Hambo Stamps called #1 Dog!
I played along with the Splitcoast Sketch challenge (SC449) this week too!


Supplies:
Pattern Paper: Pebbles Inc (Seen & Noted Collection)
Spectrum Noir: CR9, CR11, CR8, GB7, BT4, BT5, FS3, FS2, TN2, IG6, IG7, IG8, PP4

Gems: Kaiser

Monday, August 19, 2013

Coming up Daisies...

Happy Monday Friends!

Today I'm sharing a card using a pretty set from Crafter's Companion called Poppies & Daisies along with some pattern paper from The Paper Loft called Easy Breezy.  


I colored my daisies to with my Spectrum Noir pens ~ BT9, TB4, GB8, GB11, DG4.  I also used a few other sets on my card ~ for the background on the blue cardstock, I stamped the vines with the Best Friends Swirl set using VersaMark Dazzle Champagne ink.  I also stamped a very light background with Antique Linen Distressed ink using the crackle background image from the Ageing Beautifully set.   The lace trim is from May Arts as the last added touch to my card.

Have a great day & we'll see you tomorrow!


Sunday, August 18, 2013

New!!!! Creative Cafe Kits from TRC!

The Rubber Cafe is introducing a beautiful new monthly crafting kits called CREATIVE CAFE KITS.  It includes a stamp set, cardstock, pattern paper, ribbons, Washi Tape, and lots of bling.  I adore this first kit...and I know I'll love the ones that follow as well!

introducing

There has been a wonderful response to the kits so far and The Rubber Cafe has decided to hold a couple of GIVEAWAYS!!   
The first giveaway is via Rafflecopter on the TRC Blog.  Hop on over there and enter now through September 5th!


Here's a peek at one of the photos for the new Creative Cafe Kit!  


Later this week, I'll be posting some projects that I've made with this wonderful kit!

Saturday, August 17, 2013

CC Birthday Week... Magical Reindeer

This week, Crafter's Companion USA is celebrating it's 6th birthday & there are tons of wonderful specials going on ~ take a peek HERE.  One of the specials is that if you spend $50, you get a brand new rubber stamp FREE called Peace Deer  (see below) AND...if you spend $100, you get this new image called The Snowflake (the image I used a few days ago).  You don't even need a coupon code...they will automatically add them to your order ~ that kind of ROCKS, huh?  Hurry ~ this deal ends TOMORROW!

I used Peace Deer image and stamped it directly on a piece of pattern paper (an old Christmas collection from Basic Gray) for this simple but elegant card.  I also used several other sets to compliment the beautiful reindeer ~ Ornate Snowflakes, Tree Whirl & the sentiment is from Mistletoe Kisses.  Those background images were stamped with VersaMark Champagne Dazzle ink and the other images were stamped with Memento Rich Cocoa.  Then I went a little "ink happy" with my antique linen distressing ink over the background.  I finished off the look with a wooden button and twine and some pretty cream trim from May Arts.


We would love it if you "LIKED" our facebook page.  If you do, and share our birthday week post, you'll be entered to win all kinds of fun goodies!

Friday, August 16, 2013

Sneak Peek Time!

Are you ready for a sneak peek?  Well Crafter's Companion has a new release coming out August 23rd from Sheena Douglass and it's really quite magical!   These fun mushrooms are part of the Enchanted Doorway set.    The sentiment is from the Sentiment Swirls set and I also used two Embossalicious Folders on my card ~ Chevrons & Petite Dots.


Spectrum Noir Pens: CR4, CR5, CR7, CR8, TN5, EB1, EB2, EB5, LG1, LG4, LG5

Don't forget about the AWESOME birthday specials this week!  Take a peek HERE for all of the details and see how you can get 2 brand new FREE sets with your Crafter's Companion order.

Thursday, August 15, 2013

CC Birthday Week: Rustic Snowflakes

This week, Crafter's Companion USA is celebrating it's 6th birthday & there are tons of wonderful specials going on ~ take a peek HERE.  One of the specials is that if you spend $50, you get a brand new rubber stamp FREE called Peace Deer.  AND...if you spend $100, you get this new image called The Snowflake.  You don't even need a coupon code...they will automatically add them to your order ~ that kind of ROCKS, huh?

So I used The Snowflake image for this rustic card.  I also used the Let It Snow Embossalicious folder for the background and then went "ink happy" with my antique linen distressing ink all over the place!  I added a "JOY" die cut and used twine and wooden buttons to finish off this rustic beauty.


Here's what the fabulous image looks like ...


We would love it if you "LIKED" our facebook page.  If you do, and share our birthday week post, you'll be entered to win all kinds of fun goodies!


Wednesday, August 14, 2013

Color Throwdown Day!

Hi Peeps!  It's week #2 of my Color Throwdown guest spot & I have to say...I think I found the PERFECT paper for this week's challenge.  It's from Doodlebug and the collection is called Flowerbox ~ so sweet.   Then I added all the fun stampy touches ~ the butterfly is from the Crafter's Companion set called Flying Colors and the flourish and sentiment are from the Sentiment Swirls set.  The inks are from Memento ~ my favorite!


Here's the pretty color palette for today...
Play along & add your link to the Color Throwdown Challenge blog.


Take a peek and see what lovely creations everyone on the team came up with...

Barbara Anders
Broni Holcombe 
Joan Ervin 
Lori Tecler 
Lynn Put
Melody Rupple 
Tammy Hershberger 
Vickie Zimmer  
Wanda Cullen 
Kendra Wietstock – August Guest Designer (that's me!)

Tuesday, August 13, 2013

Happy Birthday Monica!

Today is a special day!  It's the birthday of the owner of Hambo Stamps ~ Monica Hunter & we are having a Surprise Birthday Hop to celebrate.   The Bacon Bits Design Team got together and decided to throw a little surprise party for her, and we would like you to join us! 

If you arrived here from Judy's blog, you are in the right place. Otherwise, start at the beginning with Deborah's blog so you don't miss out on any party fun. Every birthday has to have presents, so we have one for you!  One random hopper that completes the hop and comments on each blog will receive a Hambo Birthday surprise! The winner will be announced at the Hambo Hoedown on Wednesday, August 21st.
Here is the hop order in case you get lost:
Deborah
Jane
Jeannie
Judy
Kendra
Lyn


My card uses the sweet digi image called Bailey Cupcake ~ I just love Bailey!  I added several papers from the My Mind's Eye Birthday collection called Hootenanny for the border and then colored my image with my Spectrum Noir pens.

Spectrum Noir Pens used:
Dog: TN2, FS3, FS2, IG3, IG4, IG1, IG6; Hat: CG2, CR11, TB2; Dog Collar: CR8, CR11; Cupcake: CR8, CR9, CR11, GB7, TN7.


Now hop on over to Lyn's Blog for more birthday fun!

Monday, August 12, 2013

CC ~ Challenge Time!

Hi Friends!  I spent a little time this weekend trying to get caught up.  While I'm not quite there, I did manage to get some projects done for a few of my due dates.   One project I completed is this month's Challenge Card for Crafter's Companion.  The challenge this month is to use an Animal on your card ~ well that's pretty easy!  I used this sweet puppy from the Popcorn the Bear Christmas Collection in the Angel Wishes set.  Yup!  This is actually a Christmas set, but the puppy was just too cute not to use on his own. 


I also used a sweet little paw print from the set to add watermarked paw prints around the edge of my card.  And I used the Basketweave Embossing Folder on the pattern paper for a great textured look.  The puppy is colored with my Spectrum Noir pensTN2, TN3, FS2, FS3, EB3, EB4, EB6, BG6, BG8, IG1.

Come play along on the challenge & just add your link to the CC challenge post!

Saturday, August 10, 2013

Paper Loft Sketch Time!

It's a new month and The Paper Loft has a new challenge... and a new collection!  The new collection is called Island Sun and I have used one of the new patterned papers (Sand Dollar) as the background for my page.  I also used the Vacation Accessory Sheet for the title and accents.  


Check out the Paper Loft Blog for the new sketch & your chance to win a guest spot on our team.

Friday, August 9, 2013

Peek-A-Boo Little Heggie...

Today I have a cute little Hedgehog digi image from Hambo Stamps.  I love this sweet little guy!   I paired him up with some beautiful papers from Simple Stories (Vintage Bliss Collection) and the sentiment is a rubber stamp image from Hambo also called Best Buds (1611) ~ (the rest of the sentiment is on the inside of the card).


Spectrum Noir Markers Used: BP1, BP2, BT4, BT5, DG2, DG4, CR1, CR5, CR7, IG2, IG3, IG5, IG6, IG8.

Thursday, August 8, 2013

Colorful Washi Birthday

Hi There!  Today I'm here with a Clean & Simple 5-minute card!
  
Today I'm using one of the Washi tape images from The Rubber Cafe's -Don't Be Wishy Washi stamp set and repeated the image down the side of the card in five different ink colors. 

I finished it by coordinating buttons with matching bakers twine and attached it to the card using Scrap Happy Glue. I just love how all that color just pops off the white cardstock!  The final step was to add a birthday sentiment from the True Friend stamp set with Tuxedo Black Memento ink.  It really doesn't get any easier than this!


Supplies:
Stamps:  The Rubber Cafe' - Don't Be Wishy Washi;True Friend
Ink: Tuxedo Black Memento ink. Color  Box pigment ink
Adhesives: The Rubber Cafe' -Scrap Happy Glue;
Embellishments: misc buttons; bakers twine


Wednesday, August 7, 2013

Guesting for The Color Throwdown!

Today I'm excited to share some fun news...I've been asked to be the guest designer for the Color Throwdown Challenge this month!   WOOHOO!

The color palette is gorgeous and it includes KRAFT!   You know how I adore kraft cardstock!  I used the pretty Silhouette Wildflowers stamp set from Crafter's Companion along with my waterbased Stampin' Up markers.  For the sentiment, I used Sentiment Swirls with Tuxedo Black Memento Ink.


Here's the pretty color palette!


I hope you can find time to play along. If you don't have the exact colors, use something that's close.    If you upload to a public gallery, be sure and use the key words CTD254.  Also, link up your card using the Inlinkz tool at the bottom of the Color Throwdown Blog.

Tuesday, August 6, 2013

Time for some Island Sun!

Super excited to share this fun page using a brand new Paper Loft collection called Island Sun.  I used one of the photos of Megan while we were shopping in Cozumel, Mexico ~ along with 3 of the patterns in the new collection.  The stamps I used around the focal point and the title are from Technique Tuesday ~ love those stamps!

OH!  How could I forget to pick a winner for my blog giveaway for the adorable Crafter's Companion set called Sledging By?   The winner is....

Edited: the winner never contacted me and a new name was selected.

Please contact me by August 7th with your contact information.  If I don't hear from you, I will pick a new winner.

Thanks for buzzing by today!

Monday, August 5, 2013

Baby's First Haircut Envelopes

Hi Peeps!  Hope you had a great weekend.
Here's another part of the freelance job I've been working on...Baby's 1st Haircut envelopes.
The top one is for little girls and the bottom one for boys.


Once the stylist trims the baby's hair, they can take a lock of it and tie the ribbon closed.
Then the whole card goes inside the window envelope.
It's sealed up, the date is written in, and VOILA, it's ready for a baby book or scrapbook page.


Supplies:
Cardstock: Bazzill
Printing & Scallop Border: computer graphics
Scallop Rectangle ~ cut from Silhouette image
Stamps: Floral Border (The Rubber Cafe ~ Asian Floral); Bubbles (old Our Craft Lounge Stamp set); Date Arrow ~ Simple Stories stamp set.
Ink ~ Memento
Ribbon ~ May Arts
Envelopes ~ available at www.evelopes.com


Have a great day & thanks for Buzzing by!
Blog Widget by LinkWithin
 
Blogger Template By Designer Blogs