Showing posts with label Felicity Jane Kits. Show all posts

Tuesday, April 30, 2019

{JOY} ~ Only Little Word April Prompt


Hello Friends! I've been working on lots of different projects, but I've been remiss about posting here. To be honest, I'm not sure many people even read my blog anymore, but I like having a place to find things, so I'll post now and then.

Right now One Little Word is probably my most meaningful projects. I LOVE IT! For this month's activity, Ali sent us a journaling prompt each Monday morning. This was a fun one! The themes were: I Am... ; I Give Myself Permission... ; I am Learning... ; and, I Feel Most Alive When...


Have A Wonderful Day!

Friday, September 7, 2018

Marching Band ~ More Pocket Pages!

Happy Friday!  I was looking through my blog the other day and noticed this post in my drafts folder & realized I never finished up posting my son's band pages from Junior year. And... I still have all of Senior year to share as well. I guess I should get busy!

For these pages, I used an assortment of supplies from various kits I had on hand ~ Ali Edwards story kits, Hip Kit Club, Elle's Studio, and Felicity Jane. 


Have a Great Weekend!

Wednesday, March 28, 2018

Dear Matt...

Hi Friends!  I just finished a page directly from my heart. This past marching band season was a special time for me watching my son grow and mature. He is an outstanding young man and I couldn't be more proud of him. So, I decided to write him a letter about some of the things I observed this season and included one of my favorite things... watching him conduct Part 3. 


For this page, I used lots of bits and pieces from various Felicity Jane kits ~ Caroline, Mila, Summer and Alexis. I recently split up my kits, which is why I don't stick to just one kit per page. I love how all the kits coordinate so well together.


Thursday, February 1, 2018

Felicity Jane Kits ~ Remember Today

Hello There!  The other day I was looking for some photos from the end of the marching band season. I knew that a friend of mine had posted some, so I went searching. I found this gem of my son right after his last evening practice was over.  It is a bittersweet photo that made me tear up when I saw it.  His face showed so many emotions of accomplishment and satisfaction, and yet a bit of sadness too because his Concord Marching Band days were coming to a close.  Years down the road, I hope when he looks back on his years in band, he has this same look on his face.


For my layout, I selected products from several different Felicity Jane Kits ~ Reagan, Mila, and Willow that I can recall. I love how all of the products fit so beautifully together from kit to kit.


Enjoy Your Day!

Friday, January 19, 2018

Felicity Jane ~ Love This Boy


Happy Friday! 

Today I have another page to share using my Felicity Jane Reagan Kit. This is such a fun kit to create lots of different looks on projects.  I posted a Prom page last week with the same kit {click here to view}... just look at the versatility of these products!

For this page, I wanted to journal some of the things I love about my son.  This has been a fun year with him & documenting my favorite things about him at this age is so important to me.


Have an Amazing Weekend!

Monday, January 15, 2018

Felicity Jane ~ Love this Smile

Hello Friends and Happy Monday! 

I've been on a mission this past week to use my Felicity Jane kits and get some pages done!  So far, I have completed four layouts with several ideas ready to go.  I enjoy doing all sorts of projects, but working on full 12x12 layouts are probably my favorite.  I love printing large photos and making them the star of the page.  Like this cute photo of my beautiful daughter Megan. 


For this page, I used the Felicity Jane kit called Willow.  Just look at all the lovely patterns on this page!!  This was a super fun page to work on because the patterns and embellishments were all so quirky.  I did grab the "Smile" embellishment from the Caroline kit and the small bit of black/white stripe paper from the Reagan kit.


Enjoy Your Day!

Friday, January 12, 2018

Felicity Jane Kits ~ Prom

Yipee!  I spent some more time in my craft room this week and pulled out a few more Felicity Jane kits. This time, I used the Mila kit with some paper from the Willow kit.  I really love how all of these kits work so beautifully together.  When I saw this particular piece of paper, I knew I needed to make another prom page because the colors/patterns are so perfect with Nia's lovely dress.  The floral embellishments and leather alpha... they are oh so yummy!


Have a Fabulous Weekend!

Wednesday, January 10, 2018

Felicity Jane ~ Sweet Moments

Hello Friends!  As you can tell by all of my blog posts, I've been working on lots of projects ~ woohoo!  I couldn't wait to dive into my new Felicity Jane kit called Reagan that just arrived a few days ago.  


I'm not sure I would have thought to put these pretty rust & blush colors with my son's prom photos, but it totally works!  There are so many gorgeous colors in this new kit that work beautifully for a variety of pages.

Here's how I made my layout:

  • I started off with the rust color solid paper with the scallop edge already printed on it. I trimmed the sheet to 12x12 and added the beautiful floral pattern on top.  TIP: To get more out of my kit, I used a paper trimmer and cut out the inside of both papers so I would have more to work with on this or other projects.  
  • I trimmed my white textured cardstock to size and inked the edges with Memento Dessert Sand ink.  
  • I added the copper heart washi tape along the top and bottom and pulled out my sewing machine to add a zig zag stitch along the tape.
  • Using the rust paper that I trimmed from the inside of the sheet, I flipped it over and used the blush color to mat my photo. Then I added a larger white mat and inked the edges.  Using some foam dots, I added the photo to the page.
  • Now for the gorgeous embellishments!  I used the roses, tags and labels from the Reagan kit along with the striped banner and "sweet" from the Mila kit.  In addition, the white foam "Moments" is also from the Mila kit.
  • I stamped the "Prom" using Hero Arts letter stamps and the date on textured white cardstock, trimmed them to size and added the labels.  NOTE: I didn't stamp "Prom" directly on the tag because I didn't have Staz-on ink in the rust color and I was afraid it might smear.
  • Finally, I added some copper sequins to finish off the page.


Have a wonderful day & thanks for stopping by!

Friday, December 1, 2017

December Daily ~ Cover & Day #1

Welcome to December! 

I decided to do a December Daily Album again this season since I enjoyed my finished album so much last year.  So yesterday, I pulled out and organized all of my DD supplies and worked on the cover page and "my reason why" page {which is also my Day #1 page}.


For the cover page, I used a transparency from Felicity Jane's Joy Kit.  I die cut a large red double stitched circle and embossed the "twenty seventeen" stamp from Studio Calico with Versa Ink and clear embossing powder.  Then I added the large white wooden tree & rubber shape (both from my stash that were in the 2015 Ali Edwards DD kit) and the red felt heart from this year's Ali Edwards DD kit.


On the back of the transparency, I added another double stitched circle the same size with another pattern paper circle inside.  The sticker letters are from Studio Calico and the wooden circle and cork #1 are from the current Ali Edwards DD kit.


For my Day #1 post, I typed up "My Reason Why" page in Photoshop Elements and added a pretty snowflake from my stash with a small felt heart from the DD kit. 


Here's a close up of the snowflake/heart circle.  The title on my letter "My Reason Why" was a free download from Ali Edwards blog last year.


I'll be back next week with more pages from my DD album!

Have a great weekend!

Wednesday, November 15, 2017

AE & Felicity Jane Page: Surprise!

I'm not sure if you're more surprised by the fact that I'm posting twice in the same week, or that I actually had time to make a 12x12 physical scrapbook layout!  LOL!!! It think this is the first 12x12 layout I've made since April or May and it felt great to get into my craft room again!

Over the last few weeks, since marching band finished up, I've been working on finishing my son's sophomore year Band Album. This is the final page of the school year when he was named Drum Major for his junior year. It was such an exciting night & Matt's reaction was awesome!

I used the Felicity Jane Heidi & Caroline Kits for the pattern papers and embellishments.  I love how their kits work so well together month after month.  The big acrylic "Surprise" word is from the Ali Edwards Surprise Story Kit. 


Thanks for stopping by today!

Friday, March 31, 2017

Felicity Jane ~ Remember This

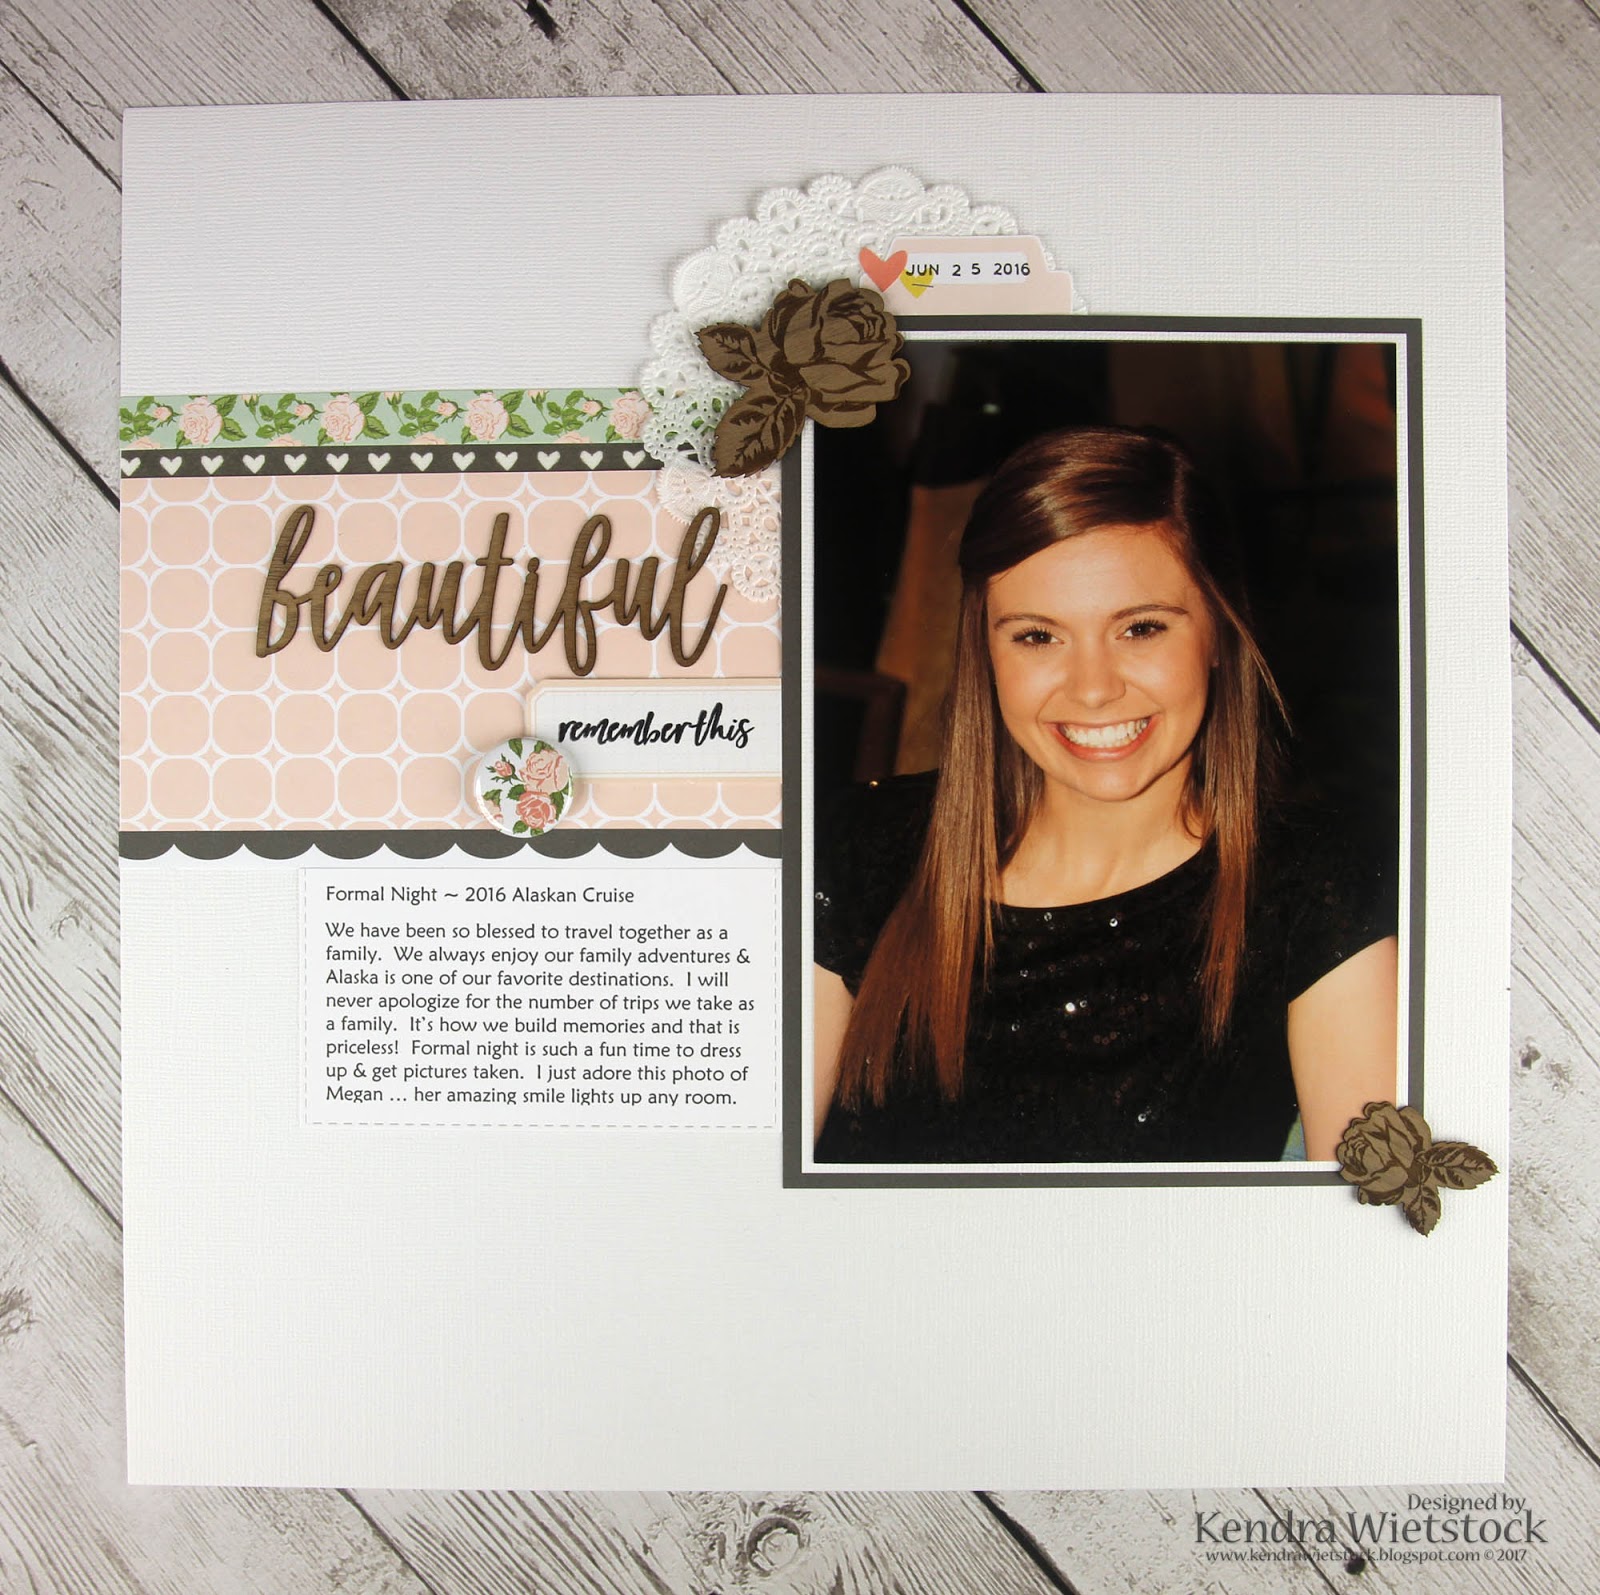
Earlier this week, I posted a page about my son using the Felicity Jane Kit called Jane.  Now I have a coordinating girly page about my daughter using the same kit.  Pretty awesome... one kit, two completely different looks.


Everything on my page is from the FJ Jane kit except the white cardstock and the black ink.  The roses and the "beautiful" title are wood veneers & the little rose flair button is super sweet.  The strip of white/black hearts is washi tape from the kit & the date tab is from the cut apart sticker sheet.   I did my journaling on the computer and trimmed it with a stitched rectangle die from Taylored Expressions.  Easy peasy!


Have a Fabulous Weekend!


Tuesday, March 28, 2017

Felicity Jane Kit ~ Just Be You

Hello my friends... I'm so glad you decided to join me today.  Last week I pulled out my new Felicity Jane kit ~ called Jane and made a double page spread using some 5x7 photos of my son & daughter. How awesome to have a kit that can so perfectly be used for masculine or girly photos. Today's layout features the photo of my son.


So I began with the green dotted pattern paper and added several other strips of papers to the top and bottom.  I also added one of the washi tape heart strips.  The wooden embellishment "Just Be You" and the row of hearts were also in the kit.  I cut one of the hearts off to fit in the space and then used it below the photo.  The doily, flair button and date tab were also in the kit.  The "Love You" heart was a printable from last month's kit.  Then I typed and added journaling to the page.  A clean and simple layout.  


Later this week, I'll share the one coordinating layout I made of my daughter.  

Thanks for stopping by today!

Friday, March 24, 2017

Felicity Jane ~ Prom-posal

Woohoo!  Welcome back and it's FRIDAY!  Yesterday I shared my Felicity Jane London Kill-A-Kit post where I used all my left over supplies to make 24 Project Life cards.  Well today, I have a page to share using several of the cards.  


Asking someone to prom {or getting asked} isn't as simple as it used to be.  Apparently it's a bit deal these days AND it requires some thought and creativity.  My son recently asked his girlfriend to prom on a walk through the woods at a local park with a series of bright colored envelopes hanging from the bushes & trees.  He did a great job... and she said YES!


Here are the cards I posted yesterday... I didn't use the middle row on this page.


Have a Wonderful Weekend!

Thursday, March 23, 2017

Felicity Jane ~ London Kill-A-Kit Project Life Cards

Hi There Friends!  Over the last few weeks I've been sharing pages that I've made with the beautiful Felicity Jane London Kit. {Click here to see my pages}  I have been so happy with this kit and love how my pages have turned out.  So last week I decided that since the next pretty kit was already here, I should finish off all my supplies ~ Kill-A-Kit.  I ended up making 24 Project Life cards (12 - 4x6 cards and 12 - 3x4 cards) jut from the bits and pieces and a few sheets of cardstock.

So here they are in various color palettes ready & waiting to be placed in some pocket pages...


For a few of these cards, I added some black sticker letters from Studio Calico.


Adding journaling blocks with dies is an easy way to dress up your cards.


The last few cards ... 


This is what I started with before the Kill-A-Kit...


What's left after I was finished ...


Check back here tomorrow for a pocket page that I created with one of the card sets. 

Have a Wonderful Day!

Monday, March 20, 2017

Felicity Jane ~ My Beautiful Girl

Good Morning!  I'm a little late getting my post up today ~ it must be Monday.  Today I have a page to share using my Felicity Jane London Kit.  I think I have used every single piece of this kit ~ I love it!


I saw a beautiful page on the Felicity Jane Blog using this kit from Nancy Damiano and copied her basic layout with the pattern papers as my launching off point {full credit to Nancy for her amazing inspiration}.  

The title is a combination of products ~ the "MY" and "GIRL" are from the chipboard alphabet in the kit and the "beautiful" is from American Crafts Thickers {Foam Phrase Stickers - Wild}.  The rest of the items/papers on the page are all from the FJ London Kit.    I added my journaling on the computer and then cut them up to apply to them my page.


Have a Wonderful Monday!

Tuesday, March 14, 2017

Bond Story Kit ~ You + Me

Good Morning Peeps!  My layout today features the current Ali Edwards Story Kit Bond & while I love all of these kits, this one is probably my favorite!  There are so many ways you can go with this kit and so many stories to tell.  My story today is about the bond I share with my sweet friend Stephanie ~ I seriously couldn't ask for a better friend. 


For the background paper, I used patterns from the Felicity Jane London kit & added the chipboard pieces from the Story Kit.  I typed my journaling on the computer and trimmed them in strips to add under the photo.

This photo was taken in on the first vacation our families took together for Spring Break 2013.  It's still one of my favorite photos of us.


I have a second coordinating layout about our friendship using the Bond kit, but I'll share that one tomorrow.  ;)

Have a Wonderful Day!


Monday, March 13, 2017

Felicity Jane ~ Today was Fabulous

Happy Monday!  I hope your weekend was awesome and you're ready for this new week!  I have a new page to share today using my Felicity Jane London Kit ~ I really love this kit!   When a new kit arrives on my doorstep, my goal is to make at least 2 layouts with that kit, either 12x12 or pocket pages.  I've already made a few layouts with this one, but I just can't stop because the supplies are so amazing!


I started with a full sheet of 12x12 pattern paper as the background border and then added Bazzill white cardstock on top.  I fussy cut the flowers and the "today" title from the sticker sheet and colored just a bit of the flowers with a few shades of yellow watercolor pencils.

I used the stamp set in the kit to finish off the title and few other words on the page.  I added the word "was" and the little hearts using a Hero Arts alphabet stamp set.

To dress up the beautiful photo of my daughter, I added the cardstock stacked labels to one side of the photo, tucking them under the left edge.  Then for some balance, I added strips of pattern paper & a die cut heart to the other side.  I'm super happy with how it turned out.


Enjoy your day!

Friday, March 3, 2017

Felicity Jane Kit ~ Be Happy, One Day at a Time

Woohooo ~ It's FRIDAY!!!  I'm super excited today because my sweet girl is coming home today for spring break!!   The other day I started using the Felicity Jane London Kit & I just love it.  I made two 12x12 layouts and my pages went together so quickly.


My page today features a picture of my daughter that I took last summer in Alaska.  It's a little dark in this page photo, but it's much lighter in real life.   All of the supplies for this page were from the London Kit, except for the black enamel dots, the black cardstock and the white paper doily.


Here are some details on how I made my page:
  • I began my page with the 3" strip of floral paper and I trimmed the word strip from one of the other sheets of pattern paper.  Each piece of paper has a decorative strip along one edge that works perfectly for 12x12 layouts or even pocket pages.  I used the black/white polka-dot washi tape so they would have a nice clean edge.   
  • The black/white gingham heart was from the cut apart sticker sheet & the "my favorite" banner and seafoam green heart circle were both from the downloadable cut-apart file.
  • The "Hello Lovely" tag was actually part of the packaging of the kit, but I saved it to use.  I used a seafoam green marker to color in the leaves and added a bit of the washi tape at the top of the tag.  Then I added some gingham ribbon at the top.  
  • The date tab is from the cut-apart sticker sheet & I used the Becky Higgins date stamp.
  • For the rest of the sentiment, I used the chipboard alphabet letters along with the "happy" chipboard and seafoam green arrows.  Then I finished the grouping with a white enamel heart.
  • I added the "one day at a time" stamped sentiment with white ink and heat embossed it with white embossing powder.
I'm thrilled with how my page turned out and excited to use more from this beautiful Felicity Jane kit.

Have a wonderful weekend!

Wednesday, March 1, 2017

Felicity Jane London Kit ~ Silly Pup!

We love having a golden retriever in the house... we've had 3 during our married life ~ Jessica, Kayla & Jazmine {Jazz}.  We love this breed of do because they are so sweet and they have been such great family pets.  The first few years of having a pup is a challenge, but fun too.  We have lots of puppy stories.  But when that puppy grows up to be an older lady... you don't really expect the antics to continue.   Except if you have Jazz... you just have to smile at that girl ~ and take a picture.  How can anyone resist that dirt covered face?


I cracked open my Felicity Jane London Kit for the first time and let me tell you, I LOVE these products!  OMW ~ such gorgeous quality and the pattern papers are amazing.    I used this kit for everything on my layout, except for the black enamel dots, a small piece of black/white twine, and the date stamp.


Here are a few of my thoughts about the kit:
  • Every single item in the kit is Exclusive to Felicity Jane... you can't find any of it in stores.  I love that!
  • Each double sided piece of pattern paper has a strip at the bottom that can be trimmed off and used on your projects.  I love that little extra detail.  The double sided papers are a nice heavy weight and the designs are not busy at all.  STUNNING!  There is even one sheet of cut apart Project Life cards with a pretty pattern on the opposite side.   I may just have to buy the paper add-on kit because the papers are that gorgeous!!
  • There is a cut-apart sticker sheet (above I used the tag, banner, date tab, "laugh" circle) that provide a nice grouping of extra embellishments. I kind of wish they were already cut; however, I did customize a few with punches and dies, so I did like that I could customize them to fit my needs. 
  • The chipboard embellishments are sturdy and the colors match perfectly.  I wished there we a few more pieces... but then I always do ;)   There is also sheet of labels & I used one behind the chipboard "smile".
  • With the subscription, you can download a cut apart PDF with additional designs.  I didn't use any on this layout, but I did for another one.
  • There is also a full size acrylic stamp set with each kit with very usable images and words/phrases.  I didn't use any on this layout, but did on the next one. 
  • This particular kit included the awesome chipboard alphabet, a full roll of washi tape & a sheet of enamel hearts and stars (5 of each).  They change up some of the embellishments each month, but it appears you always get a chipboard alphabet.  
In my opinion, this kit is a keeper!  I love it and after completing two full layouts, I still have tons of products to use for future projects and the fabulous stamp set.  My layouts went together very quickly because I was so inspired by the products.

Have a Wonderful Day!!

Blog Widget by LinkWithin
 
Blogger Template By Designer Blogs