Monday, March 31, 2014

Taylored Expressions April Sneak Peeks: Silhouette Stems

Welcome to day #1 of the Taylored Expressions April Release sneak peeks!  I am still over-the-moon excited to be part of the AMAZING Baker's Dozen Design Team and this release is a blast!

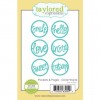
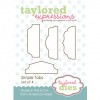
For my first card today, I used the Taylored Expression Dies called Silhouette Stems 5 and Various Vases along with a sentiment from the new set called Greetings for Her ~ both being released Thursday, April 3rd.  


For my card today, I decided to try a new die cutting technique that is very trendy right now called Inlaid Die Cutting.  It takes some planning and thought, but the results are pretty cool!  

Here's how I made it:
  1. I started with a piece of white cardstock and trimmed 2 identical pieces to the finished size (approximately 3 1/2" x 4 3/4").  Set one piece aside.
  2. I used one of the vases from the Various Vases die set, and placed it in the correct spot on one piece of the white cardstock & ran it through my cutter. 
  3. Next, I added the flower (Silhouette Stems 5) and placed it where I wanted it on the finished piece & ran it through my cutter.  Once it was cut out, I removed any excess cuts that didn't fall away after trimming.
  4. Attach the 2 pieces of white cardstock (die cut piece on top).
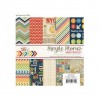
  5. Using the Doodlebug Springtime 6x6 paper pad, I decided which papers I wanted to use for the flower, stem and vase & trimmed each with the same dies I used in steps #2 and #3.
  6. Once each piece was trimmed in pattern paper, I added adhesive to all the pieces and placed them inside the previously die cut base.  Kind of like those beginner puzzles for little kids.  Note: I had to trim the green stem of the flower so the vase would be smooth.
  7. I trimmed a Chevron Border in pink cardstock and added it to the vase for decoration.
  8. I added the sentiment using the new Greetings for Her set and trimmed it using the Bloomin' Stacklet 2 die set.  Added a circle punch behind it & then a bow on top.


For my second card today, I highlighted several new products coming out this week.   Once again I used the Various Vases die set and for these flowers I used the Silhouette Stems 4 die.  I also used the fabulous new Spotted Cutting Plate and embossed it rather than cutting out the circles.   


For the sentiment, I used the beautiful set called Care & Comfort II stamp set and trimmed it out using the From Me to You die.  This great new set had 9 sentiments and verses that express love, hope and prayers for those going through a difficult loss.


Taylored Expressions is celebrating Release Week with some fabulous giveaways! 

Visit the TE Blog each Sneak Peek Day this week for details on how you can enter to win.

All of the new products being shown today through Wednesday will be released this Thursday, April 3rd.


Now it's time to hop around to see what everyone else is sharing today!


Supply List: {Sneak Peek Products are listed above & will be added here after the release}

Sunday, March 30, 2014

More Pages from Taylored Expressions & Simple Stories!

Just in case you didn't get a chance to see my pages on the Taylored Expressions Blog yesterday, I thought I'd share them here as well.   This week Taylored Expressions teamed up with Simple Stories for a fabulously fun product swap and amazing giveaways!  I was more than a little thrilled to be part of the swap!!!

Each time there is an important event, my daughter and her two best friends are always up for having a photo or two taken.  These precious girls are amazing together and it’s been fun to watch them grow into beautiful young women.  When I saw the Simple Stories “A Charmed Life” collection, I immediately thought of gathering photos of this special trio.


Page 1: All of the SN@P elements that come in this collection makes it easy to put pocket pages together.  Included on this page are some SN@P Pockets, SN@P Cards, Bits & Pieces, Expressions Cardstock Stickers, and pattern papers from the 6”x 6” paper pack that are all from the collection.  Then I added several dies from Taylored Expressions that coordinated perfectly to make this page go together very quickly.
  
Bottom Panel: Using a SN@P card as my base, I used the Pages & Pockets Fab Frames set for the “Smile” frame.  Then added a quick border to the photo using the Small Scallop Border die.  I always like to add a date of some kind for my photos, so I used the Pockets & Pages Calendar stamp set to add the month and used letter stickers from the Expressions Cardstock Sticker sheet for the title and year.  


Top Left: Inside the little pocket, I cut out the “Sweet” from the Pockets & Pages Circle Words die and added it to a tag from the Simple Stories Bits & Pieces pack. 

Top Right:  Scraps of paper from the paper pack make a perfect photo border & then an added sticker brings it all together.


Page 2:  For this page, I hit highlights from the Homecoming Football game, the Marching Band Banquet and the Marching Band trip to NYC to march in the Macy's Thanksgiving Day Parade.


Bottom: I love this little insert!  The base is from the SN@P cards. Then I added the title using a combination of TE Chunky Alpha dies and Simple Stories letter stickers.  The arrow is from the Pockets & Pages 3x4 Essentials & I added another Small Scallop Border edge to my photo.  They all work so perfectly together!


Top Left: Pattern papers from the collection make a great mat and border.  Then trimmed I used a few other patterns and solids with the TE Chevron Boarders & the Label It Dies to add some additional embellishments.

Top Right: As the base, I used a SN@P card and attached the photo with a tab from the Pockets & Pages 4x6 Essentials & a few little flower stickers and Kaiser Silver Gems to finish off the pocket piece.


Page 3: Highlights from the year end Band Banquet when Megan was named Drum Major.


I started with one of the preprinted pages in the SN@P Pages.  Then when I saw the big “ampersand” on the Fundamentals Cardstock Sticker sheet, I knew I wanted to use it.  I added the girls names around it. 

The photo is framed with the Pockets & Pages 3x4 Essentials Die and the “Love” is the Pockets & Pages Circle Word trimmed out from pattern papers in the collection.  I also added the date with the P&P Calendar stamp set on a TE Simple Tabs die cut. 


I really enjoyed how well the Simple Stories & Taylored Expressions products coordinated and worked so easily together.  I plan on making several more pages with this collection!

Supply List:


Saturday, March 29, 2014

Taylored Expressions and Simple Stories Team Up!

Today I'm pretty excited to share a little sneak peek of some scrapbook pages that I made for the Taylored Expressions & Simple Stories partnership this week!  Simple Stories is one of my favorite companies and their products pair perfectly with the Pages & Pockets products from Taylored Expressions!

Here's a little Sneak Peek for you and then head on over to the Taylored Expressions Blog to see the pages I made and fun prizes they are giving away!  Don't forget to leave comments for your chance to win!!!  Then head over to the Simple Stories Blog to see what they are giving away too!


I'll be back tomorrow with more of my TE/SS pages!!

Supply List:
Taylored Expressions Dies: Chunky Alphabet; P&P 4x6 Essentials; Small Scallop Border
Pattern Papers & Stickers: Simple Stories 'A Charmed Life'

Friday, March 28, 2014

Taylored Expressions ~ SOTM Missing U


As soon as I saw the March Stamp of the Month (SOTM) from 
Taylored Expressions, I had the idea for this card & I'm thrilled with how it turned out.    The SOTM set called Take a Spin along with the coordinating die set called Spin It To Win It.  So much fun!!!


I started out my card by using some fabulous papers from Simple Stories called Urban Traveler for the background of my card and also for some of the die cut pieces on the spinner.   I stamped the spinner image using Memento Bamboo Leaves Ink and the arrow was stamped with Rich Cocoa.  Once the items were stamped, I lined up the coordinating dies and trimmed them.  Then I assembled the pieces of the spinner and attached it to the card.

I wanted to do more with the arrows and chevron that were in both the pattern paper and the stamped image, so I added the TE Chevron Border and then used the Simple Stories Typeset stickers and spelled out the word "Missing" to the Label It arrow.  To finish the sentiment I used the "U" from the Chunky Alphabet dies and I popped it up and made sure the arrow on the spinner was pointing to it.  Finally, I added some buttons with twine to balance the layout.


Time is ticking away on this Stamp of the Month & the Key Ingredients Kits so make sure you get it while you can!


Supply List:


Blog Widget by LinkWithin
 
Blogger Template By Designer Blogs