Friday, May 31, 2013

Same Supplies...3 ways with TRC!

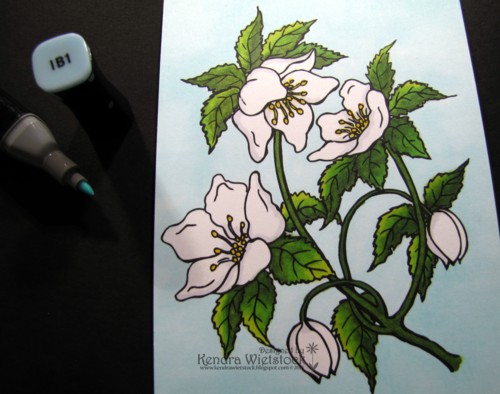
Hi Friends...I'm here today with a super simple card set that features a fun little stamp set and just a few additional supplies from The Rubber Cafe.   I used the stamp set called Build-A-Bloom and made three different cards all using the same colors, cardstock, pattern papers, and inks.    


For my first card, I stamped the flower stems in light green ink directly on the white cardstock.  Then I inked up the flower in light blue and stamped it on another piece of cardstock.  After I trimmed it out with a scallop circle diecut, I popped it up using Kool-Tac foam dots.  I also popped up the sentiment from the Fabulous Phrases stamp set with foam dots.


For my second card, I used some different images from the Build-A-Bloom set and used the sentiment from the True Friend set.  I used all of the same supplies on this card, but just changed up the layout.


On my third card, I once again used the same supplies with yet another layout.  The Thank You sentiment is from the Thank You For Everything set.


Get more out of your stamps and use up the bits and pieces you have laying around.  See you next time!


Supplies:
Stamps ~ The Rubber Cafe:  Build-A-Bloom Fabulous Phrases,  True Friend,  Thank You For Everything
Ink ~ Memento (Rich Cocoa)
Adhesive ~  Kool-Tac foam dots

Thursday, May 30, 2013

Amare Roma...

{Loving Rome}...

That's the title of my page "Loving Rome" and we really, really do love and adore this amazing city.  As you can see, we love to travel & we've been on some incredible trips; however, I've never felt this way about any other place that I've been.  It's a very special city, and the fact that we were there as a family, made it even more amazing.

I clearly remember the day this photo was taken ~ first we spent the day at Vatican City & St. Peter's Basilica, then we walked back to our hotel, shopping along the way.  After a bit of down time, we had an amazing dinner at the Ristorante Tre Scalini in the Piazza Navona, and then we walked to the Trevi Fountain to make our wishes for a return to the city.  It was ... PERFECTION!

To capture this special memory, I used some papers from the Everyday Life Collection from Paper Loft. I also used a few of the graphics from the Good Times Accessory Sheet & the matching Alphabet Stickers for my title.  To add a bit of texture and visual interest, I used stamps from Unity Stamp Company (passport stamp background) and Technique Tuesday (date/words).


Arrivederci


Wednesday, May 29, 2013

Time for the Hambo Hoedown

 Hi Peeps ~ It's Wednesday and time for another addition of the Hambo Hoedown Challenge.  I decided to play along this week's challenge which is BUBBLES.  My bubbles are from this cute embossing folder from Cuttlebug.   The super cute Sitting Duck image (2504) is what I used for my card and I colored him with my Spectrum Noir Markers.  The pattern paper is an old print from October Afternoon that I found in my stash of paper scraps.


the inside of my card uses the Sunshine & Happiness sentiment (4704)


Have a great day!

Tuesday, May 28, 2013

More Graduation Cards...

After I posted the graduation cards I made last week, I had orders for 10 more cards.  One of the orders is from my neighbor & she is going to give them to a few of the same people I am...therefore, I needed to change up my cards just a bit.  So here are a few more versions using the Paper Smooches Digits Dies and Stamps.  Oh...and the "Class of" sentiment is printed off my computer.


And the final design...


The cool notebook paper and chevron embossing folders are from Crafter's Companion ~ I just LOVE the added texture of embossing folders!

Monday, May 27, 2013

Crafter's Companion Challenge

Happy Memorial Day!

The month of May is drawing to a close and you have just a few days to enter your masculine challenge card for the Crafter's Companion challenge!  

For my card I used the stamp set called Through the Rain and the Gun Metal Embossing Folder.  


Sunday, May 26, 2013

i love you...24/7

Lots of special occasions are coming up around us ...graduations, birthdays, Father's Day and anniversaries. I made this particular card for my sweetie.  Yes, I can't seem to put down this fun Digits stamp set & dies by Paper Smooches ~ but they are just too much fun!  The pattern paper is from Teresa Collins ~ He Said She Said.


See you tomorrow...

Saturday, May 25, 2013

New Release...Wild Rose with Tutorial

Today is the day for a beautiful new release for Crafter's Companion and Sheena's new Floral Fantasy Collection.  Today I used the Wild Rose set and decided NOT to concentrate on coloring the flowers, but instead I left them white with just a few gray accents for shadows.   This time I really put my shading efforts into the leaves & I'm happy with how they turned out using just three Spectrum Noir Markers.


Here are the color I used ~ Spectrum Noir Markers (CG3, CG4, DG3).  See below for the steps I followed to shade the leaves.


Step 1: Decide where you want the light source to come from ~ mine is from the top left.  So most of the lighter shades will be on the tops of the leaves (unless the leaf goes under the flower).  TIP: Only work on one leaf at a time so the ink stays wet.

Step 2: Use the lightest shade of green (CG3) on the top of the leaf.


Step 3: Color in the rest of the leaf with medium shade of green (CG4).  Don't overlap the CG3 too much.


Step 4: Add the darkest shade of green (DG3) on the bottom of the leaf.


Step 5: Take your medium green (CG4) and go over the darkest part (DG3) so the colors start to blend.


Step 6: Take your lightest color (CG3) and color over the medium green (CG4) so those colors blend.   And here you have a finished leaf.  

NOTE: For some of the leaves that fell under the flowers, I only used the medium and dark greens.


Step 7: I added a medium and darker yellow (CT2, CT4) for the flower centers & a few shadows here and there on the white flowers (IG1).

Step 8: Since I decided that the flowers would remain white, they really need to pop off the page.  Therefore, I used a light blue (IB1) to color the entire background of the card.  Then I added a piece of black cardstock as a mat to the panel so the entire image would pop off the card.


Hope you enjoyed my tutorial today ~ for one of my tutorials on coloring flowers, check out THIS blog post.

Friday, May 24, 2013

It's a Hambo Hop!

ARE YOU HERE TO HOP???  Did you come from Sue's Blog?  If so, you're in the right place.  If not, you can start the hop at the Hambo Stamps Blog ~ or check back there if you get lost along the way.

Welcome to "The Battle of the Bands" sponsored by Hambo Stamps! Today Hambo friends and the Bacon Bits Design Team are bringing you fun creations that depict Band groups! It might be our favorite, or just one that was fun to design.

A prize will be awarded to one participant whose themed creation tickles the Bacon Bits’ fancy!  Another prize will be awarded randomly to a hopper who comments on all of the blogs along the way. The winners will be announced on the Hambo company blog, Talk to the Ham, on Wednesday, May 29, as well as at the Hambo Hoedown challenge blog. We love comments anytime, but the deadline for prize entry comments is Sunday, May 26 at 5 PM CST. Don't miss it!

The band I selected for my project is ... Hootie and the Blowfish!  I used the super cute Fish Trio Digital image along with Everything Better (2922) Rubber Stamp.


Now jam on over to Judy's Blog for our last stop on the Band Tour!


Supplies:
Hambo Digital Image ~ Fish Trio Digital image 

Hambo Stamp ~ Everything Better (2922) Rubber Stamp
Ink ~ Memento
Markers ~ Spectrum Noir Markers (BT3, BT4, BT5, CG2, CG3, CG4)

Cardstock ~ Bazzill
Pattern Paper ~ Echo Park
Embossing Folder ~ Lifestyle Crafts
Ribbon ~ May Arts

Thursday, May 23, 2013

A Visit to The Vatican

What?  It's Thursday already????  Not at all sure how that happened!  Today's project is a scrapbook page of our trip to Vatican City last summer while we were in Rome.  It's such a gorgeous place and it was ginormous!!!  I used pretty papers from The Paper Loft collection called Shades of Gray and also some beautiful stamps from Crafter's Companion called Decorative Swirls.


Have a great day!

Wednesday, May 22, 2013

Sheena's Floral Fantasy Sneak Peek

Are you ready to do a complete U-Turn from what I've been showing you the last few days?  Well hold on, cause here it comes...

Today I'm showing you a sneak peek from a beautiful new release from Crafter's Companion  The new collection is from Sheena and it's called Floral Fantasy.  I knew when I saw all four new sets they would be MUST HAVES, but the violets are the stamps I picked up first.  I colored them with my Spectrum Noir markers (see colors below).  Before you ask, YES, I did cut out each violet!  I don't usually do all that fussy cutting, but I really wanted to use that gorgeous Lattice Embossalicious Folder for the background.


Supplies:
Stamps ~ Crafter's Companion (Sheena Collection ~ Floral Fantasy Violets set).
Sentiment Stamp ~ Crafter's Companion (Stamp It Australia Sentiment Swirls)
Spectrum Noir Markers ~ Violets: LV1, LV2, LV3, CT2, CT4; Leaves: DG2, DG3, DG4
Ink ~ Memento (Tuxedo Black)
Embossing Folder ~  Lattice Embossalicious Folder 

Tuesday, May 21, 2013

PS Sparks Color Challenge goes Nautical

Yup...still on the Paper Smooches kick!  I decided to play along on the SPARKS Color Challenge this week with my Word Salad and Digits stamp sets and Digits dies.  The color challenge has a nautical theme this time ~ kraft, red, navy and teal.    Here's my super simple CAS card!


Have a great day!

Monday, May 20, 2013

{PS} ...i love you

I've been on a Paper Smooches kick lately so I decided to title my blog post {PS}...i love you for Paper Smooches ... haha, get it?

For today's card I used the Reflections & Word Salad stamp sets along with the matching flower and leaf dies that match the floral set.   For the embossed background, I used the new Wire Fence Embossing folder from Crafter's Companion.  For the ink colors, I used my Memento Dew Drops (Rich Cocoa, Angel Pink, Rose Bud and Pear Tart).   For the finishing touches, the ribbon is from May Arts and the gems are from Kaiser.


Sunday, May 19, 2013

Class of 2013...

Graduation season is once again here & I'm finding that as my daughter gets older, she has been invited to more and more graduation parties.  This year we have several for Concord (our school), but also have a few friends and family members at other schools so I made these cards based on each graduate's school colors using the new Digits stamp set & dies by Paper Smooches.   The "Good Luck" sentiment is also from Paper Smooches in the Word Salad stamp set.  I also added some texture for the background using the Embossing Folder from Crafter's Companion called Notebook.


But this one is my favorite because it's for Concord ~ Go BIG Green!


The cards in mass production.


Saturday, May 18, 2013

A Friend...

Happy Saturday Friends!
Just popping in today to share this bright card using some sets by Crafter's Companion.  Both are part of the Sheena Collection ~ Ageing Beautifully (ink splatter) and Through the Rain stamp sets.  I stamped several colors of Memento Inks using the ink splatter image and then stamped the sentiment in Tuxedo Black.  Added some ribbon & cardstock and VOILA ~ all done!


Memento Ink Colors ~ New Sprout, Bahama Blue, Tangelo, Love Letter, Dandelion, Grape Jelly, Tuxedo Black.

Friday, May 17, 2013

Another Teen Boy Card...

For today's card, I made another teen boy birthday card using the new Paper Smooches dies and set called Digits.  I totally LOVE this set!  I also played along on the Paper Smooches SPARK challenge.


Supplies:
Stamps ~ Paper Smooches (Digits)

Dies ~ Paper Smooches (Digits); Spellbinders (Circle & Pinking Edge Circle)
Ink ~ Memento
Embossing Folders ~ Cuttlebug (numbers); Crafter's Companion (Chevron)
Pattern Paper ~ Pebbles Inc
Cardstock ~ Bazzill

Thursday, May 16, 2013

Vintage Butterfly Love Note ...

Hi Friends ~ I have a fun new project for The Rubber Cafe today, both here and on the TRC Blog.

For the background of the main card base and the angled card panel, I used several images from the Vintage Treasures stamp set. I also used the Paris Nights Background image for the angled card panel & stamped everything tone on tone.  I stamped the butterfly on the card panel in Memento ink (Tuxedo Black) and then stamped the same butterfly again on another piece of kraft cardstock and cut it out.  I added a light tan marker to the butterfly for a little bit of color so it would stand out and then used my Wink of Stella Glitter Brush in clear and painted glitter on the wings. The "Love" sentiment is from the Fabulous Phrases stamp set and then I added some Black Soot Jellie Dots using Scrap Happy Glue.  The last touch to add is some May Arts kraft twine and a big black button.  Then I added the card panel to the card base with some Kool Tac foam adhesive.


Supplies:
Stamps ~ The Rubber Cafe (Vintage Treasures, Paris Nights Background , Fabulous Phrases 
Ink ~ Memento (Tuxedo Black)
Glitter ~ Wink of Stella Glitter Brush
Embellishment ~ Black Soot Jellie Dots 

Adhesive ~ Scrap Happy Glue , Kool Tac foam adhesive

Wednesday, May 15, 2013

Scooting by...with a new release

Hey There Peeps!  Today Crafter's Companion is coming out with a new 4 set collection called Camden Town.  There are two girly sets and two that are perfect for the guys!  The set I'm using today has a great scooter in it ~ which really could be used for guys or girls.

Here's what I used for my card: First, I stamped the image with Memento Ink (Tuxedo Black) on Kraft cardstock.  Then I colored it with an EB2 Spectrum Noir marker so it would stand out a bit. I paired up the image with pattern paper from Studio Calico (Here & There Collection) and I used the Embossilicious Gun Metal Embossing Folder for some texture.  A few wooden buttons with twine and the Camden Town sentiment finished off this very simple card.


FYI ~ the new stamps sets should be up on the website at about 9am (ET).

Tuesday, May 14, 2013

Hambo Stamps & SCS Sketch Challenge

Hi Friends!  I'm popping in today with some "Hogs & Kisses" for you ~ just because it's Tuesday.

For my Hambo Stamps card this week, I'm using the Mud Pig (1901) image along with the Hogs & Kisses (1919) sentiment.  I also played along on the Splitcoast Stampers sketch challenge this week.


Supplies:
Stamps ~ Hambo Stamps (Mud Pig; Hogs & Kisses)
Ink ~ Memento (Tuxedo Black)

Spectrum Noir Pens ~ CR4, CR5, CR6, EB3, EB5
Pattern Paper ~ Lily Bee (Sweet Shop)
Sparkly Fluff ~ Coffee Bean Brown
Embossing Folder ~ Crafter's Companion (Grande Dots)

Monday, May 13, 2013

Teen Boy + Paper Smooches = The Perfect Birthday Card!

I know a lot of people struggle to make cards for teenage boys... I am no exception!  This week I had some fun with new Paper Smooches stamps and dies that arrived in my mailbox & I easily figured out what I wanted to use for my nephew's birthday card.  I really LOVE this card!


Supplies:
Stamps ~ Paper Smooches (Digits)
# Dies ~ Paper Smooches (Digits Dies)

Ink ~ Memento (Morocco, Pear Tart, Rich Cocoa)
Pattern Paper ~ Studio Calico (Here & There)

Sunday, May 12, 2013

Saturday, May 11, 2013

around the garden...

Just a few spring pictures from around our house & our neighbor's garden


and a few pics of my pretty girl after her friends curled her hair


with Jazz...


See you tomorrow...

Friday, May 10, 2013

Paper Loft May Sketch Challenge

It's been a crazy, crazy week ~ so I say, TGIF to everyone!  Today's project is a page for the monthly Paper Loft Sketch Challenge.  I used the In The Zone Collection of pattern papers and Alphabet Stickers.  The sketch will be posted on the Paper Loft Blog today & if you play along, you might win a guest spot on our team this summer!


Here's a close up of my focal point ~ my sweet boy enjoying the view of the crater at Mt. Etna (Sicily).


Other supplies ~ Unity Stamp Company SMAK kits (May 2012 & February 2013), Memento Ink (Rich Cocoa, Pistachio)

Thursday, May 9, 2013

Dragonfly Palette Blending

Hi Peeps ~ today I have a card using a pretty set from Crafter's Companion called Flying Colors.  I love this ginormous dragonfly ~ it's wing span is 4" wide!  I colored it using my Spectrum Noir pens using a technique called Palette Blending.  Jennie Lin Black has a fabulous tutorial online ~ I know you'll want to watch it and learn this very cool technique. I even used the same colors Jennie used because I wanted to compare my dragonfly at the end.


Spectrum Noir Pens:
Body ~ GB8, GB10
Wings ~ DG3, CG2, CT1

Wednesday, May 8, 2013

Hambo Hoedown & A Sketch!

It's time for another edition of the Hambo Hoedown.  Today the challenge is a Sketch, which you can find on the Hambo Hoedown Challenge Blog.  I decided to use the Flower Monster (HCL013) clear stamp set by Hambo Stamps.  I colored the image with my Spectrum Noir markers (see colors below).  


Supplies: 
Hambo Stamps ~ Flower Monster
Ink ~ Memento
Spectrum Noir Pens ~ CR7, CR9, CR11, CT2, CT4, CG1, CG3, CG4, BT4, BT5
Pattern Paper: Doodlebug - Flowerbox

Tuesday, May 7, 2013

Spring Kit with Gina K Designs

Hey Friends!  I had a few minutes yesterday and decided to pull out the new Spring Parade Kit by Gina K Designs that I bought a few weeks ago.  Everything in the kit coordinates so beautifully so putting this Clean & Simple card together was super duper fast!


Have a great day & thanks for buzzing by!

Monday, May 6, 2013

...with sympathy

Happy Monday!  Yesterday I showed you a card that I made for a friend who recently purchased some cards from me.  Today I have another card sample that I made for this card order.  Again, I wanted to make it pretty simple, with minimal embellishments for easy mailing.

I used a pretty set by Crafter's Companion called Silhouette Wildflowers stamp set from the Sheena Collection.   For the background texture, I used the Embossalicious Lattice Embossing Folder and stamped the image twice (without reinking) in Paris Dusk Memento Ink.


Blog Widget by LinkWithin
 
Blogger Template By Designer Blogs