
Hello Scrappy Friends! This past year I was able to complete {and keep up with} my Project 52 using the Project Life App on my tablet. The {keeping up with} part was HUGE for me! I have tons of unfinished projects in piles around my studio, so starting another long-term project in 2017 didn't feel like the smartest thing to do. However, a scrapbooking goal last year with my One Little Word was to take more photos and tell more stories. So... I decided to embark on Project 52. You may be thinking... "What the heck is Project 52? Well, simply put, you tell stories and take photos and document them on a weekly basis.
Decisions to make prior to starting this project:
1. Physical/Digital/App: I knew the only way I would be able to keep up with weekly storytelling was to use the Project Life App by Becky Higgins on my tablet because it is so quick and easy. I take the majority of my photos on my phone & they automatically upload to Google Photos so it is very easy to pull photos into the App from the cloud to my tablet. I have a Samsung 6S phone, a Samsung 2014 Edition tablet, and I use the Android Project Life App on the tablet. The PL App is available in both the Google & Apple stores.
Side Note: I love scrapbooking with physical products and I continue to do both pocket scrapbooking and 12x12 layouts for other albums.
2. Number of Layouts per Week: The next decision was how many pages to do for each week ~ single or double page layout. When making this decision, I looked at how many photos I felt like I would take each week & if I could really fill two pages. The answer was a very quick "NO" and I made the decision to do a single layout each week.
3. Page/Album Size: I didn't really want another big 12x12 album on the bookshelf so I began looking around Pinterest for inspiration. I found some different options to try ~ 6x8, 9x12 or 6x12. Ultimately, the 6x12 option won out, but here were my thoughts on the others...
* 6x8 ~ I ruled this one out right away because it felt too small and limiting for weekly stories. I like that size for short term or specific projects like One Little Word, December Daily & Week in the Life, but it didn't feel right for this project.
* 9x12 ~ I found this size kind of cool & even ordered an album from Studio Calico to see how I liked it. However, I felt like working with this size in the App would be too difficult. I would have to leave boxes blank and felt it would limit my productivity.
* 6x12 ~ After seeing Kelly Purkey's weekly album done in this size, I was very inspired to think seriously about this option. Working with this size in the App wouldn't be very difficult because I could still use 12x12 layouts, as long as they could be split down the middle ~ more on that below.
4. Product Availability: Before I officially committed to 6x12, I needed to make sure I could actually get the products I needed since it isn't a standard size. I ended up finding two different albums at my local Hobby Lobby ~ black cloth & burlap for $14.99. I also found some on Amazon, but ended up with the black one from Hobby Lobby. The album came with divided page protectors, so the next step was to find 6x12 full page protectors. I found the Becky Higgins brand at Joanns.com last year & ordered them from her website for my album this year.
NOTE: This size can be a bit difficult to find, so I recommend that if you decide on 6x12, you buy everything you need for the whole year before you begin.
EDITED TO ADD: As of December 2018, Studio Calico now has 6x12 albums and refills. I haven't been able to find them at Hobby Lobby the last few times I've been there, but they are on the website.
5: Page Layout Options: As I mentioned above, if you decide to do 6x12 layouts, you have to pick layout options in the App that can be split down the middle. This probably rules out the majority of the 4x6 portrait options for your pictures - so keep that in mind. Your portrait photos will be smaller in the 3x4 boxes. There are lots of layout options available in the free packs, but I also purchased a few others. The photo below shows my three favorite layout options: Design A (which is the default layout that comes up) and SU Design 6a & 6b which was a separate purchase in the App. NOTE: There are others that I used and many others that will work for 6x12... these are just the ones I used the most.

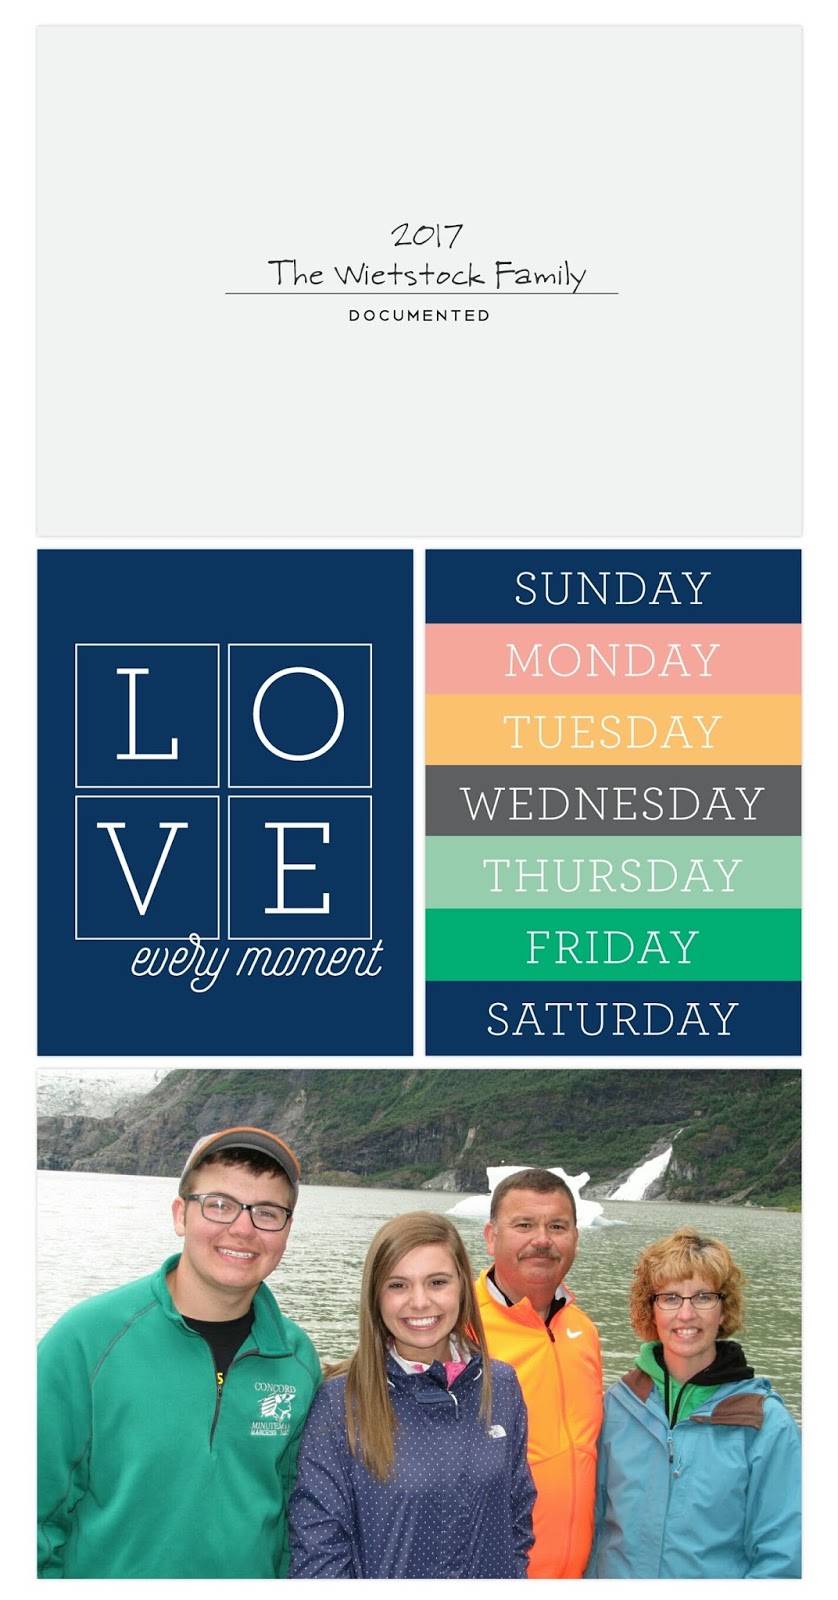
Layout: Design A
Kits: Currently with Currently & Project 52 Overlays

Layout: SU Design 6a
Kit: Happiness Is Edition

Layout: SU Design 6b
Kit: September Skies, Essential Overlays - White
Kit: September Skies, Essential Overlays - White

6. Workflow for 6x12: Another consideration for 6x12 is how the page reads. In a normal full page 12x12, you would "read" the page from the left to the far right. With the 6x12 format, I decided I wanted my weekly entries to read like a book. So if you follow along the numbers below, (1) would be the weekly title card with the week # and dates for the first entry of the week. However, sometimes I put a photo there and used my title card in one of the smaller spots. Next I move down to spot #2, 3 & then 4 at the bottom for the first half of the week. Spot #5 - 7 are usually for the second part of the week & journaling.

Here's an example that shows the work flow for the week. On this page, I used the first 3x4 box for the weekly title because of the photos I wanted to use.

7. Kit Decisions: When I began this project last year, my intent was to use a limited number of kits for the entire year. That decision didn't last long because I was already getting bored with the cards. But one decision that did work for me was to stick with one kit per weekly page (except for overlays... I never put a limit on the number of overlay kits to use). Every now and then I would come across a card that worked with another kit and would use it, but for the most part, all of my pages only used one kit each week.
The other decision I made was that I would only use products in the Project Life App and not use other apps or programs for my pages. I don't need more choices... this project needs to stay simple so I can be successful!
8. Working Ahead: Another thing I like to do is work ahead. I started doing this so that I would have pages already done and could just pop in the photos and journaling as the week was happening. I simply pick a kit that I like, select a layout and start putting kit cards inside. If I know an event or a holiday will fall in a particular week, I usually pick a kit that will coordinate otherwise, I just pick whatever I like.
To start a page, I usually pick one title card and fill in the week # and date range, at least one filler card and at least one journaling card. Sometimes I add additional cards so I have choices for what best fits that week. Of course, I've made up pages that totally don't work for the events of that week and switch out all of them, but at least this gives me a jumping off point.
Below is a photo of my folder for 2018 & the pages I've put together so far.

Here's a page I have made ahead for Week #3. I may or may not use all the cards once the week rolls around. If the floral theme doesn't work for the photos/event of week #3, I'll just use a different page & change the title.

9. Yearly Folder & Backup: I always make folders for my projects so I can quickly find a page to work on or find completed pages. I also name each page with the week #. Below is a photo of part of the 2017 folder.
Also, once I have a page finished, I upload it to Google Photos and then save it to my computer so I have multiple backups.

10. Printing/Trimming: For 2017, I printed my pages twice during the year ~ About half-way through the year (at week #26 or #27) & again at the end of the year when Week #52 & the back cover page were finished. I wanted to print some pages to make sure I liked the format which is why I ordered in July. I will probably do that again this year.
I order my prints through Persnickity Prints online, but you can also order directly through the App. I have several photo credit packages that I pre-purchased on sale through Persnickity, so I always use those. I order 12x12 photographic prints/matte finish. Shipping is very reasonable at $5.99 & the photo credits never expire. I have been very happy with the quality and they are super fast!

Here is the finished look of one week in the protectors.

... and the same page from the App that I display on my blog post.
Layout: SU Design 6b
Kit: Seasonal Snapshot 2015

I did make a 6x12 cover page for the front and back pages of my album. For the front cover I used a 6x12 layout in the App and just printed as a 12x12 and trimmed it. For the back cover, I used part of a 12x12 layout and put some random photos on the other side for printing.

The last thing I did for my 2017 Project 52 Album was make a 4x4 title block for the window on the front cover. I used the collage feature of the PL App and used a card from the Good Vibes kit. It was originally in navy blue but I didn't like how it looked with the black album, so I changed it to coral.


No comments:
Post a Comment