Hi Friends ~ I hope it's a Happy Monday for you! I'm super excited about sharing my card and tutorial today! AND... I'M GIVING AWAY AN EMBOSSING FOLDER ~ so read the details at the end of this post.
It's all about EMBOSSING over on the Crafter's Companion Challenge Blog this month. So I used one of the fabulous Embossalicious Embossing Folders (Lattice) and my Ultimate Crafter's Companion Boards ~ which has about 1,001 uses for all kinds of cards, boxes, bags and bows...
My card uses the gorgeous set from Sheena's collection called Wild Rose & Hibiscus and colored with my Spectrum Noir Markers {BT3, BT4, BT5, CT3, CT4, GB6, CG3, CG4, DG3}.

I thought I'd share some of Crafter's Companions great products in my post today.
The eBosser (along with the cutting plates are shown below). This machine is SWEET!
Just turn it on and it will feed through automatically.

I placed a piece of white cardstock inside the Lattice Embossalicious Folder and fed it through my eBosser. It comes with all the plates needed and instructions for the correct "sandwich" recipes on how to stack your plates based on what you're doing (embossing or cutting).

Get it started in the machine and then let go...easy peasy!
AND...the plates are 8 1/2" x 11" so you can use the fabulous 8"x 8" Embossalicious Folders
or the GIANT 8 1/2" x 11" sized embossing folders!
AND...the plates are 8 1/2" x 11" so you can use the fabulous 8"x 8" Embossalicious Folders
or the GIANT 8 1/2" x 11" sized embossing folders!

I love this Lattice Embossalicious Folder because
you can get two different looks with the same folder.
you can get two different looks with the same folder.

Next I used my Ultimate Crafter's Companion Tool with the Ulti-Bags Board.
I pulled out a piece of vellum and then used the embossing tool
that comes with The Ultimate to emboss the triple frame.
Then I trimmed it with my scissors.
By the way ~ there are TONS of different boards available.
I pulled out a piece of vellum and then used the embossing tool
that comes with The Ultimate to emboss the triple frame.
Then I trimmed it with my scissors.
By the way ~ there are TONS of different boards available.

Next it was time to make the flowers.
I stamped my images with Memento Tuxedo Black ink and colored them
with my Spectrum Noir Markers.
For the leaves, I used CG3, CG4, DG3
with my Spectrum Noir Markers.
For the leaves, I used CG3, CG4, DG3

First I started with BT4 around the edges of the flower petal.
Then I added BT3 inside and blended the colors together.
Then I added BT3 inside and blended the colors together.
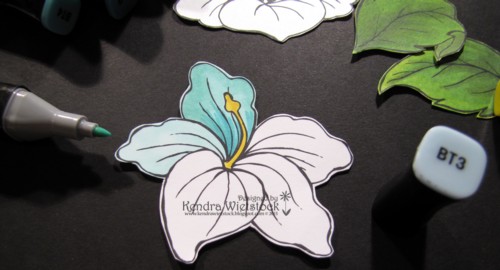
I color one petal at a time so the ink is wet and will blend better.

For the inside of the flower, I added CT3, CT4, and GB6

The final step, I added BT5 and starting from the center,
flicked my bullet tip toward the outside edge.

Here are my finished pieces...ready to assemble.

You can also use The Ultimate to score your card bases.

I started assembly wit the leaves.

Then added the flowers with foam dots.

I used a double layer of pretty May Arts Ribbon
(Turquoise Stitched Sheer and Black Gingham)
and wrapped it around my embossed card panel.
Then I added my stamped image & attached the entire panel to the card base.
(Turquoise Stitched Sheer and Black Gingham)
and wrapped it around my embossed card panel.
Then I added my stamped image & attached the entire panel to the card base.

Once again, here's the finished product!

Whew... that was long, huh?
BLOG GIVEAWAY TIME!!!
OK ~ ready to WIN A PRIZE??? I have a fabulous Embossalicious Embossing Folder called Grande Dots as my prize this week. Just leave a comment on any of my blog post this week, from now until Friday, September 13th at midnight (EST). You can enter once each day.

GOOD LUCK!


22 comments:
Your card is gorgeous Kendra! Love the colours!
Kendra, this is absolutely beautiful!
In my dreams I would be able to color this beautifully. . .your card is absolutely gorgeous. Thanks for sharing the tutorial!!! Love the embossing folder.
Wow...that is so vibrant and beautiful!
Wow...that is so vibrant and beautiful!
Beautiful card!!!Love the flower,Awesome coloring,Thank you for sharing!!!Such a great give away!!!
Gorgeous and vibrant card. Love your coloring. Thanks for the tutorial.
Love the hibiscus and the folder too. thanks for a chance to win.
Beautiful card--I like your coloring and the lattice background.
lovely card and wonderful prize, thanks for the chance.
Beautiful card!! Just started coloring with the Spectrum Noir and love soaking up all the how to's, thanks!!
Thanks for the tutorial on how you made your card, Love the flowers!
Thanks for sharing your beautiful card. Love the flowers!
I am a novice user of Spectrum Noir markers and your coloring is marvelous! I love your card and the great tutorial.
Love your card and the color combo, your so lucky to have all these tools to play with! :)
What an amazing card! Love the coloring on it and all the details. Thanks for sharing.
I absolutely love your card and the great coloring job that you did. Also, the combination of the sheer and solid ribbons is neat...have to try that. Great job. Thanks for sharing and for the tut.
Absolutely stunning! Love your coloring skills!
The card is beautiful and I love the vellum panels.
Kendra... This is absolutely beautiful. The color is wonderful. All the details with embossing and coloring is perfect. I am in live with your card.
Beautiful card, thank you for sharing your techniques!
Neat tutorial and that lattice folder is pretty cool! The vellum touch is my favorite though - it is great!! Love it!
lyn
Post a Comment