Monday, July 20, 2015

Tutorial with Spectrum Aquas, Acrylic Blocks and Gina K

Today I'm doing a tutorial using my Spectrum Aqua Markers with acrylic blocks... it's all about getting more out of your supplies and mixing things up a bit!

For my cards today, I used one of my favorite Gina K stamp sets called Elegant Florals 2 by Theresa Momber.


Step 1: Gather supplies - stamps, watercolor paper, large acrylic block, white pigment ink, white embossing powder, spray bottle and Spectrum Aqua markers (Aquamarine, Bud Green, Sunflower - Floral and Primary packs).

Step 2: Stamp the image in white pigment ink on Spectrum Noir watercolor paper and heat set with white embossing powder.


Step 3: Using the Aquamarine Spectrum Aqua Marker (Primary Pack), add color to the top of quarter of the acrylic block then spray with several squirts from the water bottle.  Tip the block so the color runs a bit.


Step 4: Turn the block over and "stamp" on the watercolor paper.  Make sure to press all of the areas of the block so the color will transfer.


Step 5: Use a watercolor brush to spread any color that didn't transfer until you get the look you want.  The embossed flower will peek through.


Step 6: Add Sunflower Spectrum Aqua Marker to the acrylic block and repeat step 5.


Step 7: Add Bud Green Spectrum Aqua to the acrylic block and repeat.  This time I turned the watercolor paper around so I would have a nice clean edge on the bottom.


Step 8: Using a watercolor brush, blend and fill in the colors until you have the look you like.

Here's a second card I made using the same basic technique with just a few changes.


Step 1:  Select Spectrum Aqua colors (Sunflower, Gold, Orange, Sunset) and using the brush tip, color each directly on acrylic block.


Step 2: Spray several times with water bottle, flip over and press on to Watercolor paper.  Make sure all of the areas are pressed down.


Step 3: Using a watercolor brush, blend colors until you have the desired look.  Set aside to dry or use a heat tool to speed things up a bit & then stamp images and sentiment.


Here are the finished pieces ready to put on cards.


Thanks for stopping by today!  Stay tuned for more fun Gina K/Spectrum Noir tutorials in the coming weeks.

Friday, July 17, 2015

a clean and simple happy birthday ...

How about a quick CAS card today?  I love making Clean and Simple cards and these supplies from Crafter's Companion made for a very quick card.  I used the Die'sire Only Words - Happy Birthday die and trimmed it from Spectrum Noir Watercolor Paper.  Then I added some Spectrum Aqua colors (Gold, Sunflower, Orange and Amber) and blended the with a watercolor brush.  Easy Peasy.

The embossed Happy Birthday is from the Embossalicious Happy Birthday folder.  I put my cardstock in at an angle and then added the HB die cut and some gems to finish it off.  


Have a Happy Weekend!

Thursday, July 16, 2015

Fancy Edge'Able Pocket Card

Had to get one more card made using the new Die'sire Fancy Edge'Able dies from Crafter's Companion.  This time I made a pocket card using the Victoriana Die.  I also added the Only Words - Special Friend die for the sentiment.


Here is the full view of the pocket insert.


Have a great day!

Wednesday, July 15, 2015

Die'sire Fancy Borders Release

Today is release day for some gorgeous new Die'sire dies from Crafter's Companion.  They are called Edge'ables Fancy Borders and the die I am using today is the Floral Dance Die.   It adds so much to this very simple card.


Take a peek on the Crafter's Companion website later today to see the other 4 dies available in this collection!  You'll love them!

Tuesday, July 14, 2015

Gina K & Spectrum Noir Tutorial: Palette Blending

Hi There Friends!  Today I have another new tutorial for Gina K Designs & Spectrum Noir Markers where I will be showing you a technique called Palette Blending.  I used the new stamp set called The Wetlands by Theresa Momber.  


Step 1: Stamp the image in Memento Tuxedo Black ink.
Step 2: Color the top half of the dragon fly body with BG6 (Brown/Grey).


Step 3: Add BG5 to the bottom half of the dragon fly body and blend.


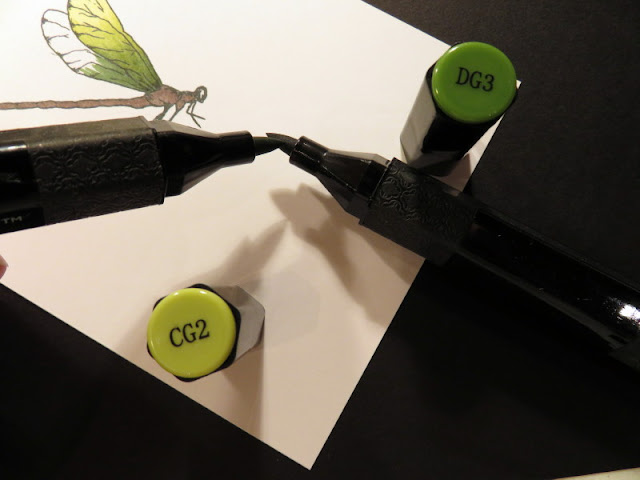
Step 4: Select shades of green for the dragon fly wings.  I selected CG2 & DG3.  Since the shades are pretty different, they won't blend well without a shade between the two.


Step 5: Color the base of the wing with DG3.  Note: I added a brush tip to this marker, but it can easily be done with the bullet tip as well.


Step 6: Taking the tip of the DG3 marker, add ink to the tip of the CG2 marker.


Step 7: Where the DG3 ink ended on the wing, begin adding the new blended ink color.  Add more color to the marker tip as needed.


Step 8: Add CT1 to the tip of the wing and then go over the entire wing so the color is well blended.


Step 9: Add additional color as desired until you have the blend you are happy with. Super easy huh? Here is the color palette I used.


the finished dragonfly


Have fun exploring the different shades you can develop with this fun Palette Blending Technique!

Monday, July 13, 2015

Sneak Peek Time... Fancy Edge'Ables

Hi Friends!  It's time for some sneak peeks using some gorgeous new Die'sire dies that are coming out from Crafter's Companion.  They are called Edge'ables Fancy Borders and the die I am using today is the Floral Dance Die.   I made a gatefold card using my Ultimate Crafter's Companion Tool.


open view


another view of the gate fold 


These dies will be available later this week!

Crafter's Companion Supplies:
Die'sire Fancy Edge'Ables - Floral Dance
Die'sire Decorative - Chantilly Lace
Die'sire Only Words - Thank You
Vintage Floral Embossing Folder - Rose Plaid

Friday, July 10, 2015

Blue Bells...

Crafter's Companion came out with a new Sheena Douglass Perfect Partners Collection with stamps and matching dies called Victorian Floral.  For my card below, I am using the Blue Bells dies by themselves by cutting them from watercolor paper and then using my Spectrum Aqua markers to color them.


Spectrum Aqua Markers: Aquamarine, Navy, Olive, Moss, Evergreen

Thursday, July 9, 2015

Victorian Floral new from Crafter's Companion

Hi everyone!  I'm back from vacation and have some fun new cards to share over the next few days.  Today, Crafter's Companion is coming out with a new Sheena Douglass Perfect Partners Collection with stamps and matching dies called Victorian Floral.  For my card below, I am using the Pansy stamps & dies.  This beautiful collection is due out later today on the website.


Crafter's Companion Supplies:
Stamps: Sheena Douglass Victorian Floral Pansy
Dies: Sheena Douglass Victorian Floral Pansy Perfect Partners; Scallop Tags; Essentials Just the Ticket
Embossing Folders: Textures Woodgrain; Sheena Douglass Silhouette Grasses (tag)
Spectrum Noir Markers: HB1, HB2, HB3, CG3, CG4, CT4, OR2
Spectrum Noir Blendable Colored Pencils: 15, 58, 78, 82

Tuesday, July 7, 2015

a piece of my heart...

My dad LOVES puzzles!  As long as I can remember, he has had one going.  So when I needed a birthday card for him, I pulled out my Taylored Expression Pieces of my Heart stamp and die combo set to make this fun card!


Taylored Expressions Supplies:


Monday, July 6, 2015

Gina K & Spectrum Tutorial: Spectrum Aqua Crazy Color Palette

Hi Friends!  Today I'm sharing a new tutorial using the brand new Gina K Designs set called The Wetlands by Theresa Momber and the sentiment is from the Triple Play Fillers by Melanie Muenchinger.  I colored my image with my Spectrum Aqua markers and I'm pretty sure you are going to look at the colors I picked and think there is no way that will look good...


Here's how I made my card...

Step 1: Stamp the image on Spectrum Noir Watercolor paper using pigment ink and heat emboss with clear embossing powder.


Step 2: Using the Sepia Spectrum Aqua marker, add color to the left edge of the cattail.


Step 3: Add Spectrum Aqua Chocolate next to the Sepia.


Step 4: Add Spectrum Aqua Tan on the remainder of the cattail.


Step 5: Use a waterbrush to blend the colors.


Step 6: Next add Slate and then Charcoal Spectrum Aqua colors with a waterbrush to the dragonfly's body.  I like to add color by scribbling the color directly from the marker to a paint palette.  Then just dip the watercolor brush to the palette and paint away.


Step 7: For the stems, added Olive and Moss Spectrum Aqua colors using a waterbrush.


Step 8: Add Leaf Green from the marker directly on the dragonfly wings.


Step 9: Next add Bug Green with the marker (yes, it looks horrible right now... trust me)


Step 10: And finally add some Sunflower.


Step 11: Use a watercolor brush to blend the colors.   {See... I told you it would look cool!}  Add more color with the waterbrush until you get the desired look.


Step 12: Add Aquamarine Spectrum Aqua to the background with a waterbrush.


My crazy color palette


Stay tuned for more fun Spectrum Noir & Spectrum Aqua Tutorials with Gina K Designs in the coming weeks!

Friday, July 3, 2015

Crafter's Companion Create-A-Card Dies!

Hi Peeps!  Hope you are ready for a great holiday weekend!  I wanted to pop in today to share a Create-A-Card project I made using the Create-A-Card Kaleidoscope of Butterflies die.  These are super fun to use and make for some pretty awesome quick cards!  


The cool part of these dies, is that they don't cut around the outside of the die, so you can cut a card front or the top of a box, like I did on the box below (previously posted HERE).


Have a great 4th of July weekend!

Wednesday, July 1, 2015

Crafter's Companion on HSN... TODAY!

We are super excited to have Sara Davies back on HSN today and she has lots of wonderful Crafter's Companion products and projects to share!  Yesterday, the Crafter's Companion Design Teams had a Blog Hop and shared lots of fabulous projects to spotlight several of the products that will be on the shows today!

For my project today, I used the fabulous Ultimate Crafter's Companion Tool with the Sweet Treats Boards.  One of the great projects on these boards is a large gable box and I decorated it with some of the pretty pattern papers and embellishments from the Sweet Treats CD-ROM.


Make sure you check the Crafter's Companion Facebook Page today for the show times and if you didn't get a chance to hop around yesterday, it's not too late... you still have time.
Blog Widget by LinkWithin
 
Blogger Template By Designer Blogs