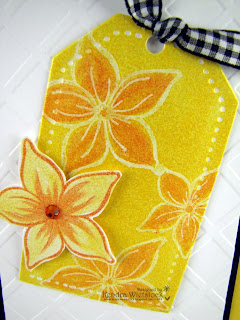
Stamping with Water
That's right...I said WATER! Yup, right from the tap! Here's the finished card...
Note: It's important to prep all of your supplies and work quickly so the ink is still slightly wet when trying to stamp the image with water. I used a sandwich size plastic container with a folded paper towel inside. Then I added enough water so it was dripping wet.
Step 1: Using a piece of Luxury Centura Pearl Cardstock, die cut a tag. This cardstock has a GORGEOUS shimmer to it and comes in 6 different sizes.
Step 3: Place your flower image on the clear block and get the image wet (just like you would on an ink pad), and then stamp the image on the inked tag. The water will take away the dye ink. Note: make sure not to have too much excess water on your image, otherwise you won't see the image.
Step 4: Repeat as many times as you want...
Step 5: I added a sentiment from the Best Friend Swirls set in Tuxedo Black Memento Ink. Then I set the tag aside to dry completely. Note: the dye ink takes a little bit longer to dry on the Luxury Centura Pearl Cardstock... but the look is TOTALLY worth it!
{I'll show how I did the flowers later in the tutorial.}
Embossed Resist
The next card uses an older technique called Embossed Resist. Note: I used the same Luxury Centura Pearl Cardstock for my tag.
Step 1: I started out by stamping the 2 sizes of flower images with my VersaMark ink pad on the tag & then I heat embossed the images with clear embossing powder.
Step 2: Next, I used my Memento Rose Bud Dew Drop ink pad and swiped ink across the entire tag. Tip: Use the end of a pen or paint brush to hold your tag in place. The dye ink doesn't dry instantly on this shimmery cardstock.
For the third and final look today, I did the same Embossed Resist technique, but this time I added another color to the flowers for something a bit different.
Step 1: Once again, I stamped the 2 sizes of flower images with my VersaMark ink pad on the tag & then I heat embossed the images with clear embossing powder.
Step 2: I swiped Dandelion Memento Ink over the entire tag.
Step 3: Using one of my acrylic blocks, I added some ink from my Tangelo Memento Ink pad so I could use it as a palette to paint my flowers.
Step 4: Using a small, damp paint brush, paint the Tangelo ink on each flower petal. Set aside to dry.
Here are what my tags looked like after they were dry.
Flower Embellishments
Next I made flower embellishments for each of my tags. I really wanted the bright color of the ink to appear on each flower, but I also wanted to heat emboss the flowers. Here's what I did...
Step 1: I inked up my flower image with VersaMark ink and then immediately inked it with one of the dye inks & stamped the image on the Luxury Centura Pearl Cardstock.
Step 2: Sprinkle with clear embossing powder, shake off excess and heat emboss.
Step 3: Repeat for second color and then again for the third color.
Step 4: Using lighter shades of Memento Inks (Angel Pink, Dandelion, Summer Sky), I painted the background of each flower with a paint brush. Note: I used my clear acrylic block as a paint palette again.
Step 5: Using the darker shades of Memento Inks that I used above (Tangelo, Rose Bud, Bahama Blue), I added some brush strokes on each flower petal.
TIP: When adding the brush strokes, start from the center of the flower and flick your wrist outward toward the edge. Bring the brush tip up as you go.
And there you have it! Three lovely techniques to get more out of your dye ink pads!


2 comments:
WOW!Awesome cards!Thank you for the tutorial!
Cool tutorial Kendra!! I will have to get out all my memento ink pads and give some of these a try! Thanks for sharing!
lyn
Post a Comment