At first I couldn't remember all the steps to the Pearl Ex Bling, so I called my girlfriend Michelle & she walked me through it ~ thanks MY! I was going to post this card yesterday, but then thought I would include a tutorial on it ~ just in case you haven't seen it before (or maybe you forgot too).
Step 1: Gather your supplies - line drawn image, Staz-On Jet Black ink, Pearl Ex pigment powder, a paint brush and a transparency sheet. You don't want to pick an image that has writing on it because it may end up reversed & that would make you very sad!
 Step 2: Stamp your image on the transparency sheet. Make sure you use Staz On ink. This will not work with Palette or Stampin' Up! black ink. Also, if your transparency sheet has a rough side to it, stamp on the smooth side.
 Step 3: Your image should dry fast, but just in case, let it sit for a minute or two. Then run your transparency sheet through your Xyron machine - stamped side up. I have repositionable adhesive in mine ~ sometimes the permanent adhesive tends to peel off, so I don't recommend it for anything (personally, I don't like it at all). Peel off the adhesive sheets and put your image (sticky side up) on your work surface.
 Step 4: Dip your paint brush into one color of Pearl Ex pigment powder & "paint" onto the sticky side. NOTE: once you have a color on there, you cannot change it! Plan how you want to paint.
 Step 5: I usually pick 3 colors and start with one for the little details. Then I add another color with some of the larger detail and the 3rd color for the majority of the image. It may look a little messy, but don't worry about it.
Step 6: Run a piece of black cardstock through your Xyron machine and put the sticky side of the black cardstock to the sticky side of the transparency sheet.

Step 7: Press the transparency sheet firmly to the black cardstock and smooth out with your fingers. Then cut out your image.
 Here is my finished product! This isn't the same butterfly as in the tutorial, but it's close.
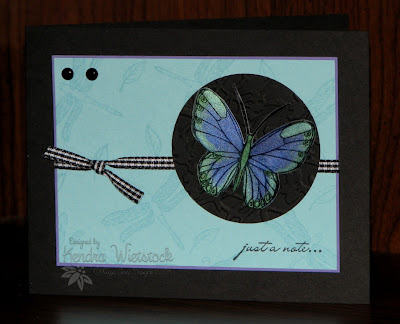
Supplies: Stamps ~ Lizzie Anne Designs (Au Naturale); Cardstock ~ SU; Ink ~ Staz-On, VersaMark; Pigment Powder ~ Pearl Ex; Circle Punch ~ Marvy; Embossing Folder ~ Cuttlebug; Ribbon ~ SU; Brads ~ Queen & Co.


5 comments:
Wow! Such a pretty effect! Awesome tutorial!
This card is beautiful and a great technique. Thanks for sharing Kendra. :)
ty ty...perfect idea for a HB card that needs to be done and I do believe your card gave me the nudge I needed.
GORGEOUS!! I need to drag out those unused PE powders, Kendra - what a good kick in the pants to do it! :)
What a beautiful presentation of this technique! So inspiring!
Post a Comment