The Cast and Crew of Gina K
Designs would like to welcome you to another fabulous blog hop celebrating the new Painted
Autumn StampTV Kit! We hope to inspire you with some beautiful card projects as
you hop along to each of the designer’s blogs!
The set we are featuring today is called Painted Autumn. In this set, you
will find beautiful floral and leaf images where you will be able to create the
3 or 4-step stamping technique! You can create one floral image or an entire
bouquet of gorgeous autumn flowers. This set will be great to use all year
long!
For my card & tutorial today, I used two of the layers to show another way to get more from your Spectrum Aqua Markers.

Step 1: Begin by stamping the base of the leaves image using Jelly Bean Ink. (I began by stamping the 4 corners, but then decided I wanted to fill in the entire outside border).
Step 2: Stamp the outline layer with Fresh Asparagus ink. NOTE: Gina has some great Tip Sheets for lining up and stamping the leaves and flowers for this stamp set.
Step 3: Stamp the sentiment with Gold Pigment Ink and heat emboss with gold embossing powder.
NOTE: You could easily replace the ink pad & color the images with Spectrum Aqua Markers for this step as well. However, this time, I decided to use ink pads.
NOTE: You could easily replace the ink pad & color the images with Spectrum Aqua Markers for this step as well. However, this time, I decided to use ink pads.
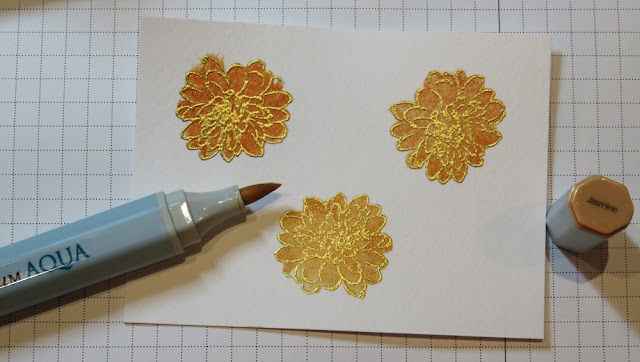
Step 4: Using the smaller flower base, ink with the Terracotta Spectrum Aqua Marker. Spritz the watercolor cardstock with water & then stamp. Use a heat tool for quick drying.
Step 5: Stamp the outline floral image with gold ink and heat emboss with gold embossing powder.
Step 6: Repeat step #4 with Marigold Spectrum Aqua Marker & stamp/emboss the floral outline with gold.
Step 7: Repeat step #4 with Jasmine Spectrum Aqua Marker & stamp/emboss the floral outline with gold. Trim each flower with scissors.
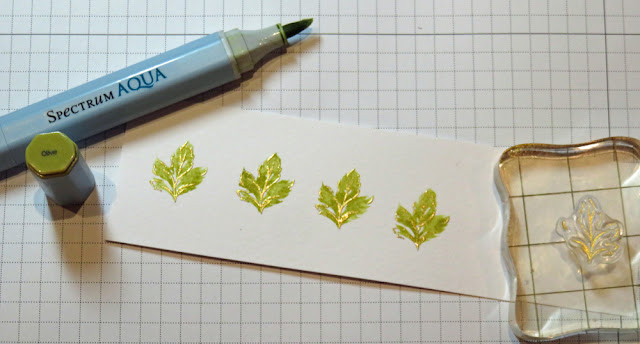
Step 8: Stamp 4 leaves with the Olive Spectrum Aqua Marker & stamp/emboss the leaf outline with gold. Trim with scissors.
Spectrum Aqua Marker colors used for my card (Note: I didn't end up using the Moss, it was darker than I wanted)
Close up of the watercolored markers & embossed outline.
Enjoy the gorgeous inspiration samples from the team and then comment on each blog for your chance to win a $20 Gina K Designs gift certificate! To see who won, check the Big News Forum at StampTV a few days after the hop. So... Are you ready for more awesome creations? Just click on the links below
...
Don’t forget to pop over to the Gina K Designs Store and check out
all of the new products available this month in the “What’s New” section at http://www.ginakdesigns.com.
Thank you for stopping by!


43 comments:
Oh so gorgeous Kendra!! Love this with the gold embossing!
Beautiful Kendra! Thanks for the tutorial and I love the Gold embossing on the flowers and leafs! Beautiful! :) <3
I really like this tutorial. It is so nice to look at your tutorials and stamp and color along with you.
Lovely colors
Your work is just terrific- you shared wonderful ideas. Thank you
So pretty! A great tutorial!
Oh this is so pretty! LOVE how you did the vine leaves around the card! thanks for the tutorial!!
Dang those flowers are so pretty and the gold embossing is fantastic! I'm going to try this. Thank you for the tutorial!
Thanks for the detailed tutorial...they really help me in understanding what different techniques will do to enhance the project.
Your color choices are amazing! Thanks for sharing your great ideas with us.
love the gold embossing... nice!
Love the gold ink. Great tutorial as always. I have never used gold ink before. Time to go find some! Beautiful Kendra
Beautiful card - always love the tutorials. Thanks for sharing!
Beautiful cards and great directions.
Love love love the gold embossing.
The gold embossing is perfect for these beautiful flowers, thanks for a wonderful tutorial Kendra!
Gorgeous card, Kendra! Love the embossing and great tutorial!
Just beautiful! Love the gold. Adds so much to the card.
Great idea to emboss part of the images! Lovely cards.
I can't wait to try this. I will probably order this stamp set after seeing what you did with it. Thanks for the inspiration.
Fabulous technique -= love the gold embossing
Love the fun and different way to use the set!
Love your cards and the awesome coloring tutorials.
Such pretty cards, love your color choices.
Thanks for the inspiration.
Awesome card. The flowers and leaves are gorgeous with the gold. Thanks for the great tutorial.
Love that gold embossing! Can't wait to try that. Thanks, once again, for showing us how to do it! Wouldn't have thought to use the watercolor markers. So pretty!
The gold embossing with the flowers is lovely.
So, so pretty!"how to"!
Beautiful--I like the gold embossing.
Gold inks and embossing powders are the top of elegance to me! You sure did a lot of work and it's a treasure!!!
Gorgeous! The gold embossing is really great on this.
Gorgeous flowers! Love the gold embossing detail!
Love these cards. Everything looks better when heat embossed in gold,night? Beautiful work...
It was great to see you see the aqua markers. They came out fantastic. I need to start using mine more often!
Ladyjs711@yahoo.com
Thank you for the tutorial, your card is gorgeous
Kathleen
Wow! the gold embossing takes this to a whole new level! Love it!
Those new layering stamps are so beautiful!
Kendra, love the gold embossing! Using the gold ink and then embossing really makes the color stand out. Your card is just beautiful!
Wow fantastic card thanks so much for sharing your secrets I can't wait for my kit to come so I can play too!
Beautiful card.
Love the vines on the background.
The gold embossing on the flowers is
great. The shading is so good.
thanks for sharing a wonderful card.
Love that sentiment and the way you embossed it in gold and all the other embossing and coloring. Absolutely stunning!
Another stunning card! Beautiful embossing!
Such a pretty card. LOVE the gold embossing:)
Such a beautiful card! Love the gold embossing. And your tutorial is wonderful! Thanks for taking the time to show the details in your creation!
Post a Comment