Sunday, September 15, 2013
Embossalicous Embossing Folder Winner!
Sue Bridges was randomly selected as the winner!
Beautiful card, thank you for sharing your techniques!
Posted by Sue Bridges to Kendra's Card Company at September 11, 2013 at 9:25 AM
Thanks for all of the lovely comments last week. They always put a smile on my face!
Labels:
Crafter's Companion
Saturday, September 14, 2013
Best Fishes...
Hi There! Just popping in on a Saturday to send Best Fishes to you for a wonderful weekend... LOL! Today's fun little project uses a few digital images from Hambo Stamps (Fish Trio & a sentiment from Fish Birds).
I used my Spectrum Noir markers to color and used a Palette Blending technique to blend the red/orange/yellow. Colors used ~ CR10, CR11, OR3, CT4.
Labels:
Gifts,
Hambo Stamps,
Spectrum Noir
Friday, September 13, 2013
Last Day for the Giveaway & some Sneak Peeks!
Today we are sneak peeking a new collection at Crafter's Companion called the Makey Bakey Mice... kind of a silly little name for some pretty adorable mice! There are 12 stamps sets (6 Christmas & 6 Everyday) along with two CD ROMs with such cute images. My cards today use the everyday collection CD ROM. For my first card, I paired the image up with my Petite Dots Embossalicious Folder and some pretty May Arts trim and ribbon. Super fast and simple because the image is just printed off the computer. I like to use linen coverstock (65 lb) when printing from my photo printer for a little texture.
My second card also uses the Everyday Collection CD ROM along with the Embossalicious Folder called Grande Dots ~ which by the way, I'm giving away tonight ... so leave a comment today.
I know you want it ~ just leave a comment here today for your chance to win.
I'll post the winner of the embossing folder on Monday ~ thanks for buzzing by today!
Labels:
Card Creations,
Crafter's Companion
Thursday, September 12, 2013
Blog Prize Giveaway This Week!
Hi Friends!
Ready to win this fabulous Embossalicious Embossing Folder?
It's called Grande Dots and it's one of my favorites.
Just leave your comments here on my blog through tomorrow night (9/13/13) at midnight (ET)
and I'll pick a random comment as the winner.
The winning name will be posted here this weekend & notified by email, if possible.
Ready to win this fabulous Embossalicious Embossing Folder?
It's called Grande Dots and it's one of my favorites.
Just leave your comments here on my blog through tomorrow night (9/13/13) at midnight (ET)
and I'll pick a random comment as the winner.
The winning name will be posted here this weekend & notified by email, if possible.
Here's how this folder looks when embossed.
Here's a little blast from the past with a card I made (and blogged)
earlier this year using the Magnolia set by Sheena.I colored my image with Spectrum Noir Markers and colored pencils.
Good Luck!
Labels:
Card Creations,
Crafter's Companion
Wednesday, September 11, 2013
Whooooo's There?
Don't forget about my blog candy ~ see details HERE ~ or you can leave a comment on this post too!
Good Wednesday Morning to you! Yesterday I realized that I didn't have a card ready for today, so I pulled out this cute little image from Crafter's Companion that I've had sitting on my desk for a few weeks called What a Hoot. I think it's kinda cute.
Supplies:
Stamps - Crafter's Companion (Stamp-It Australia What A Hoot; Sentiment Swirls)
Ink - Memento Tuxedo Black
Spectrum Noir Markers - TN2, TN3, TN5, TN7, TN8, TN9, EB2, EB3, EB4, EB5, GB9, CG4, LG5
Cardstock - Bazzill
Pattern Paper - Echo Park (Reflections)
Labels:
Card Creations,
Crafter's Companion
Tuesday, September 10, 2013
New Release Day for Whimsy & Stars Studios!
I'm super excited about this sweet new release digi image from Whimsy & Stars Studios.
The image is called Pumpkin & Sunflower Teddy
and can be found today in the Whimsy & Stars Studio Store for instant download!
Take a peek at the Whimsy & Stars Blog for all the pretty creations by the design team! And, head on over to the store to see some returning fall favorites!
Supplies:
Cardstock ~ Bazzill
Pattern Paper ~ Doodlebug (Happy Harvest)
Spectrum Noir Markers ~ EB3, EB8, TN1, TN2, TN3, TB1, TB2, TB3, TB4, GB3, GB6, PP3, PP5, OR1, OR2, OR3
Trim ~ May Arts
Monday, September 9, 2013
A GIVEAWAY & Embossing Tutorial
Hi Friends ~ I hope it's a Happy Monday for you! I'm super excited about sharing my card and tutorial today! AND... I'M GIVING AWAY AN EMBOSSING FOLDER ~ so read the details at the end of this post.
It's all about EMBOSSING over on the Crafter's Companion Challenge Blog this month. So I used one of the fabulous Embossalicious Embossing Folders (Lattice) and my Ultimate Crafter's Companion Boards ~ which has about 1,001 uses for all kinds of cards, boxes, bags and bows...
My card uses the gorgeous set from Sheena's collection called Wild Rose & Hibiscus and colored with my Spectrum Noir Markers {BT3, BT4, BT5, CT3, CT4, GB6, CG3, CG4, DG3}.
It's all about EMBOSSING over on the Crafter's Companion Challenge Blog this month. So I used one of the fabulous Embossalicious Embossing Folders (Lattice) and my Ultimate Crafter's Companion Boards ~ which has about 1,001 uses for all kinds of cards, boxes, bags and bows...
My card uses the gorgeous set from Sheena's collection called Wild Rose & Hibiscus and colored with my Spectrum Noir Markers {BT3, BT4, BT5, CT3, CT4, GB6, CG3, CG4, DG3}.
I thought I'd share some of Crafter's Companions great products in my post today.
The eBosser (along with the cutting plates are shown below). This machine is SWEET!
Just turn it on and it will feed through automatically.
I placed a piece of white cardstock inside the Lattice Embossalicious Folder and fed it through my eBosser. It comes with all the plates needed and instructions for the correct "sandwich" recipes on how to stack your plates based on what you're doing (embossing or cutting).
Get it started in the machine and then let go...easy peasy!
AND...the plates are 8 1/2" x 11" so you can use the fabulous 8"x 8" Embossalicious Folders
or the GIANT 8 1/2" x 11" sized embossing folders!
AND...the plates are 8 1/2" x 11" so you can use the fabulous 8"x 8" Embossalicious Folders
or the GIANT 8 1/2" x 11" sized embossing folders!
I love this Lattice Embossalicious Folder because
you can get two different looks with the same folder.
Next I used my Ultimate Crafter's Companion Tool with the Ulti-Bags Board.
I pulled out a piece of vellum and then used the embossing tool
that comes with The Ultimate to emboss the triple frame.
Then I trimmed it with my scissors.
By the way ~ there are TONS of different boards available.
I pulled out a piece of vellum and then used the embossing tool
that comes with The Ultimate to emboss the triple frame.
Then I trimmed it with my scissors.
By the way ~ there are TONS of different boards available.
Next it was time to make the flowers.
I stamped my images with Memento Tuxedo Black ink and colored them
with my Spectrum Noir Markers.
For the leaves, I used CG3, CG4, DG3
with my Spectrum Noir Markers.
For the leaves, I used CG3, CG4, DG3
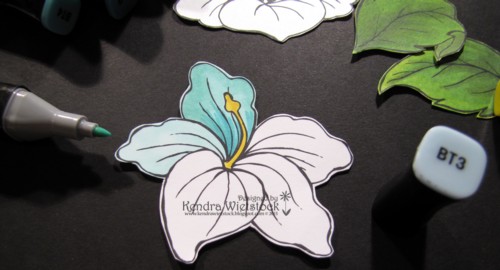
First I started with BT4 around the edges of the flower petal.
Then I added BT3 inside and blended the colors together.
I color one petal at a time so the ink is wet and will blend better.
For the inside of the flower, I added CT3, CT4, and GB6
The final step, I added BT5 and starting from the center,
flicked my bullet tip toward the outside edge.
Here are my finished pieces...ready to assemble.
You can also use The Ultimate to score your card bases.
I started assembly wit the leaves.
Then added the flowers with foam dots.
I used a double layer of pretty May Arts Ribbon
(Turquoise Stitched Sheer and Black Gingham)
and wrapped it around my embossed card panel.
Then I added my stamped image & attached the entire panel to the card base.
(Turquoise Stitched Sheer and Black Gingham)
and wrapped it around my embossed card panel.
Then I added my stamped image & attached the entire panel to the card base.
Once again, here's the finished product!
Whew... that was long, huh?
BLOG GIVEAWAY TIME!!!
OK ~ ready to WIN A PRIZE??? I have a fabulous Embossalicious Embossing Folder called Grande Dots as my prize this week. Just leave a comment on any of my blog post this week, from now until Friday, September 13th at midnight (EST). You can enter once each day.
GOOD LUCK!
Saturday, September 7, 2013
Sketch Saturday Challenge & some Whimsy...
Hi Friends!
Today Whimsy & Stars Studios is sponsoring the Sketch Saturday Challenge
My card features the adorable Acorn Squirrel digital image (which is available for instant download).

Today Whimsy & Stars Studios is sponsoring the Sketch Saturday Challenge
My card features the adorable Acorn Squirrel digital image (which is available for instant download).
Just add your link to the Sketch Saturday link this week for your chance to win a digi from Whimsy & Stars Studios.
Supplies Used:
Digi Image: Whimsy & Stars Studios (Acorn Squirrel)
Cardstock: Bazzill
Pattern Paper: Doodlebug (Fall Collection)
Spectrum Noir Markers: EB2, EB3, EB4, EB5, EB6, EB7, EB8, DG2, DG4, OR2, OR3, TN2, FS3
Friday, September 6, 2013
love you best...
New stamps and dies from Avery Elle Stamps arrived in my mailbox this week & they just HAD to find ink ~ this company is one of my stamping weaknesses! I was in a hurry when I made this card, so I'm not super in love with it...but it's growing on me. LOL!
Gotta run...lots of deadlines today! Thanks for buzzing by...
Supplies:
Stamps & Dies ~ Avery Elle (Aim High Stamps & Ella-ments Dies); Oh Yeah Stamp set.
Cardstock ~ Bazzill
Ink ~ Memento
Pattern Paper ~ My Minds Eye
Embossing Folder ~ Lifestyle Crafts
Twine ~ The Twinery
Labels:
Avery Elle Stamps,
Card Creations
Thursday, September 5, 2013
The Rubber Cafe ~ Creative Cafe Halloween Kit!
Hi Stampy Friends! Super excited today to FINALLY share one of my projects from the brand new Creative Cafe Kit by The Rubber Cafe! The very first kit in this product line is for Halloween and the name of it is called Best Witches! I LOVE IT!!!!
The card I want to share with you today, I made with "subway art" in mind and ALL of the supplies I used (other than ink & adhesive) are INCLUDED in the kit! Before I started the stamping for this project, I prepped the rest of my card so everything would be ready to go. I cut a piece of green cardstock 4 1/4" x 11" for the card base. Then I cut 2 additional mat pieces ~ purple (4/18" x 5 1/4") and black (3 7/8" x 5 1/8") and attached them. I trimmed a piece of the pretty striped pattern paper 2" x 3 3/4" and added at the bottom of the black mat. Then I set those pieces aside to assemble after the stamping was finished.
When making a card like this, the easiest thing to do is start in the upper left hand corner and then take each image/sentiment one at a time. I started with the large "Happy Halloween" sentiment and stamped it in Tangelo (orange) ink. After I had that "jumping off" point, the next thing I did was stamp the witch because it is the largest image on the card and I wanted to make sure I had enough room. Next, I began adding the rest of the images the sentiments (largest to smallest). I alternated colors and the direction of each image or sentiment as I went along. I also made sure that I didn't bunch up all the images (or sentiments) in one spot.
Once the larger images and sentiments were stamped, there were several open spots on the panel that I left there intentionally. This is where I added the other smaller images from the set like the star and two sizes of bats. I continued to alternate the colors and directions as I stamped.
A Little TIP: Be careful not to fill in every single little white space with an image, it will look too crowded.
Most of the images in the set are solid stamps so there was a nice array of color to my panel. One image needed to be colored, so I used coordinating marker colors for the little witch shoes.
Here's a close up of the finished panel.
Once the stamping on the panel was completed, I added it to my finished card panel. To cover up the cut edge of the panel and pattern paper, I wrapped a black seem binding ribbon around the card panel and then tied a small piece of orange and purple seem binding in the knot. Once the ribbon was secure, I attached the card panel to the base with Kool Tak Foam Tape.
I added the "BOO" sentiment from the Best Witches Add-On Stamp Set from the kit and I stamped it with Memento Tuxedo Black ink. It is trimmed with a scallop oval punch and popped up with Kool Tak Foam Tape. Last, but not least, I used the pretty little Purple Goosebump Gems from Queen & Co on the bottom corners of my card for a little bling ~ and by the way, they also comes with the kit!!
A little TIP: I always stamp my image or sentiment and then trim with a punch or die cut. That way it is lined up perfectly.
Wednesday, September 4, 2013
Pretty Fall Sunflowers
Hi Friends! I'm here today with a "sunny hello"... and just have to say how thrilled I am to be back on the Whimsy & Stars Studios team again for the Fall Term. I can't wait to share lots of fun projects with Mabelle's beautiful images.
My card today uses the Sunflower Teapot Digital image. I colored my image with my Spectrum Noir Markers (colors listed below) and then paper pieced the teapot. As a little added touch, I added dark brown flock to the center of each sunflower.
Thanks for stopping by today! This image as well as all of Mabelle's images can be found at Whimsy & Stars Studios , and are available by instant download!
Supplies:
Whimsy & Stars Studios Digi Image ~ Sunflower Teapot
Cardstock ~ Bazzill
Pattern Paper ~ Crate Paper (Farmhouse)
Spectrum Noir Markers ~ TN7, GB3, GB5, OR2, DG2, DG4
Flock ~ Dark Brown
Twine ~ May Arts & Button ~ Miscellaneous
Tuesday, September 3, 2013
Hambo & a SCS Challenge
Time for a fun little Tuesday card using an adorable digi image from Hambo Stamps called Floating Pig. This is a super popular digi image, and I've seen lots of adorable cards with it...I just couldn't resist getting him for myself. I'm also playing along on the SCS Featured Stamper Challenge (FS343) this week. Here is the inspiration card by Lee Murphy and here is my card... I loved the layout!
This is what I started out with, but decided the paper pieced pig was a little much... but I decided to show it to you anyway.
Supplies:
Hambo Stamps Digi Image ~ Floating Pig
Spectrum Noir Markers ~ CG3, CG4, BT4, BT5, CT4, BG6, PP4, PP5, PP6
Pattern Paper ~ Echo Park (Here & Now)
Postage Die ~ My Favorite Things
Gems ~ Kaiser
Ribbon ~ Stampin' Up!
Monday, September 2, 2013
Silhouette Grasses...
Happy Labor Day! Just a quickie CAS card today showing off a pretty set from Crafter's Companion called Silhouette Grasses. I stamped the wildflower image on pattern paper (Echo Park Here & Now Collection) with Tuxedo Black Memento Ink. The sentiment is from the Poppies & Daisies stamp set and the embossed bottom border is an embossing folder called Wire Fence.
Have a great day ~ thanks for buzzing by ...
Labels:
Card Creations,
CAS,
Crafter's Companion
Sunday, September 1, 2013
Whimsy & Stars Studio... I'm back!
Hi Friends! Hope you're having a wonderful weekend so far. I'm excited to share that I am back on the Whimsy & Stars Studio Design Team for the Fall term. The owner/illustrator, Mabelle Ramirez-Ortiz comes up with the most adorable images & I'm so honored she asked me to join her team again.
The super cute project I want to share today uses the adorable digi image called Acorns Pumpkin Teddy. Isn't he fabulous? It's super easy to paper pieced digital images. I just printed the image on cardstock, then taped a piece of pattern paper over the part I wanted to paper piece and then printed it again & fuzzy cut the image ...VOILA!
Bear ~ TN2, FS3, FS2, PP3, PP5
Acorn ~ EB3, EB5, TN7
Greens ~ DG2, DG4