Wednesday, December 24, 2008

Keepsake Ornament...

While completing another assignment for the Lizzie Anne Design Team ~ I was really trying to come up with some different ideas. This year our families on both sides decided to go light on gifts, so I handmade all of the gifts we gave to the grandparents, our adult siblings and my neices and nephews. This sweet ornament was a gift for the grandparents.

Supplies Used: Stamps ~ Lizzie Anne Designs (Glad Tidings); Cardstock, Ink & Pattern Paper ~ SU.

Tuesday, December 23, 2008

Beautiful Packages...

I love beautiful packages & I like making my own wrapping paper too. However, I really don't enjoy wrapping gifts. I know it sounds odd doesn't it?

I had a ton of fun with today's project because I didn't really have any paper at home to wrap these gifts except for a roll of Kraft paper from Michael's. I was too lazy to go out, so I decided to make my own (and get another Lizzie Anne Design Team project done while I was at it).

I used the Glad Tidings set from Lizzie Anne Designs ~ it's perfect for this project! So here are my tips for making your own gift wrap.

1) Unroll a good amount of paper and tape it to a large flat surface. (Did you notice all my unfinished projects in the background? You have probably seen all of the finished projects on my blog by now.)

2) Select 2 colors of ink and stamp a random pattern all over the gift wrap. Make sure you stamp them close enough together & make sure you go in all different directions.


3) Coordinate your gift tags and ribbon ~ I like using fabric ribbon rather than normal gift wrapping ribbon. It gives it a much richer feel. This new ribbon by Stampin' Up! was perfect for this project.

And there ya go ~ a pretty & inexpensive package! It will be a big hit with the recipient!

Supplies Used: Stamps ~ Lizzie Anne Designs (Glad Tidings); Ink, Ribbon & Scallop circle punch ~ SU; Kraft Gift Wrapping ~ Michael's.

Monday, December 22, 2008

Today's new layout...

I'm excited to show you the latest scrapbook layout that I made last night. I used some of my new Unity Stamps & love the little added touch they add. I don't have that many {yet}, but I did use a few on this page.

OK ~ So the story behind this page is pretty funny. My son, Matt, is in Cub Scouts & my husband is the Assistant Cub Master. Each year the troop has a cake auction and all the proceeds benefit a local family in need. This year, Matt & Tim wanted to go all out on their cake. I gave them some pointers, but pretty much left things up to them. Tim found directions online for this cool Christmas Tree cake & thought they would have a great time making it. So that night, they made a cake and put it in the freezer so they could decorate it later that week.

So a few nights later the guys began cutting the shapes and decorating the cake. I was down in my studio creating and decided that I would just stay away ~ I was a bit afraid! About an hour later {and much restraint on my part}, I heard roaring laughter coming from my guys in the kitchen. I went upstairs to see the masterpiece ~

I immediately grabbed my camera to take a few shots!


They decided against trying the Christmas Tree cake again and opted to go with the Boy Scout Theme. I think you'll agree that this came out much better! And ~ Matt won for the best cake the night of the auction!

Supplies Used: Stamps ~ Unity Stamp Company (Flirty Flowers, Our Life ~ Our Story); Cardstock, Pattern Paper, Chipboard & Letter Stickers ~ KI Memories; Ink ~ SU.

Sunday, December 21, 2008

Quick and Easy Christmas Treats...

Good Sunday Morning!

Over the last several weeks I have been trying to create some quick and simple treats so I'd have them ready for teachers, school office staff, church volunteers, neighbors and friends. While I was preparing all of these ideas, I decided to get some design team assignments done for Lizzie Anne Designs at the same time. Gotta love multi-tasking!!!

My first project today are little candy jars. They are simply Ball Canning Jars filled with yummy M&Ms & then I decorated the jars. I used the set Glad Tidings by Lizzie Anne Designs. I used two different ribbons to decorate the jars (wide red and narrow green). Then I added a button where the seams meet.

The second project is a little bag filled with Cami Patties ~ decorated York Peppermint Patties. I call them Cami Patties because my sweet friend Cambria Turnbow came up with this brilliant idea!My final project is really nothing new, but it's a big hit as a quick and simple gift.

The chocolates inside are Hersey Nuggets (these fit the best inside) & they are just decorated with Avery address labels. Easy Peasy!

Come on back over the next few days more easy gift ideas, decorations and gift wrap!
Supplies Used: Stamps ~ Lizzie Anne Designs (Glad Tidings); Cardstock ~ SU; Ink ~ SU; Pattern Paper (jars) ~ American Crafts; Ribbon ~ SU.

Saturday, December 20, 2008

Secret Santa Gift...

A group of my wonderful online friends all did a Secret Santa gift exchange last night at our virtual Christmas party. I've had this gift set done for a few weeks, but didn't want to share until I knew she had it. My Secret Santa girl was Cindy from Starlit Studio ~ talk about pressure to get the perfect gift!!! What do you give a SUPER DUPER talented stamper ~ YIKES!

MERRY CHRISTMAS CINDY ~ LOVE YA!!!!
The coffee bags has COFFEE inside ~ who would have guessed? LOL!

Supplies from i{heart}papers: Pattern Paper ~ Be Merry (My Mind's Eye); Stamps ~ Hero Arts (Winter's Butterfly) & Inkadinkado (Christmas Characters); Nestabilities; Palette Ink ~ Burnt Umber; Gems ~ Hero Arts; Glitter Pen ~ Clear
OH ~ and one more thing! Carolyn from the i{heart}papers Design Team is having blog candy this weekend. Go take a look and enter for her fun Valentine candy!

Friday, December 19, 2008

Inchie Friday ~ Christmas Eve, part 2...

I had so much fun with last weeks page, that I wanted to finish the 2-page spread and document our Christmas Eve traditions. We always enjoy so many things on Christmas Eve. In fact, I may need to do a few more pages just to document everything else.

This weeks page focuses on some stamp techniques that I haven't done with my Inchie Squares ~ paper piecing and cutting out stamped images. Isn't this cup of cocoa too fun? I colored the image to match the page (thus why it's pink). Then I used my Glaze pen to make the dots stand out ~ it looks so yummy to me!
This is my page from last week's Inchie Friday (click here for more photos of this page). One thing I did change on this page from last week ~ I added stamped snowflakes on the blue border and I like it much better.

This is what scrapbooking is all about to me ~ documenting my family history. I know that years down the road, our family will love looking at this page and reading about what we did every Christmas.

I used my Inchie squares on my journaling block to do two things: 1) bring attention to the journaling; and 2) tie the journaling to the specific photo.

I stamped the ice cream cone on cardstock this time and after I colored it with my Copic markers, I cut it out. It was such a long, narrow image that I thought it looked better popped up off some coordinating pattern paper.

On this last Inchie square, I decided to paper piece the mittens. When you have a larger amount of empty space on your image, paper piecing is a fun technique to try. It adds a lot to your image without having to color it.

Supplies: white Inchie Squares ~ Inchie Arts; Cardstock ~ Stampin' Up!; Stamps ~ Lockhart Stamp Co. Supplies from i{heart}papers: Pattern Paper ~ Be Merry Collection by My Mind's Eye; Palette Ink (Burnt Umber); Stamp set ~ Hero Arts (Winter's Butterfly); Velvet Ric Rac ~ May Arts.

Thursday, December 18, 2008

Christmas Cheer for the teachers...

This year for teacher gifts I found these adorable plastic cups and matching trays at Target (my favorite store). Then I made some cookies and put them in some fun little cookie bags. The cups are filled with an assortment of chocolates.

To complete the little set, I added a Target gift card and wrapped everything up in clear plastic wrap ~ VOILA! Easy, yummy and cute ~ it doesn't get better than that!

All supplies are Stampin' Up!

Wednesday, December 17, 2008

Merry Christmas to all...

First I have to say ~

HAPPY BIRTHDAY PAULA!!! I miss you & I really wish we were spending the day together!


Today I thought I'd share our family Christmas card with everyone. I ended up making about 45 of these & then sent out lots of Christmas cards that I already had made for design team projects. I love these & would have made more of them, but I ran out of pattern paper & just needed to get them in the mail!

As you can tell from the gobs of projects I've done with this pattern paper, I LOVE IT! It's called Be Merry from My Mind's Eye & it's still available from i{heart}papers. I love the pink and blues for the non-traditional Christmas colors ~ so fun!

Here are a few more versions of the card. It's all the same card ~ I just used several differen't patterns in the same line of paper.


Supplies from i{heart}papers:
Pattern Paper ~ Be Merry (My Mind's Eye)
Hero Arts ~ Winter's Butterfly
Other Supplies:
Cardstock ~ SU
Stamps ~ Lizzie Anne Designs (sentiment from Holiday Cheer); Papertrey Ink (large snowflake from Snowfall Additions by my friend Pine!)
Punches ~ Marvy snowflake, SU Oval

Tuesday, December 16, 2008

Unity Sketch Challenge

Since I had some new stamps from Unity Stamp Company, I decided to play along on a sketch challenge yesterday over on Splitcoast Stampers ~ HERE's the link for the Challenge.


Supplies: Stamps ~ Flirty Flowers (Unity Stamp Co); Cardstock ~ SU; Ink ~ Palette (from i{heart}papers.com) & SU; Buttons ~ Foof-a-La & Hero Arts.

A little more fun...

Once again, I took a break from my crazy schedule to spend some time scrapbooking. This time I selected some pictures from our cruise last summer to New England and Canada. All of the stamps are from Unity Stamp Company (Flirty Flowers and Our Life, Our Stories stamp sets).

Here's a better shot of the title ~ I just love the little buttons on the stamped flowers.

Because I had so much journaling for this page, I did it on the computer. Make sure you always print out your journaling on plain paper first to make sure it is set up correctly ~ you don't want to waste card stock or pattern paper.

Here's a look at the pattern paper that I also stamped ~ it just adds a little extra touch to the paper & ties the page together.

I'll have more holiday goodies to show you later today or tomorrow ~ don't worry!

Monday, December 15, 2008

i{heart}paper challenge day...

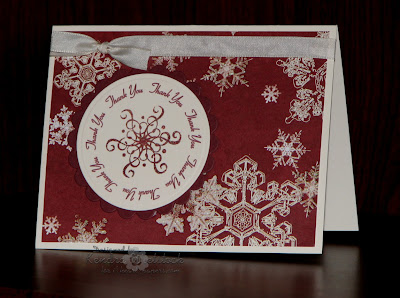
Today at i{heart}papers, the design team is having a new challenge and we are making Christmas thank you notes. It's a great way to use all those wonderful Christmas cardmaking supplies after the holiday. Now I love to scrapbook, so I will be using mine for quite some time.

I used this beautiful paper from the Alpine Frost line by SEI called Dust of Snow ~ isn't it gorgeous? And, for the stamped snowflake, I used my current favorite Hero Arts set called Winter's Butterfly. I've used this set a bunch because it's great for both a main image and backgrounds! Actually, I will probably end up using it all winter long!

For the Circular Thank You sentiment, I used Word Art on my computer and printed it directly on my cream cardstock in burgundy ink. Here are the instructions:

Go to Insert>Picture>Word Art. Select the half-circle shape with simple black letters (the third shape in the top row). In the box, shoose your font and size, then type your text and click OK. Click on your words to select them, and the Word Art tool bar will appear. Click the WordArt Shape button, and choose Circle (Curve) from the menu. The words will be all messed up. Click on your text again to select it, and go to Format>WordArt. Click the Size tab and enter the height and width (set them the same for a circle). I used 1.2" x 1.2" so I it would fit inside the punch I was using. Click the Colors and Lines tab. Under Fill, select a color for your type. Under Line, select No Line. Then click OK. (I found this tip in Simple Scrapbooks Magazine).

Look for all the fabulous projects by the i{heart}papers designers ~
Sarah Anderson;

Cathleen Torina

Loretta Lock

Amber Kroening

Lori Tecler

Deb Felts

Tracy Schultz

Meredith Socha

Carolyn Mustopa

Sunday, December 14, 2008

In the midst of craziness...

I took a little time for myself this week to scrapbook. I shouldn't have because I have so much to do for Christmas, but I did it anyway. And you know what? I didn't feel one bit guilty! I enjoy scrapbooking so much~ it was my first papercrafting LOVE! So you know what I decided? I'm going to sit down and do more of it ~ just because I love it.

Another thing I love are my new stamps by Unity Stamp Company. I was browsing their site last week and found these fun stamps that I thought would be perfect for scrapbooking. WOW ~ do they stamp NICE & the sets have tons of images!

I did a layout earlier this year with one of these pictures of my beautiful daughter; however, I had so many from that day, that I really wanted to use more of them & decided to create another layout. The layout idea came from the current Stampin' Up! Catalog & Idea Book (with a few tweeks here and there).

Isn't this journaling block stamp cool? It's big enough to write out all the details of an event. I hand wrote my journaling ~ which is something I don't do often, eventhough I know I should. And look at that cool flower! I stamped it in chocolate pigment ink and heat embossed it with clear embossing powder so it would really stand out. Then to give it a cool look, rather than a straight cut, I followed the curves for a fun wavy look.

I also had fun with buttons! I stamped a piece of textured cardstock with the circle cluster stamp in the Flirty Flowers set ~ it made a great subtle pattern on the paper. Then I added all different buttons to the strip of green cardstock. For the brown polka-dot pattern paper, I stamped the row of flowers (also from the Flirty Flowers set) at the bottom and stamped the "memories" stamp ~ both in chocolate ink.

Supplies Used: Cardstock ~ SU; Pattern Paper ~ Heidi Grace; Stamps ~ Unity Stamp Company (Flirty Flowers & Our Life, Our Stories); Ink ~ Palette; Embossing plate ~ Cuddlebug.

Saturday, December 13, 2008

Riley on the slopes!

Here's another Riley image I've had colored forever, but completely forgot about. I also found this fuzzy paper in my stash that I've had forever and thought it would be perfect for this little guy on the slopes.
I hope you're having a great weekend and you're getting all your Christmas preparations done!

Friday, December 12, 2008

Inchie Friday ~ 'Twas the Night Before Christmas


And all through the house...were some very excited kids! We LOVE Christmas eve in our house. Each year we celebrate at a special Christmas Eve church survice and then we come home to open presents. After that, we have ice cream sundaes and then we set out cookies for Santa and spread Reindeer food on the lawn (making sure it's done in an area that the dogs can't get to it).

Today's Inchie Friday project is a fun scrapbook page with a picture of my kids last Christmas Eve. I plan on doing another layout that documents all of our triditions ~ the week just got away from me, so here is side one!

I used 3 little white Inchie squares with these wonderful Christmas images on them. Rather than go with the traditional green and red for the holiday, I love the light blue and pink that is on this page. It gives the page such a warm and pretty feel.


Well I finally got this last picture to load correctly ~ not the great picture I wanted to use, but at least you don't have to tilt your head! I'm getting very frustrated with Blogger because it keeps rotating my pictures. So if you see me switching to Typepad soon, you'll know my frustration level reached it's limit. Anyway, here is a closeup of my cute little Inchie squares.

Supplies Used: Inchie Arts ~ white Inchie Squares; Stamps ~ Lockhart Stamp Co, Hero Arts; Cardstock ~ SU; Pattern Paper ~ My Minds Eye (Be Merry) from i{heart}papers; Ink ~ Palette, Copics, glitter pen; Velvet ric-rac ~ May Arts; Cricut ~ Jasmine cartridge.
Blog Widget by LinkWithin
 
Blogger Template By Designer Blogs