Tuesday, December 16, 2008

Unity Sketch Challenge

Since I had some new stamps from Unity Stamp Company, I decided to play along on a sketch challenge yesterday over on Splitcoast Stampers ~ HERE's the link for the Challenge.


Supplies: Stamps ~ Flirty Flowers (Unity Stamp Co); Cardstock ~ SU; Ink ~ Palette (from i{heart}papers.com) & SU; Buttons ~ Foof-a-La & Hero Arts.

A little more fun...

Once again, I took a break from my crazy schedule to spend some time scrapbooking. This time I selected some pictures from our cruise last summer to New England and Canada. All of the stamps are from Unity Stamp Company (Flirty Flowers and Our Life, Our Stories stamp sets).

Here's a better shot of the title ~ I just love the little buttons on the stamped flowers.

Because I had so much journaling for this page, I did it on the computer. Make sure you always print out your journaling on plain paper first to make sure it is set up correctly ~ you don't want to waste card stock or pattern paper.

Here's a look at the pattern paper that I also stamped ~ it just adds a little extra touch to the paper & ties the page together.

I'll have more holiday goodies to show you later today or tomorrow ~ don't worry!

Monday, December 15, 2008

i{heart}paper challenge day...

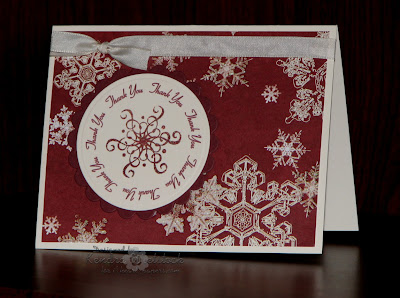
Today at i{heart}papers, the design team is having a new challenge and we are making Christmas thank you notes. It's a great way to use all those wonderful Christmas cardmaking supplies after the holiday. Now I love to scrapbook, so I will be using mine for quite some time.

I used this beautiful paper from the Alpine Frost line by SEI called Dust of Snow ~ isn't it gorgeous? And, for the stamped snowflake, I used my current favorite Hero Arts set called Winter's Butterfly. I've used this set a bunch because it's great for both a main image and backgrounds! Actually, I will probably end up using it all winter long!

For the Circular Thank You sentiment, I used Word Art on my computer and printed it directly on my cream cardstock in burgundy ink. Here are the instructions:

Go to Insert>Picture>Word Art. Select the half-circle shape with simple black letters (the third shape in the top row). In the box, shoose your font and size, then type your text and click OK. Click on your words to select them, and the Word Art tool bar will appear. Click the WordArt Shape button, and choose Circle (Curve) from the menu. The words will be all messed up. Click on your text again to select it, and go to Format>WordArt. Click the Size tab and enter the height and width (set them the same for a circle). I used 1.2" x 1.2" so I it would fit inside the punch I was using. Click the Colors and Lines tab. Under Fill, select a color for your type. Under Line, select No Line. Then click OK. (I found this tip in Simple Scrapbooks Magazine).

Look for all the fabulous projects by the i{heart}papers designers ~
Sarah Anderson;

Cathleen Torina

Loretta Lock

Amber Kroening

Lori Tecler

Deb Felts

Tracy Schultz

Meredith Socha

Carolyn Mustopa

Sunday, December 14, 2008

In the midst of craziness...

I took a little time for myself this week to scrapbook. I shouldn't have because I have so much to do for Christmas, but I did it anyway. And you know what? I didn't feel one bit guilty! I enjoy scrapbooking so much~ it was my first papercrafting LOVE! So you know what I decided? I'm going to sit down and do more of it ~ just because I love it.

Another thing I love are my new stamps by Unity Stamp Company. I was browsing their site last week and found these fun stamps that I thought would be perfect for scrapbooking. WOW ~ do they stamp NICE & the sets have tons of images!

I did a layout earlier this year with one of these pictures of my beautiful daughter; however, I had so many from that day, that I really wanted to use more of them & decided to create another layout. The layout idea came from the current Stampin' Up! Catalog & Idea Book (with a few tweeks here and there).

Isn't this journaling block stamp cool? It's big enough to write out all the details of an event. I hand wrote my journaling ~ which is something I don't do often, eventhough I know I should. And look at that cool flower! I stamped it in chocolate pigment ink and heat embossed it with clear embossing powder so it would really stand out. Then to give it a cool look, rather than a straight cut, I followed the curves for a fun wavy look.

I also had fun with buttons! I stamped a piece of textured cardstock with the circle cluster stamp in the Flirty Flowers set ~ it made a great subtle pattern on the paper. Then I added all different buttons to the strip of green cardstock. For the brown polka-dot pattern paper, I stamped the row of flowers (also from the Flirty Flowers set) at the bottom and stamped the "memories" stamp ~ both in chocolate ink.

Supplies Used: Cardstock ~ SU; Pattern Paper ~ Heidi Grace; Stamps ~ Unity Stamp Company (Flirty Flowers & Our Life, Our Stories); Ink ~ Palette; Embossing plate ~ Cuddlebug.

Saturday, December 13, 2008

Riley on the slopes!

Here's another Riley image I've had colored forever, but completely forgot about. I also found this fuzzy paper in my stash that I've had forever and thought it would be perfect for this little guy on the slopes.
I hope you're having a great weekend and you're getting all your Christmas preparations done!

Friday, December 12, 2008

Inchie Friday ~ 'Twas the Night Before Christmas


And all through the house...were some very excited kids! We LOVE Christmas eve in our house. Each year we celebrate at a special Christmas Eve church survice and then we come home to open presents. After that, we have ice cream sundaes and then we set out cookies for Santa and spread Reindeer food on the lawn (making sure it's done in an area that the dogs can't get to it).

Today's Inchie Friday project is a fun scrapbook page with a picture of my kids last Christmas Eve. I plan on doing another layout that documents all of our triditions ~ the week just got away from me, so here is side one!

I used 3 little white Inchie squares with these wonderful Christmas images on them. Rather than go with the traditional green and red for the holiday, I love the light blue and pink that is on this page. It gives the page such a warm and pretty feel.


Well I finally got this last picture to load correctly ~ not the great picture I wanted to use, but at least you don't have to tilt your head! I'm getting very frustrated with Blogger because it keeps rotating my pictures. So if you see me switching to Typepad soon, you'll know my frustration level reached it's limit. Anyway, here is a closeup of my cute little Inchie squares.

Supplies Used: Inchie Arts ~ white Inchie Squares; Stamps ~ Lockhart Stamp Co, Hero Arts; Cardstock ~ SU; Pattern Paper ~ My Minds Eye (Be Merry) from i{heart}papers; Ink ~ Palette, Copics, glitter pen; Velvet ric-rac ~ May Arts; Cricut ~ Jasmine cartridge.

Thursday, December 11, 2008

Hot Cocoa Kits...


I LOVE IT! Yes, I love it when I come up with a fun idea and it turns out the way I pictured it!

I purchased these acrylic boxes that had 3 tins of hot cocoa in each. I used 4 of the tins in my ice cream baskets and was trying to decide what to do with the other two when I looked at the container they came in ~ LIGHT BULB MOMENT! Woohooo! I added the fun polka-dot cups, the wire wisk that came with each box, some marshmellows and some peppermint chips! YIPPPPEEEE SKIPPPPPYYYY ~ easy Hot Cocoa Kits!


I used a great stamp set called Glad Tidings from Lizzie Anne Designs for this kit ~ way too fun! It's such an easy set to use. I also used a few images from another wonderful set called Holiday Cheer (also by Lizzie Anne Designs).


You gotta love Target ~ the Cocoa tins & the cups I found MATCH! I also found some other fun things that match this pattern too.


One kit will be for the kids piano teacher and I'm not sure who the other one will go to just yet ~ there are always those last minute gifts that I need. I've made a bunch of things this year & will just keep them on hand for teachers, office staff, our mail lady!


Supplies: Stamps ~ Lizzie Anne Designs (Glad Tidings, Holiday Cheer); Cardstock, Pattern Paper and Ink & Ribbon~ SU (Riding Hood Red & Kiwi Kiss) ; Nestabilities.

Wednesday, December 10, 2008

Merry Moosemas!

OK ~ I LOVE these Riley Moose images! They are way too fun ~ and so darn easy to color too. I've actually had them colored for months and just found them in the drawer the other day. I'm so glad I found them before Christmas was over!


Supplies Used: Stamps ~ Hanna Stamps (Riley Collection); Cardstock ~ SU & PTI; Pattern Paper ~ American Crafts; Embossing Plates ~ Cuddlebug; Ink ~ Palette & Copics; Ribbon ~ May Arts.

Today I want to say Happy 12th birthday Megan!
WOW ~ that went super fast!

I just found out that Amber from the i{heart}papers
Design Team is having blog candy this week.
Go check out her adorable card today and
enter for blog candy!

Tuesday, December 9, 2008

The twelth day of Christmas...

My true love gave to me... A card with 12 embellishments! That's what the challenge is today on the 12th and final day over on Paper Crafts Planet.

On my sweet little giraffe card, I used stamps from Our Craft Lounge called Treemendous Love. To correspond with the challenge, I used 6 buttons and tied 6 pieces of ribbon on them ~ so there you have it! So go take a peek at the cute cards over there & upload one of your own. Just make sure you put 12day12 in the tag .
My next happy little dog is also features stamps from Our Craft Lounge ~ it's the Pat the Dog set. This card wasn't part of the challenge, but I wanted to include it in this post anyway.

Supplies from i{heart}papers:
Stamps ~ Our Craft Lounge (Treemendous Love & Pat the Dog)
Pattern Paper ~ My Minds Eye ~Zest for Life & Paisley Patch

Monday, December 8, 2008

Holiday Family Gifts...

This year for Christmas, our family decided to give some super fun gifts ~ Ice Cream Baskets. I got the idea from Nicole Heady from Papertrey Ink & thought it was brilliant. Of course, I needed to put my own twist on the idea.

Basket:Stamp snowflake stamp around the band of the basket using a hybrid ink. Stamp round Holiday stamp (from Holiday Cheer set) on white cardstock & stamp sentiment in black ink in the middle. Cut out circle & red scallop circle using Nestabilities dies. Punch 1/8" hole & set red eyelet at the top of the tag. Attach to basket handle with red gingham ribbon.

Jar/Hot Cocoa/Hot Fudge Tags:Fill jars with toppings. Stamp round Holiday stamp (from Holiday Cheer set) on white cardstock. Cut out circle & red scallop circle using Nestabilities dies. Punch out layered circles & stamp sentiment in black ink & attach to center of large image. Attach to the tops of the jars with foam dots. Attach ribbon with adhesive around the band of the jar.


Gift Card Holder:Using the gift card or gift certificate as a guide for the measurement, cut cardstock and score so the cardstock is folded in thirds. Round the corners and stamp snowflake image inside and out in coordinating green ink. Close the gift card holder with a scallop circle and stamped image (Santa Hat from Holiday Cheer set).

Supplies Used: Stamps ~ Lizzie Anne Designs ~ Holiday Cheer and the snowflake from Build-a-Bauble; Ink ~ Palette ink (red, green and black,); Cardstock ~ red, white, and green; Nestabilities circle and scallop circle dies, circle punches, red gingham and stripe grosgrain ribbon, canning jars (Ball 1/2 pt. #61162 canning jars), ice-cream scoop, basket, bowls, 3 ice-cream toppings, hot fudge, hot cocoa mix, gift card to purchase ice cream.

Sunday, December 7, 2008

Buh Humbug!


This card totally makes me laugh! In fact, I was giggling all while I was making it! I used the beaver from one of the new sets from Our Craft Lounge called Bubs the Beaver! Bubs doesn't actually come with a Santa hat; however, I really wanted to make a Christmas card with him.

I used the following supplies from i{heart}papers ~ Stamps ~ Our Craft Lounge (Bubs the Beaver); Hero Arts (Winter's Butterfly) background; Stampendous (Winter Family) Santa Hat. Scalloped Pattern Paper ~ Sassafras Lass Garland Galore; Ink ~ Palette; Glitter Pen ~ (Clear); Nestabilities.

On a more serious note ~ today I am a 3-year cancer survivor, which comes with some mixed emotions because it isn't a day I feel like I can celebrate yet. I'm happy to have come so far, to have it behind me (for the most part), and to have learned so much. I know God had lots of lessons for me in that experience (and still does) and I also met some wonderful people because of it. However, my life was totally turned upside down from it and I wish I could make the constant fear go away that it will return. I keep praying that as the years go by, the fear will subside a little.

I won't go into the details for that horrible day I was diagnosed, but I know I wouldn't have gotten through it without my wonderful friends Paula Wade and Michelle Yager. They stayed with me , played with my kids, and helped me get ready for my daughter's birthday party until my husband got home from being across the country. Paula & Michelle ~ I love you both more than words can say and I will always remember that you were there for me that day. Everytime I think of that day, I remember how both of you showed me the perfect defination of friendship. I hope that I've lived up to the honor of your friendship. As the months progressed into surgeries, treatments and a rollercoaster of emotions, I had (and still have) a great network of friends. So I say to my Shistahs ~ I love you girls & thank you!

OK ~ now that I'm bawling, I want to finish by saying ~ please, please, please ladies, make sure you are doing self exams and that you get your yearly mammogram. If you have a history of breast cancer in your family, please get checked out BEFORE you are 40. If you find something, and the doctor ignors it, find another doctor ~ you are your own advocate!

Saturday, December 6, 2008

Your Wish...

Here's my last new Hanna card for this week. I saved it for today because it's Hanna Stamps turn over on Paper Craft Planet for the 12 Days of Christmas Challenge. (See the home page for all the instructions).

The challenge today is to make a card with a girl on it ~ well I think I have enough Hanna Stamps to fill the bill on this one! This set is called I Dream of Hanna ~ and it's SUPER DUPER FUN!!!

Did you notice the pretty pink pants? They are all shimmery because I painted them with pink Shimmerz Paint ~ VERY COOL!!!

So go get busy ~ I know you have some girl stamps ~ once you upload your card over at Paper Craft Planet, put 12day9 in the tag line. There will be some fun prizes for the winner!


Friday, December 5, 2008

Inchie Friday ~ Advent Calendar Photo Box

I have just been bursting at the seams to show you this project! I've had this fabulous Advent Box (from Karen Foster Designs), for about 3 months. I knew the second I saw it, I was going to use it for an Inchie Arts project! In fact, when I saw it, I grabbed it so fast that my friend Michelle was nearly knocked over! Sorry about that girlfriend!

Anyway, I just got these adorable Itty Bitty Christmas images by Lockhart Stamp Company & they are the perfect style for the Basic Grey Christmas paper I selected. This little snowman just happens to be my favorite (you will see him again).

The box measures 8" x 8" and has 25 individual pull-out drawers. They are perfect for hiding some special Christmas treats when counting down the days until Christmas.


Step 1: I cut out 25 pieces of coordinating pattern paper in 1.5" squares. Then I used my 3/4" circle punch to take a knotch out of the top of the paper. The drawers already come cut out. Then I attached the papers.

Step 2: I wanted this project to show some pictures of my kids and some of the Christmas traditions we have so I printed off 11 photos ~ size 1" x 1.25" & then trimmed them to a 1" square & attached them to an Inchie Arts white Inchie square. I placed them in various spots on the box.


Step 3: On six white Inchie squares, I stamped the Itty Bitty Check Border and then I added the cooresponding number for that box.

Step 4: After rearranging several times, I added small numbers to the rest of the boxes. I cut out either a red or a green 1/2" circle and stamped a small number on it in black ink.


Step 5: Next, for any box that didn't have a photo or a large number, I stamped an Itty Bitty image on an Inchie square and colored it with coordinating Copic marker colors.


Step 6: I attached all the Inchie squares with glue dots ~ (yes, I really did use 25 Inchie squares for this project).


Step 7: I added some bling with my glitter pen and my glaze pen ~ just to make the project sparkle.


Step 8: The last thing I added was a ribbon around the entire outside edge of the box and tied a bow at the top!


WOOHOOO! This is a project that will definately make me smile each year I pull it out! My kids will smile each day too when I open the drawers for new treats.

I hope you enjoyed my project as much as I enjoyed creating it!

Supplies : Inchie Arts ~ white Inchie squares; Paper ~ Basic Grey (Fruitcake); punches ~ SU; Stamps ~ SU & Lockhart; Ribbon ~ SU; Ink ~ Palette, Copics, atyou Spica glitter pen from i{heart}paper.

Thursday, December 4, 2008

Happy Trails to you...


Can't you just hear the song playing ... "Happy Trails to you...until we meet again." These new Riley stamps will be coming out tonight at midnight as part of the December Hanna Stamps release. The van and trailer are actually 2 separate stamps, but they come together perfectly!

Don't forget to stop by the Hanna Stamps release party tonight from 7 to 9 pm ~ there will be all kinds of fun surprises & challenges.

Supplies Used: Stamps ~ Hanna Stamps (Riley Collection), Hero Arts ~ Alphabet; Cardstock ~ SU & PTI; Pattern Paper ~ Scenic Route; Ribbon ~ SU; Ink ~ Palette & Copics.
Blog Widget by LinkWithin
 
Blogger Template By Designer Blogs