Thursday, February 12, 2015

The Big Score from Crafter's Companion!

Later this week, Crafter's Companion will be coming out with a brand new product called The Big Score.  It is an extended size scoring board that is perfect for making large boxes and projects.  Today I am sharing a fun project call the Picnic Box.   


Here is the finished box opened 


Here's how she made this cute box...

Step 1: Gather a ruler, cutting blade or scissor and our 12"x 16" Construction Cardstock.


Step 2: Trim the Construction Cardstock so the size is 11 3/4" x 15 1/4".


Step 3: From the top left edge of the board, place the shorter edge of the cardstock along the left side.  Score the cardstock at 2 1/2" and 5 1/8".


Step 4: Turn the cardstock to the other shorter edge (180 degrees) and score again at 2 1/2" and 5 1/8".


Step 5: With the long edge of the cardstock against the left side of the board, score at 2 1/2".  Turn the cardstock around (180 degrees) and score again at 2 1/2".


Step 6: From the RIGHT edge and using the numbers at the bottom of the board, score just inside the lines in the center of the box.


Step 7: With scissors or a cutting blade, trim between the center scored pieces and discard.


Step 8:  Cut V-shaped notches from the outside flaps.


Step 9: Use a corner rounder on the outside flaps.  This will give your box a finished look.  Note: If you are using Construction Cardstock, you will need to use a heavy duty corner rounder.


Step 10: Folder and burnish the scored lines & apply strong adhesive to the flaps.


Step 11: Using your finger as a guide across the top, carefully attach the flaps.
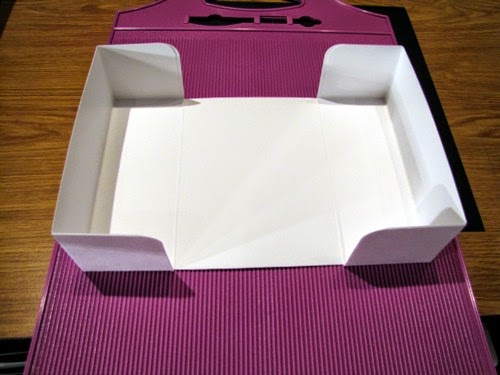

Step 12:  For the inside base box , trim a second piece of Construction Cardstock to 9 7/8" x 11 1/2".  Note you may also use 12x12 cardstock.  

Step 13: Using the right side of the board and the numbers across the bottom right, score the board all the way around at 2 1/2".


Step 14: Cut V-Shaped flaps and apply adhesive.


Step 15: Attach the flaps of the inside box.


Step 16: Attach the box to the inside of the picnic box with adhesive.  


Once the box is attached inside, the box will open and close.

Step 17: Trim two 1" x 12" pieces of cardstock for handles and secure them with brads.  Then decorate as desired.  Kendra used paper from the Sweet Treats 11x17 Card Pack to dress up her sweet picnic box.


Make sure you keep checking here on our blog, visit our Facebook pagefollow us on Twitter and on Pinterest for more sneak peeks, inspirations, and news!

Wednesday, February 11, 2015

Golden Anniversary Wine Box

Today I am sharing a Wine Box that I made for Crafter's Companion that would be perfect for a Golden Anniversary celebration using the brand new Big Score board that will be released later this week.  Here is a photo of the closed box...


and a photo of the box with the lid off the box...


Here's how she made her box...

Step 1: Gather some 12x16 Construction Cardstock and trim it to 11 3/4" x 15 1/2" .  If you have A3 size, you don't need to trim.


Step 2: Using the shorter side of the cardstock, hold it securely to the left edge.  Score it at 3 1/4", 6 1/2" and 9 3/4".


Step 3: Fold the last score mark (9 3/4") and hold that securely at the left edge of the board and score at 3 1/4".


Step 4: Turn the paper so the long edge is along the left side of the board and score at 3 1/4" all the way down the cardstock.


Step 5: Along the first 2 score marks, cut a V-shape.  Cut the 3rd score mark and then trim the last piece out completely (see below).  The 4th full square will be the bottom of the box.


Step 6: Add a strong adhesive to the smallest flap (bottom) and on each of the first 3 squares & assemble your box.  This is your base box  & the top will be open.


Step 7: To make the top of the box, trim a piece of Construction Cardstock to 8 1/4" x 14 1/2".  Using the bottom of the score board, securely hold the cardstock to the right edge and score at 3 1/4".


Step 8: Fold the edge, and then hold that edge to the right side and score again at 3 1/4".  Repeat 2 more times folding the cardstock after each score mark.


Step 9: The final score mark will leave a smaller flap.  That will be the flap on the inside with adhesive that holds the box in place.  Flip the cardstock and holding it along the left edge score at 3 1/4" all the way down.  Attach like you did the base in Step 5 & 6.


Step 10:  For the inside liner for the base, trim a piece of Construction Cardstock to 11 3/4" x 14 1/2".  Score at 3 1/8", fold and score again on that fold at 3 1/8" and repeat until the end of the cardstock.  Add adhesive to the smallest flap and attach to the opposite section to make a tube (it will be open at each end).


Step 11: Here are the 3 pieces for the wine box (left to right): Lid, Liner, Base Box.


Step 12: After you make sure the liner fits inside the base, add a bit of adhesive to the bottom 4 sides and fit it inside.  From the inside, push down on the cardstock to make sure the adhesive sticks.


Decorate as desired...

Crafter's Companion Supplies:
The Big Score
12x16 Construction Cardstock
Opulence 11x17 Card Pack
Sentimentals - Imagine Stamp Set
Die'sire Essentials - Butterflies
Die'sire Decorative - Circle Doilies

Monday, February 9, 2015

Bebunni Floral Coloring Tutorial

Hello Friends!  Sorry I've been silent for a few days, major computer issues going on and everything is taking way too much time to get done!

Anyway... today I have a tutorial to share coloring a new image from the Bebunni Floral collection called Birthday Blossom.


Step 1: Select Spectrum Noir Marker colors using the Spectrum Noir Color chart (available for download from the Spectrum Noir Website).   Below you can see the markers I selected for Bebunni and for the flowers.


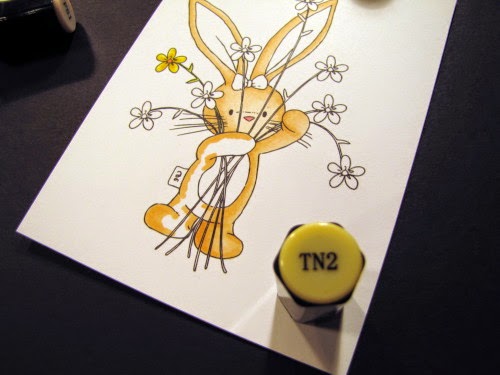
Step 2:  For Bebunni, start with the darkest color (TN2) and color the outside edges of one ear.


Step 3: Add the next darkest color (FS4) and color in the rest of the ear slightly going over the TN2 to blend the colors.


the finished ears


Step 4: Next, use the TN2 on the face and arm, then use the FS4 and lastly, add FS1 to blend all the colors.


Step 5: Repeat Step 4 on the other arm and body.  It is important to work on small sections so your ink stays wet because it will blend better.


Step 6: Use the FS4, FS1 and blender markers to add/remove color on Bebunni's tummy until you are happy with the result.


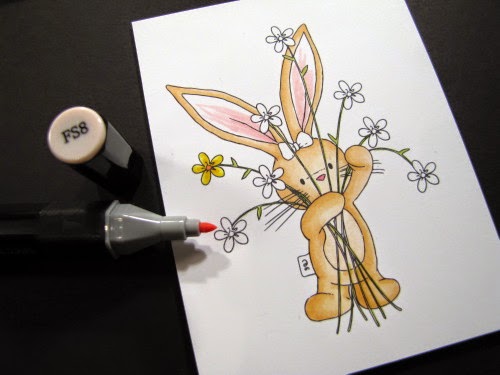
Step 7: Add FS8 to the inside of the ears, starting at the base and flicking the color toward the point of the ear.


Step 8: Add FS6 to the rest of the ear going over the FS8 to blend the colors.


Step 9: Color a few of the flowers with CT1.


Step 10: Add CT4 to the edge of each petal.


Step 11: Add GB6 to the inside lines of the flowers and OR2 to each flower center and the bow.


Step 12: Using the Spectrum Noir Blendable Colored Pencil (#58) color the stems of the flowers.  I used the pencil rather than a marker because the lines on the stems were so narrow.


I hope you found this tutorial helpful ~ happy coloring!
Blog Widget by LinkWithin
 
Blogger Template By Designer Blogs