Tuesday, December 31, 2013

Pretty Birthday Wishes!

Today is my birthday... so I thought I'd share one more birthday card using the latest Creative Cafe Kit called Wish Big from The Rubber Cafe.  This sweet little cupcake image is from the Wish Big stamp set and the sentiment is from the Birthday Wishes Add-On set.  The beautiful Bazzill cardstock (both kraft and yellow) as well as the ribbon and Doodlebug Flower Box pattern paper are also included in this amazing kit!


I stamped my image in Memento Luxe Tuxedo Black ink and heat embossed it with clear embossing powder.  Then I colored it with my markers.


For the last touch, I made a matching envelop using some of the stickers and coordinating stamps in the kit.


This kit is SO MUCH FUN!!!


Supplies:
Creative Cafe Kit - Wish Big (Bazzill Cardstock; Doodlebug Designs Flower Box Pattern Paper & Stickers; Ribbon; Wish Big stamp set & Birthday Wishes Add-On set.
Ink - Memento Luxe Tuxedo Black
Spectrum Noir Markers

Monday, December 30, 2013

i {love} you...xoxo

OK... Christmas is over & I am so ready to move on from making Christmas cards because I've been making samples since June ~ Crazy card industry!!!  Anyway... my favorite season of card making is Valentine's Day and I LOVE, LOVE, LOVE this card I made.  It is unconventional, Clean & Simple, and oh so much fun!

I used several products from Crafter's Companion, including the awesome new Sentimentals stamp sets called Friends & Family for the Hugs & Kisses sentiment and the Imagine set for the I Love you image.  I stamped the images using my Memento Luxe Inks ~ Love Letter & Bahama Blue and then embossed them with clear embossing powder.   To add a bit of texture, I used the new Teresa Collins embossing folder called Dotted Chevron and then the Petite Dots Embossilicious folder for the red heart.  Finally, I just added a punched edged with red cardstock behind it for a bit more interest.  I really love the results on this card!


Thanks for buzzing by today!

Saturday, December 28, 2013

Happy Bird-Day!

I'm here today share a little "Bird-Day"... I mean Birthday card with you.  Now that Christmas is over, it's time to gear up for birthdays in our house because we have 4 in the next few weeks.   I used the cute Hambo Stamps clear set called Bird-Day (HCL-015).


Supplies:
Hambo Stamps ~ Bird-Day Clear Stamp set (HCL-015)
Spectrum Noir Markers ~ CT2, CT4, CG3, CG4, IG5, IG8, BT1, BT3, BT6, OR2, DR2, DR6
Pattern Paper ~ Doodlebug (Flower Box)
Ribbon ~ May Arts
Cardstock ~ Bazzill

Friday, December 27, 2013

Wintery Owl Friends...

Hi Friends!  I'm here today to share a fun little card using the Wintery Owls image from Whimsy & Stars Studios.  Such a super cute image that Mabelle came up with as a wintery treat!  It is available for instant download so you can print and color it right now!!!  I just love the teal, kraft, and chocolate brown color combo!


Supplies:
Spectrum Noir Markers ~ BT3, BT4, TN4, TN5, EB3, GB6
Embossing Folder ~ Let It Snow by Crafter's Companion

Thursday, December 26, 2013

Birthday Flowers

Now it's time to get ready for some birthdays!  Today I'm sharing a card using the Everyday Sentimentals set called Imagine by Crafter's Companion.  I stamped the image in Memento Luxe ink ~ Pear Tart and then heat embossed it with clear embossing powder.


Thanks for buzzing by today!

Wednesday, December 25, 2013

Merry Christmas!

Merry Christmas Everyone!
Here's a little card I made for one of my gifts this year using one of the Sentimentals sets from Crafter's Companion called Happy Holidays.


shhh....and here's the inside.
I can't wait until he opens it.


Enjoy your day!


Tuesday, December 24, 2013

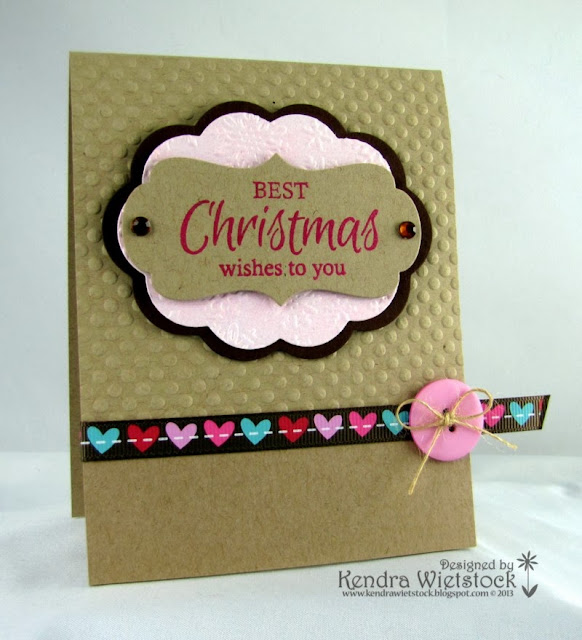
Christmas {{Hearts}}

I must be in a transition from Christmas card making to Valentine's Day with this card ~ LOL!  I just thought adding the very NON-Christmasy heart ribbon was a fun little touch on my card for today.


Supplies:
Stamps Stamp-It Australia - Christmas Happiness
Memento Luxe - Angle Pink, Rose Bud
Embossalicious - Petite Dots; Let It Snow

Monday, December 23, 2013

2013 Family Photo Christmas Card

I felt a bit guilty this year because I didn't hand make our Christmas cards.  With marching band season extended this year by our trip to the Macy's Thanksgiving Day Parade, I lost 3 weeks of Christmas prep time & just couldn't pull everything together to get this task done.  However, I did find a beautiful photo card on the Shutterfly website & decided to go for it!  And as it turns out, the cost of these cards was far less then the supplies I would have spent to make my own.   So here it is ~ our 2013 Family Photo Christmas Card...


However, when they arrived, I couldn't resist adding a few personal touches to them.  The plain white envelopes that came with the cards were begging to be decorated! I used the Sheena Douglass set from Crafter's Companion called Ornate Snowflakes along with Memento Rhubarb Stalk Ink and the pretty Delicata Golden Glitz ink.


And then I had to cover up the obnoxious white logo strip on the back of the card because it just bugged me way too much.  So I took a strip of matching burgundy cardstock and embossed it with my Let It Snow Embossalicious folder to add to the bottom of the card.


 It's not that I didn't want to give Shutterfly the credit for the pretty photo card, but it was very distracting from the photo of my gorgeous girl.


Before & After... see how much better that looks!


Here's the front of the card opened up...

and here is the back with a personal little holiday message!


And so there it is ~ our family card for Christmas 2013!  I love it and have now let go of the guilt that I did not make them.  I know that helping prepare our marching band for an amazing once-in-a-lifetime trip to NYC and sharing in the experience as a family, was far more important than making 80 hand stamped cards this year.

Friday, December 20, 2013

Snow Fun!

Happy Day ~ Christmas is coming!  I'm here today with a cool little card layout and a super cute Hambo digital image called Snowman Bird.   This is one of my favorite color combos for winter and holiday cards.  I like the unconventional!  


Supplies:
Hambo Image ~ Digital Snowman Bird
Pattern Paper ~ My Mind's Eye
Spectrum Noir Markers
Snowflake Punch ~ EK Success
Gem ~ Kaiser

Thursday, December 19, 2013

Creative Cafe Kit ~ Birthday Banner

Hello ~ Hello!!!  I'm super excited about my card today.  It's one of my favorite cards for this month's Creative Cafe Kit called Wish Big by The Rubber Cafe.  I just love all the pretty elements of this kit ~ the pop-up tree sticker, the gorgeous papers & ribbons and of course, the fun Birthday banner from the Wish Big stamp set.


To add the banner to my card, I stamped the images directly on my pattern paper. These are two different stamps and since they are clear, they are super easy to line up.  


Although, they stamped out nice and clear on the pattern paper, I really wanted them to pop, so I stamped them again on white cardstock.  Then I trimmed out each letter with my scissors.


Once they were all trimmed, I just attached each letter on top of the banner I originally stamped on the pattern paper.   Then to cover up the tops of the banner strings, I added some Queen & Co Pearl accents at the top edge of the card. The pretty pearls are included in the kit & I also added some to the flowers on the tree.


For the final step, I made a matching envelop for the birthday card using some of the stickers and pattern paper from the kit.


I know you are really going to enjoy this awesome Creative Cafe Kit!

Supply List:
Creative Cafe Kit - Wish Big (Bazzill Cardstock; Doodlebug Designs Inc Flower Box Pattern paper & tree sticker; Ribbon, Wish Big Stamp set & Birthday Wishes Add-on Stamp set; Queen & Co pearl accents; Stickers on envelope.
Memento Ink - Tuxedo Black


Wednesday, December 18, 2013

Krafty Fun with Hambo!

It's time for a little "kraft-y" fun with the Hambo Hoedown this week.  The challenge is a color challenge ~ Kraft and anything.  That's why I adore Kraft cardstock... it goes with absolutely EVERYTHING!

I used the Bailey Christmas digital image and sentiment for my super CAS Christmas creation.  I also played along with the Splitcoast Stamper CAS challenge this week which was to add bling to my project.  I add a little Kaiser Crafts red gem to my button, but I also used some sparkly Smooch liquid pigments to color the Santa suit  in Siren Red, Moonlight and Green Apple.  I colored the rest of Bailey with my Spectrum Noir Markers ~ EB1, EB2, EB3, TN1, TN2, TN3, FS2, FS3.  I also added a bit of clear glitter for snow.


Don't forget to add your kraft creation to the Hambo Hoedown within the next 2 weeks!

Tuesday, December 17, 2013

Joy & Cheer

Christmas is just a few days away... ACK!  Are you ready?  Here's a super quick card I made using the Mistletoe Kisses Sentimentals set by Crafter's Companion.  I stamped the image in two different Memento Ink Dew Drops ~ Rhubarb Stalk & Bamboo Leaves.   I also used the Petite Dots Embossalicious Folder to add some texture to the bottom of my card.


Thanks for buzzing by today!

Monday, December 16, 2013

New Whimsy Release ~ Meet Star!

Happy Monday Friends!   Today Whimsy & Stars Studios has another new sweet release and her name is Star!  Isn't she adorable???  The design team girls have created some wonderfully sweet creations to share today so hop on over to the Whimsy & Stars Studios Blog to see all of them....


On the Whimsy and Stars Studio's Blog we are celebrating Christmas with a Two-Week Christmas Card Challenge.  Participants featuring a card using a Whimsy and Stars Studio digi stamp will receive an extra vote.    The Challenge will last until Monday, December 30th, 2013 (7:00 pm, Eastern Time) and winner will be announced on Tuesday, December 31st, 2013. 

Supplies for my card:
Spectrum Noir Markers ~ PP1, PP2, PP3, PP4, PP5, DR6, DG2, TN2, FS2, FS3, TN6, TN7, IG1
Pattern Paper ~ My Mind's Eye

Saturday, December 14, 2013

Kraft-y Snowflakes

Ahhhh...the weekend is here!  Just a quick little post to share a wintery card.  I used a favorite snowflake set called Ornate Snowflakes and used Christmas Happiness for the sentiment by Crafter's Companion.  I stamped everything in Rich Cocoa Memento Ink.


Have a lovely weekend!

Friday, December 13, 2013

A Little Christmas Whimsy

Hi there friends!  Are you keeping warm?  It's soooooooooooo freezing cold here in Northern Indiana.  Brrrrrr!  Well I'm here today with a sweet little Christmas card using a wonderful image called Winter Friends from Whimsy & Stars Studios!   Total sweetness don't ya think???   I decided to go with a bit of a different color palette ~ because I love kraft cardstock so very much!


I colored this fun image with my Spectrum Noir markers ~ DR1, DG1, DG2, DG4, EB3, EB5, EB5, IG1, TN2, TN3, FS2, FS3, DG6.  The pattern paper is from My Mind's Eye (Vintage Christmas) and the sentiment is from Crafter's Companion (Happy Holidays).

Wishing you a Very Merry Christmas!

Thursday, December 12, 2013

Creative Cafe Kit ~ Birthday Balloons

It's time for some birthday wishes!!!  Hi there ~ I'm here today with a pretty little round card to share using this month's Creative Cafe Kit called Wish Big from The Rubber Cafe. Follow along and see how I made my card...


Step 1: To make my round card, I took a piece of the Watermelon Dotted Swiss cardstock and cut it 5 1/2" x 8 1/2" and scored it at 4 1/4".   

Step 2: I used my Spellbinders Big Scallop Circle Die and lined it up with the top edge of the folded card so the top scallop was above the card.  Then I ran it through my cutting machine.


Once the card is cut, it will still be attached at the top edge.


Step 3: I stamped the balloon image from the Wish Big stamp set using Tuxedo Black Memento Ink.  I stamped the balloons off the edge...


Step 4: Then I stamped the same balloon image 3 more times on scraps of the Flower Box pattern paper.  Then I trimmed them with my scissors and attached them to the previously stamped image.


Step 5: I stamped the cute little owl from the Birthday Wishes Add-On set and then colored him with my markers.

Step 6: I wanted to add a curved sentiment, so I placed my circle die on top of my clear acrylic block and lined up the sentiment in the shape I wanted and then stamped it with Rose Pink Memento Ink.  Super simple little trick!!!


Step 7: I added some pink stamped hearts to the image, added a black circle mat and then attached it to the card base.

Step 8: For my last touch, I added a pink stitched bow to the top of the card.


Who wouldn't love to have this sweet little owl drop in with birthday wishes?  Enjoy!!!


Supply List: 
Creative Cafe Kit ~ Wish Big (Wish Big Stamp set; Birthday Wishes Add-On Set; Bazzill Cardstock; Doodlebug Flower Box Pattern Paper; Pink Stitched Ribbon.
Ink ~ Memento (Tuxedo Black; Rose Bud)
Adhesive ~ Tombow Stamp Runner

Wednesday, December 11, 2013

Hambo Hoedown Bookmark Challenge

Hi Friends!  Are you ready for some Hoedown fun?  Last week on the Hambo Hoedown site, the challenge was to make a bookmark.    The design team made lots of different styles of bookmarks this week using lots of different winter & Christmas themed digital images.  My image is called Penguin Snowball & I thought it would be fun to make up a new sentiment for this particular challenge.  I used the word "chill" that came with the image, but then added the rest of the sentiment with some alphabet stamps.  I colored my image with my Spectrum Noir Markers (IG1, IG8, CT4, OR3, TB1, TB3, TB4).  


For the other side of the bookmark, I used the Bookmark Disclaimer image.


This is how you use this particular bookmark...
you just slide the layers on top of the page to hold your spot!

Now it's your turn to have some fun with the challenge!  Don't forget to add your link to the Hambo Hoedown challenge.

Tuesday, December 10, 2013

Celebrating the Holidays with Crafter's Companion & CardMaker Magazine!

Hey There!  Guess What????  Today the Crafter's Companion designers are teaming up with the CardMaker Magazine designers for a giant blog hop to celebrate the holiday season!  We are all making fabulous Christmas creations with amazing Crafter's Companion stamp sets and embossing folders.

For my card I used two of the Christmas Sentimentals sets ~ Jingle Bells & Happy Holidays for the round image and the "Ho-Ho-Ho" sentiment.  I stamped them with Memento Luxe Rhubarb Stalk ink and Rich Cocoa Memento.  I also used the Let It Snow Embossalicious Folder for the lovely snowflake background.


GUESS WHAT????  There are PRIZES TOO!  Just hop on over to the Crafter's Companion Facebook page and LIKE the page.  Then click on the graphic and enter for your chance to win one of two packs ~ included in the package are two 6-markers sets, a Christmas Seasons stamp set, an Embossalicious folder and a 1 year digi sub to CardMaker Magazine


Now hop along and see what wonderful projects everyone made...don't forget to leave some love along the way!!!


CardMaker
Kendra Wietstock (you are here)

Monday, December 9, 2013

Pretty Embossing...

I'm excited to share this pretty little card I made this weekend using one of my favorite new sets from Crafter's Companion.  The collection is called Everyday Sentimentals and I'm so thrilled with all of the wonderful sentiments in all four of the sets!  


I also used one of the new Darice embossing folders called Large Daisy.  I embossed it on a piece of kraft cardstock and then colored it with my Spectrum Noir Markers (CR6, DG2, EB3).   The last step was to add the pretty sentiment from the new Everyday Sentimentals set called Memories are Made.  I did a tutorial on this technique a few weeks ago ~ take a peek HERE.

Sunday, December 8, 2013

All Tangled Up!

Hi Friends! I'm here today all tangled up in Christmas fun today with a fun little Hambo Stamps Digi image called Pig Tangle.  This was me yesterday decorating the house...oh my goodness, I never thought I'd get done!

I colored my cute image with my Spectrum Noir Markers ~ IG1, IG5, PP1, PP2, PP3, CR9, CR11, LG5, TB5, GB3.  Then I added some Glossy Accents to the light bulbs to make them pop a bit.  


Are you counting down the days until Christmas... 17 days.  OH MY!  
Have a great Sunday!


Saturday, December 7, 2013

Celebrating 8 years!

Another year... a happy year with my husband, with my kids, my friends and family... I spent this year as a wife, a mother, a band mom, a crafter.  Another year ... without the big C ~ yes, that's right!  Today marks 8 years since I was diagnosed & I pray that this particular number keeps getting higher and higher without another diagnosis.  

As I hope and dream of that, I made this card to mark today's anniversary.  It's bright and happy... and not pink! LOL!  I made my card with the Flying Colors set by Crafter's Companion along with these gorgeous new Memento Luxe Inks (Pear Tart, Morocco, and Dandelion).  I also added the Lattice Embossalicious background and a sentiment the Memories Are Made stamp set.


Have a great weekend!

Friday, December 6, 2013

Sweet & Simple TY

Hi Friends ~ Happy Friday!   Today I made a quick Clean & Simple Thank You card to share.  For the main sentiment I used the Crafter's Companion set called Friends & Family.  I added a touch of color to the sentiment with my CR1 Spectrum Noir marker.  Then I stamped the Simply The Best along the bottom (from the Memories are Made set) in Toffee Crunch Memento Ink.  I also used my Petite Dots Embossalicious folder for the peach mat.


Have a great weekend!

Thursday, December 5, 2013

Wish Big with the new Creative Cafe Kit

Hi Friends!  I'm here today to share a super fun birthday card that I made with the amazing new Creative Cafe Kit for December called Wish Big!  I know you are going to LOVE, LOVE, LOVE this kit as much as I do!!!  You want to know what I love about this kit?  Absolutely EVERYTHING!  All of the Bazzill card stock and Doodlebug (Flower Box) pattern papers, ribbons, pearls, and fabulous stamped images are included in the kit!


Here's how I made my card...
  1. I cut a piece of Robin Egg blue Bazzill card stock 4 1/4" x 11" & scored it at 5 1/2".
  2. Next, I cut the piece of pink woodgrain pattern paper 3 7/8" x 5 1/8" & attached it to a slightly larger piece of white cardstock for a mat and attached it to the blue card base.
  3. Then I cut a piece of flower pattern paper 4 1/2" x 3 1/4" & wrapped a piece of stitched ribbon around it with a decorative knot to finish it.
  4. I attached the flower pattern paper with 3D Foam Squares on top of the pink woodgrain paper. 


Next I trimmed a 2 1/4" square piece of yellow cardstock and stamped some of the swirls from the Wish Big Stamp Set using Memento Ink.  Then I added piece of brown woodgrain (3/4" x 2 1/4") and attach it to the bottom of the square.


Using Tuxedo Black Memento Ink, I stamped two of the owl images on white cardstock and cut them out with my trimming scissors. One owl was from the Wish Big set and one was from the Birthday Wishes Add-On set.


Then I colored the owls with my Spectrum Noir Markers (PP3, PP4, PP5, BT3, BT4, LY3), trimmed out a few leaves from the green pattern paper and did an outline stitch around all of the pieces with a black fine tip marker.  I attached the owls to the tree branch with the 3D Foam Squares.


I also added some glitter to the owls using my Clear Wink of Stella Brush pen and added the stamped images to the center of the flower panel.


Next I wanted to add a sentiment to the card and love the happy birthday banner that is included in the Birthday Wishes Add-On set.  I decided I wanted it on a light pink background, so using the chisel tip of my marker, I colored the paper.


 After letting it dry for a few minutes, I stamped my sentiment using Tuxedo Black Memento Ink and then trimmed it with scissors.  I attached it to the top of the card using the  3D Foam Squares.


For the final touch on my card, I added some red Queen & Co Jellies (included in the kit).  Then I decided to make a matching envelop for my card because there were these adorable stamp stickers included in the kit & the pattern paper is just too gorgeous not to use!


Hope you enjoyed my first project for this month ~ more to come every day!

Supplies:
* Creative Cafe Kit ~ Wish Big (December 2013).  Contents I used: Wish Big Stamp Set; Bazzill Card Stock; Doodlebug Flower Box Pattern Paper; Ribbon; Queen & Co. Jellies; Doodlebug Cardstock Stickers.  Also used: Wish Big Add-On Stamp set ~ Birthday Wishes.
* Ink ~ Memento (Tuxedo Black, Dandelion)
* Scrapbook Adhesives ~ 3D Foam Squares
Clear Wink of Stella Brush* Die Cut Shape - Spellbinder Square
* Alcohol Ink Markers
* Black Fine Tip Marker


Blog Widget by LinkWithin
 
Blogger Template By Designer Blogs