Pages

Tuesday, June 30, 2015

Crafter's Companion & HSN Blog Hop!

We are super excited today because Sara Davies is coming back to HSN tomorrow and she has lots of wonderful Crafter's Companion products and projects to share!  So the Crafter's Companion Design Teams are having a Blog Hop today to share some fabulous projects that spotlight several of the products that will be on the show tomorrow... consider this a sneak peek!

For my project today, I used the fabulous Ultimate Crafter's Companion Tool with the Sweet Treats Boards.  One of the great projects on this board is a large milk carton and I decorated it with some of the pretty pattern papers and embellishments from the Sweet Treats CD-ROM.  I finished off my box with a window using the Essentials Ovals Dies and some pretty Die'sire 3D Flowers.


Hop around and make sure you leave some love along the way because EVERYONE has something to give away!!  You can find all of the links on Crafter's Companion Blog.

Monday, June 29, 2015

Sneak Peek: New Die'sire Dies from Crafter's Companion!

Welcome to another new week and a sneak peek of some brand new dies from Crafter's Companion.  These beautifully intricate dies are part of the Prestige Only Words Collection by Die'sire Dies.    I added a sweet little butterfly from the Beautiful Butterflies Essentials Dies.


Thanks for stopping by today & have a great one!

Thursday, June 25, 2015

TE Pinterest Inspiration ~ Let Freedom Ring!

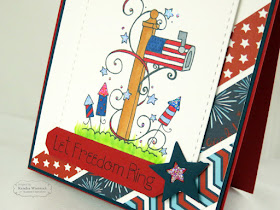
Happy almost 4th of July!  Today I am sharing my Taylored Expression Pinterest Inspiration card using the You've Got Mail - Patriotic stamp.  


This image pairs up perfectly with the Summer Nights Patterned Paper Pack and the Star Stacklet Dies.  


My Pinterest Inspiration this month came from a card/layout by Stephanie Kraft over on the Taylored Expressions Pinterest Boards.


Supplies from Taylored Expressions:


Wednesday, June 24, 2015

Scruffy Little Kitten Release Day!

There's a super cute new collection of stamps coming out from Crafter's Companion later today called Scruffy Little Kitten.  The name of this set is called 'Aggie' and she was super fun to color with my Spectrum Noir Markers {colors listed below}.


Supplies from Crafter's Companion:
Scruffy Little Kitten - Aggie
Spectrum Noir Markers - CR1, CR7, CR8, CR11; TN2; FS2, FS3; GB1, GB3, GB10, GB9; CG3; IG1, IG2, IG3; BT2, BT4, BT5

Monday, June 22, 2015

Sneak Peek Time for Crafter's Companion!

There's a super cute new collection of stamps coming out from Crafter's Companion this Thursday called Scruffy Little Kitten.  The name of this set is called 'Hallie' ~ isn't she cute???


Supplies from Crafter's Companion:
Scruffy Little Kitten Stamp Set - Hallie
Spectrum Noir Markers - CR1, CR2, CR7, CR8, CR9, CR10, CR11; TN2; FS2, FS3; GB1, GB6, GB9; CG3, CG4; BT3
Die'Sire Decorative Dies

Friday, June 19, 2015

Tutorial: The Big Score Folded Purse

Hello, Hello!  For the last HSN show in May, Sara Davies shared several projects for The Big Score by Crafter's Companion.  This is one of the projects I made for the event using a single piece of 12"x 18" double-sided cardstock from the Indulgence Collection.  


{Note: The 12"x 18" double-sided cardstock is currently a HSN exclusive product; however, there is 12"x 20" or 12"x 16" Construction Cardstock available on the Crafter's Companion website that can be used and then decorated with patterned paper}.


Step 1: Trim the cardstock to 12" x 16".

Step 2: Using the long edge of the cardstock against the left side of  The Big Score board, score the cardstock at 4" and 8".  This will divide the cardstock into 3 sections.

Step 3: Flip the cardstock so the short edge is against the left side of The Big Score board. Score at 4" and 8".

Step 4: Flip the cardstock 180 degrees so the opposite short edge is against the left side of The Big Score & score at 4" and 8".  Once this is complete, your cardstock should be divided up into 12 - 4" squares.

Step 5:  Decide which end will be the top of your box (it doesn't really matter).  Trim the outside squares off the cardstock & 1" off the middle square. (see photo above)

Step 6: Place the top flap against the left side of The Big Score & add an additional score mark at 3 3/4".  This will allow the top flap of the box to close when finished.

Step 7: Flip the cardstock over on The Big Score board, and score the lines according to the photo above.  Each of the four corner squares will be scored at a diagonal from the center to the outside corner.

Step 8: Find the center for each of the middle two squares (2") and score those sections into a "V" shape (see photo above).


Step 9: Once everything is scored, fold and carefully burnish the score marks.  Be careful not to damage the scored cardstock edges.

Step 10: Once the purse is properly folded into the correct shape, add strong adhesive to the inside edges so the purse stays in place.


Step 11: Once the purse is secured, add eyelets and ribbon for a handle and decorate the front flap.  I added buttons with string for the front closure; however, you could also use a magnet, ribbon or Velcro to keep the purse closed.

Have fun & thanks for stopping by today!

Wednesday, June 17, 2015

Yes... Another Grad Card!

Hi Peeps!  Today I have one last graduation card to share ... but I guess it could be used for many different occasions.  The new die on this card is from Die'sire at Crafter's Companion.  The Die is called 'On Your Special Day' and it is brand new in the Only Words Collection that was just released last week! 


Thanks for popping by today!

Monday, June 15, 2015

TE Die Focus: One Day in June... AND a Giveaway!

Hi Friends and Happy Monday!  I'm super excited about my project today and at the end of my post I have a fun giveaway... so make sure you see it!!

Now back to my post... Not only did I get a chance to scrapbook this weekend, but I made a full 12x12 layout using all kinds of wonderful goodies from Taylored Expressions.  It's been a long time since I've had time to do that AND.... I really love this page!


This is my Taylored Expressions Die Focus project for the month, and the die set I used is called June Script.  It has several words in the set, including the name of the month and other summer words like ~ 'summer', 'sun', '&' and 'fun').  I used the word 'June' in my page title and die cut it twice ~ once using Oreo TE Premium cardstock and once in coral to match my patterned paper.  For the rest of the title block I used the Banner Stacklet 1 with Salt Water Taffy cardstock, embossed it with the Dotted Lattice Embossing Folder and then added the 'one day' using the Sweet & Simple Lowercase Alphabet dies.  The big flower is from the Bloomers 1 die & matches the Simple Stories paper perfectly (I Am Collection).  To transition the patterned papers I added the Chevron Border along each side for a more finished look.  {Supply Links are listed below}


For the quote on the page, I used the Sky High Sentiments set & trimmed it with the Label Stacket 2 die ~ this is one of my favorite quotes and fits perfectly for a graduation page.  Once again, I used the big flower is from the Bloomers 1 die & then several small flowers from the Flower Box Sprigs and Flowers die set.   The little sticker letters are from Simple Stories - Sn@p Stickers Typeset and work great for the title block, photo label and date (and all of the letters were from the same sheet).  To set the date off, I put the stickers on a tab from the Simple Tabs die set.


I had so much fun getting back into my scrapbook this weekend and this page will be the front cover for my daughter's graduation pages... I can't wait to make more!


GIVEAWAY TIME!!!

I was so excited to buy the Taylored Expressions Graphic Greetings Graduate stamp that I guess I bought TWO of them!  LOL!  So.... if you want to leave a comment here on my blog or on my Facebook Page ~ Kendra's Paper Creations by Friday, June 19th by 9pm (ET), I will draw one random comment and send it to you.  However, there are a few rules... you need to leave a contact email or your blog so I can get in touch with you AND I will only ship to a US address.


Taylored Expressions Supplies:


Friday, June 12, 2015

Shabby Chic Graduation Party

 Hi Peeps!  I know I haven't posted much over the last few weeks ~ sorry about that!  It's been a very crazy time in our lives with the end of the school year, having a senior, graduation, and a graduation party.  My daughter wanted to have a Shabby Chic theme to her party and I was very happy to make decorations with her for it!  We came up with all kinds of fun things to make and have been working on projects for the last 6 weeks.  We were both thrilled with how everything turned out!

Here are some of the items we made... a suitcase for the cards, decorated tins for napkins and forks.


Decorated canning jars for centerpieces.  I scanned and printed music from the pieces she played each year of marching band and used it on the jars and coasters under the jars.

We found this beautiful bird cage and used it for Advice Cards that people could fill out for her.


I purchased lots of burlap, lace, and flowers to complete our projects.


Here is the Cupcake and Cookie Bar with a decorated sign and cookie jars for each flavor of cookie. 


You can't have a cookie bar without frosting and sprinkles!


Super yummy cupcakes with matching frosting and pearls.


Megan made this awesome sign so our guests would know where to enter.


Megan also made a sign with "My Plans" to tell people what she has planned next fall.  We also included travel items (the globe & card suitcase) because she plans on traveling and elements of music (her flute & sheet music) because of her love of playing.


Megan made the beautiful fabric garland for the windows, our staircase and the band table.  We ripped hundreds of pieces of fabric and trimmed yarn and lace and she attached it to jute.

The table below is her band table.  I was pretty excited because I finished all FOUR years of Marching Band scrapbooks just in time for the party.


Here is her academic table with her school & sports scrapbooks, NHS, homecoming sash, school letters, honor cords & grad hat, and her prized possession ~ her plaque as Academic Top Ten at graduation with a photo of her with her favorite teacher.


She picked favorite photos and attached them to jute with small clothes pins.


more photos and scrapbooks from her first two years.


the menu sign I made and hung in the kitchen ~
I trimmed the letters from some of her sheet music that I scanned.

Outside decorations...


the finished centerpieces...


archery... one of Meg's favorite activities outside of band ;)


a little volleyball...


and watching marching band shows!


and here she is... my beautiful grad!

Thanks for stopping by today!