The Cast and Crew for Gina K Designs
welcomes you back to Day #2 of the fabulous Inspiration Blog Hop! Gina, along with the
Cast and Crew, will inspire you with many beautiful ideas again today!
As you hop through the blogs, make sure to leave a comment on each because we will choose a few random comments and those stampers will each
win a grab bag of Gina K. Designs products! To see the full list of winners
check the Big News Forum
at StampTV a few days after the hops.
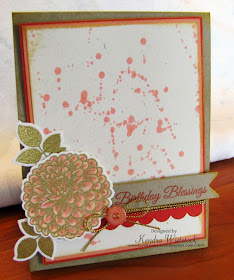
So for my project today, I used one of the sets from the Birthday Essentials Stamp TV Kit & it is called Birthday Blessings. I also used the matching dies ~ wooohooo for matching dies & YES, they are in the kit also!
Step 1: This time, I actually started with my cardbase in Kraft & then added layers of cardstock in Tomato Soup and peach & drew my inspiration from those lovely colors.

Step 2: Stamp the flower image on watercolor cardstock in gold ink and embossed the image with gold embossing powder. (Note: Also stamp the leaves 2 times and trim with dies)
TIP: Since this image has a scallop edge all the way around, I marked one spot on the back of the stamp as the TOP. I just used a permanent marker on the back of the stamp (not the stamping surface) and made a small mark for reference. You can mark any spot, I just found an indentation that was easy to spot.
Step 3: After the image is embossed, line up the metal die (I made a small mark on the die in the exact same spot as the stamp so it could be easily lined up when using it again). Next, trim the image using the die cut machine.
Step 4: Using the cardbase colors, select colors for the flower. I selected CR3, CR1, and GB2. Add CR3 randomly to portions of each petal. Note: CR2 is listed on my card, but I didn't end up using it.
Step 5: Next add CR1 randomly to other portions of the petals.
NOTE: Since this flower has a good deal of detail, no need to worry about getting the petals perfect. Just randomly add some color.
Step 6: Add GB2 to the entire flower. The gold mutes the peachy/coral colors just a bit but blends them beautifully.
the finished flower...
Splatter Background with Spectrum Noir Markers! My friend
Jenn Cochran from the Spectrum Noir Team taught me this fun trick!
Step 1: Cut the card panel to the appropriate size, select the marker color (CR1), and find an empty box.
Step 2: Using the Chisel Tip side of the marker, shake the marker downward toward the cardstock.
Step 3: Repeat Step 2 until you get the desired effect.
Here is a close up of the image on the finished card with the pretty sentiment and gold cord. I love this color combination & will be using it again!
Ready for more awesome creations?! Just click on the links
below for more from the Illustrators and Design Team!!
Lee
MurphyMelanie Muenchinger
Sean Fetterman
Tricia Traxler


