Pages

Wednesday, December 31, 2014

a lovely birthday surprise...


Several of my Crafter's Companion team members got together today to wish me HAPPY BIRTHDAY ~ what a wonderful surprise to wake up to ~ I just adore those girls!

Make sure you hop over to see what my teammates have created, and leave comments everywhere for your chance to WIN your choice of stamp from one of my favorite stamp ranges, Vintage Floral Sentiments. One winner will be chosen from the commenters on the Crafter's Companion US blog, and one winner will be chosen from a random participant's blog (comments open until Sunday January 4th - winner must be a US resident): 

Monday, December 29, 2014

Super Star...

Hi Friends!  I hope you had a great Christmas and enjoyed a little down time.  I was able to get back into my studio this weekend after a few non-productive "crafty" weeks.  It felt so good to just sit and create something.

Today's project uses some fun products from Crafter's Companion.  I used the Die'sire Essentials Star Dies, the Angelica & Adam Embossing Folder called Starry-Eyed, the Petite Dots Embossalicious Folder and the sentiment is from the Sentimentals set called Vintage Floral Greetings.


Have a GREAT day!

Friday, December 26, 2014

TE: Pinterest Inspired Card!

It's Friday... what a week.  With Christmas just barely over, the card makers everywhere are now focusing on Valentine's Day!  It's actually one of my favorite holidays to create goodies and cards.

Today, my Taylored Expressions project is inspired by the TE Pinterest Boards.  I used the Graphic Greeting Valentine stamp along with several dies (listed below) to make my Pinterest Inpired card.


I love these dangling hearts using the Hearts A Plenty die set.


My Pinterest Inspired card is based on Jen Shults' card.


Supply List:


Wednesday, December 24, 2014

Merry Christmas from us...

Wishing everyone a very
Merry Christmas!


{our 2014 Christmas card ~ printed from Tiny Prints}

Monday, December 22, 2014

Christmas Thank You

Now that the Christmas cards are mailed and the gifts have been wrapped, it's time to get a few Thank You cards made to use after Christmas.  I made this cute card using the Die'sire Classique Christmas die called Elegant Reindeer & the Decorative die called Cameo Stamping Frame ~ both from Crafter's Companion.


Thanks for stopping by today!

Thursday, December 18, 2014

Gina K Designs ~ The 12 Days of Christmas Sketch

Hello, Hello!!!  Christmas is coming so quickly & today it is my turn to host the 12 Days of Christmas challenges countdown with Gina K. Designs and StampTV.  For all the rules and prize info, see below.*


I have decided to do a sketch based on THIS Stamp TV video by Gina!


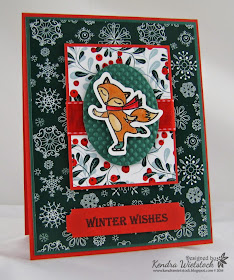
Here's my card...


Use the tag STV14TWELVEDAYS5 when you upload to StampTV for this challenge.  You can view all the entries for this day HERE. Awesome prize at stake if you complete all 12! :) We hope you have fun getting creative with us and sharing the festive holiday spirit!

 *Each challenge is different, and to play along you will need to enter a new card for each challenge in order to be eligible for prizes. You also will need to use Gina K. images and sentiments to be eligible, although any other products may be from other vendors. There is one prize per challenge of a Gina K. Designs stamp set of the winner's choice up to 23.95 value. The winners are chosen by the host/hostesses however they want to choose their winner. There will be a special badge made by Gina for both the STV 12 Days of Christmas event, as well as a special one for those who complete all 12 challenges!  There will also be a Grand Prize of a $50 GKD gift certificate.  One winner will be chosen from among those who play along with all 12 challenges! You may enter the cards you use here for challenges at Stamp TV into other challenges on other stamping sites. You have until December 31st to complete and upload your entries.

Tutorial Details:

For my project today, I will also share how I colored my sweet little fox from the Winter Cheer Stamp TV Kit with Spectrum Noir Markers and Blendable Colored Pencils.

Step 1: Begin with selecting colors that match your card for the skates & scarf.  I used JG7 for the skates and DR2, DR3 & pencil 025 for shading on the scarf.

Step 2: I selected several Spectrum Noir Blendable Colored Pencils for the fox ~ 090, 092 to start.


Step 3: I started with the darkest (092) around the edges and add the lighter pencils (090) for the rest.


Step 4: Next I used the Spectrum Noir Gamsol and paper blending stumps to smooth out the pencil lines.


Step 5: I added a reddish/brown (095) for more contrast on the fox and then blended again with the Gamsol.


Step 6: I pulled a few light tan markers (TN2, FS1) to color the remaining parts of the fox (tummy, paws, face and tail) & added FS3 to the ears.

And that's all that is needed to complete this sweet little guy!  


Wednesday, December 17, 2014

Festive Christmas Cupcake Box Tutorial

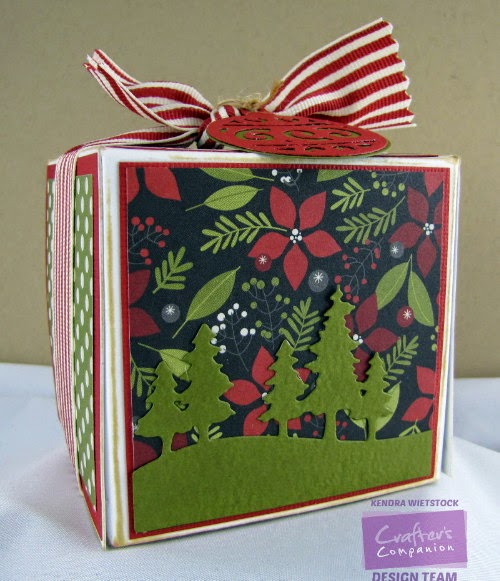
Today I’m sharing a Christmas project I made using the new Cupcake Presentation Box Template from Crafter's Companion. This cute little box could be used for any small holiday gift or yummy treat.

Step 1: Gather the desired template, cardstock, pencil and scissors.  For this project, I used the Single Cupcake Presentation Box Template and the 12”x16” Construction Cardstock.


Step 2: Line up the template on the cardstock and use EZ Release Tape to secure the template while tracing the outline.


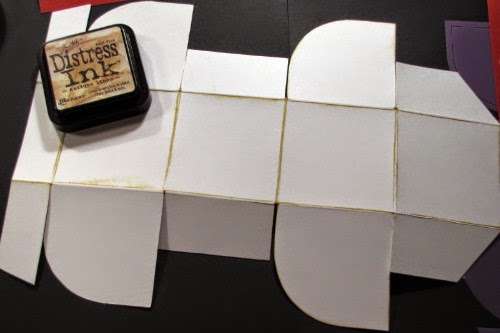
Step 3: Once the template is traced, remove the template to make sure all of the lines were completed, including the score lines (inside broken lines).  If any were forgotten, replace the template and complete.


Step 4: Trim all solid lines with scissors.

Step 5: Using the scoring board on The Ultimate Crafter’s Companion Tool, score the broken lines on the box and fold all of the score marks.


Step 6: Add Distress Ink (Antique Linen) to the scored edges.

Step 7: Trim red, green and patterned paper pieces to decorate the box.  


Step 8: Use the Presentation Box template to trace a piece of pattern paper layer using the inside broken lines.


Step 9: Attach all of the cardstock and patterned pieces to the outside of the box.


 Step 10: Attach the alternate pattern and cardstock to the inside of the box.


Step 11: Trace the Cupcake Insert from the template (this is included with the Presentation Box).


Step 12: Trim the spot for the cupcake using the Cupcake Insert Die.


Step 13: Using the Scallop Cupcake Wrapper, trim 2 wrappers ~ one from green cardstock and one from coordinating pattern paper.  Attach them and assemble the cupcake wrapper by inserting the tab into the slot.


The inside of the box with the assembled cupcake wrapper.

I decorated the outside with May Arts Ribbon and two Classique Christmas Dies - Filigree Bauble & Scenic Pines


Make sure you check out the Crafter's Companion Blog today for more great giveaways!

Tuesday, December 16, 2014

TE Die Focus: Hearts A Plenty

Hi Friends!  I've had tons of Christmas projects posted on my blog lately, but today I have a sweet little tag that I made for my daughter's birthday package using some sweet products from Taylored Expressions.


I used the sweet heart set called Hearts A Plenty and added them to elements of the Build-A-Tag 1 die set.  I embossed the tag with the Twirls and Swirls Embossing Folder and the panel with Lots of Dots.


Happy 18th Birthday Megan Lynn!


Supplies Used: